Tuesday, August 31, 2010

J.Norad Refuses to Pay A Man in Singapore $3 For Ammo

After an hour wasted looking for 1:6 scale shotgun shells to buy for cheap, I was pretty disappointed. eBay did turn up some listings for 12 shells for $3. $0.33 per shell. I'm not going to pay $3 and wait two weeks for something that I can have now for fairly little cost. So I decided to attempt to see if it's possible to build my own shotgun shells.


Initial development tests used printer paper rolls to achieve the proper thickness. The resultant product deformed significantly to be used, and wasn't replicable by the average person. Subsequent attempts using whittled bamboo sticks with paper rolls produced good results, but subpar capability to reproduce the results.

The goal then became to provide a consistent means of producing a 1:6 scale shotgun shell that YOU, the reader, could feasibly do in the comfort of your own desk, given the same tools I have. You probably have better things to do than make your own bullets, but it's always good to know you can save a bit of money for other things. Like more guns.

Using an existing Dragon shotgun shell as a model, I measured the dimensions and found that I'd need a 7.5mm long 3mm diameter cylindrical rod, and a 3.175mm diameter end cap about 0.5mm thick with a minor depression in the center. Those dimensions are mighty convenient... A 1/8" hole punch on two Magic: the Gathering cards glued together gets me the end cap dimensions. As for the 3mm diameter rods, I happen to know the perfect source!

GUNDAM runners. I ended up keeping my runners from my Airmaster, Aegis and Blitz Gundam kits. I got a few more from the Obitsu Multi Purpose Clear Stands I bought. They both have diameters of 3mm for the runners. Excellent. And there's also runners that come in red! There's enough runner from one kit (or in this case, one Obitsu stand) to just cut down the smooth sections and ignore the sprues and gates. You only need 7.5mm of material and there's enough material to make about 40 rounds or more. I chose to smooth out the runners to form relatively smooth clear plastic rods, sand them lightly, then trim them down using a Dremel. A saw or knife works fine, but Dremel's for the impatient builder. Can't be bothered waiting 2 weeks, nor 5 minutes of sawing. Got to have my results in 3 seconds.

I found the tip of my beadmaker's pliers had the right diameter to make an indentation into the card face for the primer. You'll need something about 1mm in diameter. Press hard into the card face and you'll leave a minor depression. Use a 1/8" hole punch to punch out the disk and set that aside.

With your 7.5mm long rod sections, use some non-Elmer's glue like Loc-Tite to secure the disk to the end of the rod. The diameters shouldn't be flush, to simulate the rimmed edge of a shotgun shell. Lightly apply a coat of glue over the rim to thicken and seal the card edge. Your shells are almost done. On the other side, you can use a 1/16" drill tip to bore a small hole into the other end to simulate the packaged end.

 Here's a photo of the completed shotgun shells on the left, and Dragon's shotgun shells on the right. Not quite the same, especially with the primer. It's only an issue if you really scrutinize the details up close. Far away, it's sufficient to work with for dioramas or piles of spent casings.

 The front tips don't match very well, but comparing the results with other shells I've seen, a simple small 1/16" hole in the front is acceptable. My shells rather glow due to a lack of primer on the clear rods I used. They rather resemble red gummy bears right now. As a proof of concept, I think the results are acceptable. In terms of effort spent compared to just buying pre-made ones with more detail, if you're going to just toss them around, it's worth it. You won't need the extra little detail in your photos unless you plan on taking up-close images of piles of ammo.

Saturday, August 28, 2010

J.Norad Reviews: Obitsu Multi Purpose Clear Stand MLST-AO1C

Thanks to reader Sabine for pointing my attention to Obitsu's Multi Purpose Clear Stands. I've been using Gundam Action Bases at the moment to pose the girls, using the hip holding forks. It's great if they're wearing dresses, but it won't work well if I decide to give them pants.

I bought three clear stands for evaluation ($8 each, shipping included off eBay; MSRP 294 yen; $4 at Parabox, $7.50 at Mimiwoo) in the event I liked the performance of one, I would have two more ready to fiddle with without having to wait another 2 weeks for shipping. You can inspect the contents and possible configurations at Parabox's site.

Here's a comparison of the Gundam Action Base (left) and the Obitsu MPC Stand (right). Obvious differences is that the Gundam Action Base takes a large foot path and only mounts by crotch grab. The Obitsu MPC Stand is cleaner and is designed for a doll in mind. Nothing that you couldn't have figured out by the stand names already.

From the back, you can see the massive tradeoff for using the Gundam Action Bases. The question is why use the Gundam Action Bases now that you have the Obitsu stands? The answer is unfortunately simple:

Weight. Hotaru is doing fine supported in the air with the Gundam Action Base, elevated a good 4-5 inches off the ground. Lia, on the right, is limited to poses that keep part of her body touching the circular baseplate to offset the load from the thin and delicate arms. I've tried putting the Scout on the Obitsu stand and there's no possible way I could suspend him in an airborne pose with it. The thin rods are not suited for large objects and it seems like they'd either tip over or snap before they'd cooperate with doing aerial acrobatics with anything heavier than a tournament pack of Magic: the Gathering cards.

So, the Gundam Action Base is beefy to support weight, but  has a limited use due to the grip. The Obitsu stand has great usage but is limited due to the strength of the support rods. What if we could combine the two...
I noticed that the rod ends from the Obitsu clamp fits into the Gundam support end, and snugly.

And so the Gun-bitsu Multi-Action-Base was born. Reminds me of that egg turner in Jurassic Park.

The setup lets me pose light weight objects in interesting manners. I'm no longer limited to clear runners in holding up props. The combined base lets me put objects higher than normal, and with a fair amount of strength and grip.

It's not suited for extreme weight, but I found that the Gun-bitsu stand is VERY good for posing the minigun. The minigun has been a tough item to pose due to the lack of a stand and the massive weight. The Gun-bitsu stand has a fairly mechanical look to it, and still blends in fairly well on a bright white background. It looks like it'll be well suited to propping up gun models in the future.

As for the Obitsu MPC Stand itself, it's great for posing light arms in addition to 27cm dolls. The Obitsu MPC Stand is best suited for 1/12 scale figures and anything the weight of 1.5 Magic: the Gathering tournament packs or less. For posing 1/6 scale figures, it's a toss up. The largest claw/clamp does not fit completely around a male doll waist, but you could put them around the thigh instead. Its not a good idea to have them doing anything fancy with the stand, as their weight will topple the stand.

As for female dolls, putting the claw around the waist may restrict the clothing's appearance, so you may not have the ability to have a free flowing look. It's still better to put them around the thigh. You can still do some interesting poses with it in either configuration. They're best suited for static poses and nothing absurd like a Guile flip-kick.

---=="""=._.=//Random Statistics\\._.="""==---
Price per stand: 4 good uncommon cards or 40 terrible common cards
Weight Limits: Less than 140 Magic Cards
Tools required: Phillips screwdriver, sprue cutters
Time spent assembling stand: 10 minutes (includes gate trimming)
Time spent figuring out how to use stand: 2 minutes
Time spent trying to make stand useful: 30 minutes


Rankings: MiniMS Stand vs Obitsu MPC Stand vs Gundam Action Base
(listed in order of best to worst for each application)
Stiffness: GAB/Obitsu/MMSS
Range of motion/posability: MMSS/Obitsu/GAB (Bendable wire beats liftarms any day)
Grip/Attachment/Support Versatility: MMSS/Obitsu/GAB (wires can be claws or racks)
Stability: GAB/Obitsu/MMSS (can't beat a crapton of plastic)
Aesthetics: Obitsu/MMSS/GAB (The MMSS stand can be used to store stuff, but then it looks ugly)

Sunday, August 22, 2010

This Weekend's Project: 1:6 Scale Acoustic Guitar

Every figure collection at some point needs a guitar for their accessory pool. It's one of the unspoken rules of collecting idolatrous representations of paganistic figureheads, er, I mean, toys. Your shelf's awesome quota gets fulfilled by 3% with each guitar with a ceiling of 15% maximum added value.

I actually just wanted a guitar for my Engineer. It's way better than the Gunslinger since I don't have to amputate an already half assed glove sculpt and make reinforcements to make it work. More of also just wanted the Engineer to be able to do the taunt kill with a guitar.

First, like a good Engineer, we'll need some schematics. Unfortunately, I couldn't be bothered drafting up any, so I did the next best thing: have someone else do it for me. Here's a great set of schematics that I used to build my guitar, courtesy of Christophe Grellier's guitar site. I scaled down his drawing to 69.5% to achieve 1:6 scale.

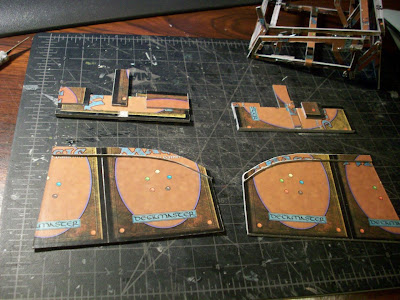
To start off, we'll need to build the body. I chose to make an 18mm thick guitar, so subtracting the thicknesses of two 4-card stacks for the back and front faces, we get 15mm of body height to make up for. Some Ronom Unicorns and Surging Sentinels were sacrificed to achieve the task. I split the cards into 15mm wide strips, then arranged them inside the stencil 5 layers thick. Use tape to hold the walls next to the stencil as you layer the insides with more cards. I ended up using 5 layers instead of 4 because I had excess material from cutting up 4 cards. More is better anyways.

 Using the stencil, I made the front and back faces. I opted to use the back of the card as much as possible stylistically rather than paint the guitar. I wanted the "Deckmaster" logo to appear on the front, and the "Magic: the Gathering" back to be unobstructed on the back.

The neck was fairly simple. 8x Magic cards with a slight bend at the top portion. I honestly know nothing about guitars, so I'm going to call parts as I see it. I cut slats in the head part for the strings to feed through. The base is composed of 20x Magic cards, cut to a taper by simple diagonal planing with an X-acto knife. Same technique used on the Hellfire.

 To make the bridges, I used some unspecified gauge stripped electrical wire and glued them to the neck. I trimmed any excess with diagonal cutters.

For strings, I used some white sewing thread. If I had silver wig hair, that would be better in terms of appearance. I think white thread works just fine. Coating the thread in some glue would help stiffen it. The threads were secured to the body and upper neck by glue. 

I looped the strings around the tuners at least once, then secured them in place with glue. Key is to pull them tight during the process so they remain relatively taught. They won't be functional, but slack will be ugly and noticeable.

And there is the finished Deckmaster guitar. The entire process took about 2-3 hours with lots of down time for drying and not trying. Could probably make another one within an hour. 

Here's the back with all the Magic: the Gathering glory.

Unfortunately, I don't have a 1:6 scale pickup truck or a campfire. Got the guitar and that's all that matters.

At long last, Coldsnap is finally playable. It may be a while before more firearms get developed, but some variety is good. Off to bludgeon people with a guitar!

Monday, August 16, 2010

J.Norad Reviews: 1:6 Scale ZACCA Panzerfaust 30/60

Been a while since I've looked at some more ZACCA Bazooka Collection models. Today, we have the Panzerfaust 30 and Panzerfaust 60 in 1:6 scale. This is perhaps the best and worst blind boxed selection you could get from Series 1, depending on what you're after.

 If you love Panzerfausts and need a lot of them for $4 for two, they're great. They surprisingly don't have Engrish text for the German warning text. Nice detailing. Unfortunately, due to the size, the sights on the Panzerfaust 30 doesn't flip up. The sights on the Panzerfaust 60 do, and the safety pin can be removed. Firing handle doesn't move though. They both have a bit of a dirty look to them, which looks nice.
 Unfortunately, I have NO idea how most 1:6 scale figures would be able to use these. You'd need really specific hands to be able to hold one properly in the "ready to fire" position. I could barely get a decent photo of the Soldier trying to use one. The 30's easier to manage due to the smaller tube. You're supposed to fire the 60 like this. Good luck finding 1:6 figure hands that can do that.

The Panzerfaust 30 looks more like a club than anything. Or a tiki torch. Or a bamboo Q-tip. You'll probably be able to equip your WWII German army well with just these, or stick them in a diorama on a truck or crate.

Well, time to give the 30 to the King of BONK! with the built in "BONK-tastic action button" left over from the Shia LeBeouf figure. I hear Scout players actually have some skill aside from holding Mouse1 and W while equipping the bat. I don't think mine's one of those skilled ones.

BONK! Or should I say, "THUNK"

"Need a dispenser here! Need a dispenser here! Need a dispenser here! Need a dispenser here!"

"Need a dispenser..."

 Ka-BOOM.

Anyways, I found the Panzerfaust 30/60 to be the most useful of the seven types you can get from Series 1, because you get two. This has the side result of being provided two sets of display pegs instead of one. If you're interested in also using the display boards as I have, they really help give you more mounting pegs to help display more objects per board. A lot of the space normally gets occupied by a large rocket launcher, but if you plan on displaying small guns and rifles, you'll want more pegs. On the backdrop, I've used 11 sets of pegs and clearly have room for more.

End notes:
MSRP's $4. If you somehow can get these for $4, they're great if they come with the display boards. Anything more than $4 isn't worth it, however, in terms of buying them for the sake of buying Panzerfausts. There's a few other brands out there with additional detail that ZACCA's display piece doesn't have. You could feasibly build your own Panzerfausts for cheap if you're not too picky about the warning labels. (ZACCA's actually are missing the large label on the projectile itself that has more instructions)

These things are disappointing unless you really wanted them specifically from the blind box. Compared to the other models you could get, the FIM-92, the Panzerschreck and even the near-unusable M202A1, this set's very unexciting compared in detail and actual content. They're just board and peg packs with bonus junk.

Saturday, August 14, 2010

The Completed Reclining Chair

After some mediocre cushion making, I've finished the chair. I used a less stupid technique of sewing the cushion for the back this time, by covering a foam block with cloth, sewing around 3 of the four sides of the perimeter, then flipping the cover inside out. I then stuffed the foam block into the cloth cover and folded the remaining material into the gap. Didn't bother sewing it shut yet, but it works fine for now and looks great.

Here's the completed chair with cushions, in the standard configuration.


Chair in "Long Day of Work Mode"


 Chair in "This Week Sucked Ass Mode"


 And the "Sitting Limbo Competitor Mode"


So there we go. I now have chair #2 to add to my collection of chairs made of Magic: the Gathering cards. Of course, now I can't build anything less challenging without appearing to be half-assing anything. I'd rather like to get some more furniture for the rest of the Team Fortress 2 guys so I can play a rousing game of musical chairs, but with firearms to settle disputes of "who gets the last chair".

I tested the chair in full recline mode on the Heavy, with his arms behind his head. Didn't go too well. Chair almost tipped backwards. He's fine with his arms on the arm rests. I anticipated that happening, but didn't expect it to go back that easily. I had angled the rear armrest supports/legs to cover the center of mass better, but it isn't enough for the Heavy.


Time to relax and figure out what's next on the project list. This project didn't contribute much to the gun tech pool, which was unfortunate. There's been a few projects I have on hold due to lack of feasibility. I could either scale it back (which is boring), or level up my tech pool with random projects until I figure it out (like how the TF2 dolls did). However, it did give me some new means of fastening thin moving parts together. Might be handy later.

Thursday, August 12, 2010

Making a reclining chair, part 2! Now with padding!

With some plans drafted for the chair sides, we're going to finish the chair. The goal I envisioned is to allow the chair to be dismantled if needed, so I'll be making some weird components. I opted to make some notches in the chair sides to fit the crossmember in the reclining mechanism as a means of holding it together.

Using the lamination techniques outlined a while back, I made some large boards 2 cards wide, one card tall and 4 cards thick using some excess X-Men TCG cards as middle filler (need to whittle down that stack) and a Magic outer covering. These will hide the joining mechanisms. Next bit of action is to make the posts for the armrests. I'll be making these in beam sections to be joined by biscuits and slots, rather than cut out large sections.


Each section is approximately 5mm thick, composed of 4 layers of 4-card thick sections. The inner section has notches cut into it before gluing. The alternative would be to cut the notches along the face, then peel the layers away. The former method allows better control over notch width and depth, as I can measure now and I know the thickness of 4 Magic cards.

There will be three parts to the armrest assembly: the front support, the back support, and the main armrest. After gluing the laminations together, they were sanded flush.

Biscuits and larger support elements were added to the members to allow better control of position when assembled. A similar method was done with the chair back.

With all the parts assembled, the chair is semi-completed. Just needs cushions. The project used up a good deal of cards, which can be seen by the dwindling stack of cards under my monitor. Both stacks used to be the same height.

To make the cushions, I wanted something spongy. Unfortunately, I didn't get what I wanted, so this crappy white plastic packing material I found at work shall do. I cut out a section roughly the shape I needed for the cushion interior.

With some useless fabric, I created a padded outer cover that would make the plastic less horrible feeling. Next step is to wrap it up in the cushion cloth. Something that looked like khaki was used.

This method is really half-assed. Since I won't be seeing the bottom of the cushion ever, I decided to assemble it by stitching it to the seat filler.

Repeat until you have this horrible looking square. Worst thing I've made in a while.

I repeated this method for the leg rest cushion, but with 4 layers of thick fabric, then sewn that to the larger cushion by means of a simple cloth. The middle cloth serves to prevent debris/legs/children from falling into the gap between the leg rest and the chair body. The straps allow me to secure the cushion to the leg rest assembly without glue, so I can remove it if necessary.

And that's the main cushion for the seat. Now, to go make the back seat cushion... then this project will be completed.