This month's project is a reclining chair. Was going to originally make a wingback chair, but that wouldn't have been fun at all. To start the program, I needed a mechanism. A bit of digging, and I found this auto-reclining mechanism on a european supplier site:
Unfortunately, this was the only image I could find that was workable: semi-profile view and a clear view of all the components. It's simple but also a good start. Time to draft schematics!
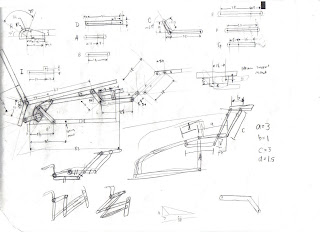
I started off by attempting to draw the mechanism in workable views to get an idea of how the parts worked. Since I was using Magic cards to build this, I decided to build all struts and members with 3mm wide cards and 1/16" holes to fasten them to each other.
With the preliminary drawings done, I drafted some mockup parts to test out movement.
 Leg rest mechanism folded. The initial build didn't fold neatly as I'd like, so I changed one of the angles on the curved arm to better fold the assembly.
With the preliminary drawings done, I drafted some mockup parts to test out movement.
 Leg rest mechanism folded. The initial build didn't fold neatly as I'd like, so I changed one of the angles on the curved arm to better fold the assembly.
 Here is the mechanism extended. Worked out fine, except I didn't know what the round disc element did early on. Turns out, that piece allows the back rest to recline further. I learned that this mechanism lets you extend the leg rest by reclining back, without the use of a switch or lever.
 With the main mechanism finalized, I proceeded to cut out two sets of parts out of 4-card thick stacks of Magic.
 To fasten the parts, I bent paper clips into U shaped staples. To lock the parts, I threaded the paper clips through 1/16" holes drilled with a manual hobby drill, and bent the ends like the ends of a staple.
 Paper clips worked well in holding the struts in place, but there's a noticeable lack of support along the axial direction of rotation due to the small area. To rectify this, the two sets of parts will need to be linked with a cross bar to keep the parts centered.
This diagram served to plan out how the parts would overlap. Since there's quite an amount of parts, I needed to sort out how they'd overlap and how they'd be joined to the main frame parts. After some gluing and shimming, we get the following result:

 Well, that worked out way better than I hoped. I didn't expect this thing to actually work out at all, structurally with Magic cards. Time to draft schematics for the sides of the chair!
From here, it's all "wing it". I modeled the chair off the actual chair's finished appearance, with the exception that mine's a lot more crappy. And I've also designed zero other reclining chairs ever in my life. Won't stop me from continuing on with this project.
Next time: we make large slabs of cards and sew some cushions!


No comments:
Post a Comment