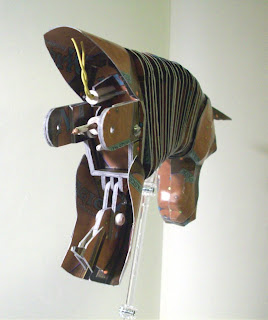
There's slow progress for the horse. Just haven't had much of an incentive to get it going farther than it currently is.
In order to determine how the neck sections will be concealed, I started developing the frame for the horse's body and skin. Since it's going to be hollow, I've experimented with a more lightweight means of making the skin than the old method of piling on 110lb cardstock tubes until the shape gets fleshed out. The method involves making use of the tube framework that holds the body together, and adding depth gauges all along key points, then connecting them together with two thickness strips of 110lb cardstock. The resulting model looks like a wireframe outline of the desired shape, and presumably uses less material. It's a lot more fragile, but that's where the depth gauges come in to support the skin. The MtG skin should be thick enough to support itself once curved and glued.
Building the body requires the legs to be somewhat fleshed out as well. Tubes have been glued over the screws to provide access points. They're all outside the horse this time instead of the cosmetically better looking underside/inner side of the horse. I'll probably be tightening them often, so it's probably for the best. The screw assemblies compose of a countersink bolt, spring washer, two washers and a nut. The nut is held in place inside the center of the tubes by strips 2.5 Magic cards thick, 2mm wide, forming a hexagonal housing to prevent nut rotation. These will be later plugged with a 110lb cardstock core so the nut doesn't travel axially, fully restricting the degrees of freedom. If this wasn't added, tightening the bolts would be tedious and difficult since there's nothing to hold the nuts in place.
Since I've opted for the neck to bend downwards, I need to conceal the gaps that result. Rather than make a giant rotating joint that resembles a LEGO horse, I chose to go a more difficult route.
With the neck region and movement limits defined, I could figure out how much gap I needed to cover. At full upright, the neck has a large exposed gap at the bottom and a small gap at the top. The system has a static upper region, and a dynamic lower region.
At mid position, the edge of the upper triangular shaped cover piece lines up with the edge of the neck opening. The lower cover sinks inwards into the chest cavity, assisted by a set of hinges.
The neck further bends downwards 22 degrees to allow the head to reach the ground to do grazing poses. This does cause another gap in the upper region of the neck, which needs to be addressed. The lower cover dips downwards and inwards to provide clearance for the neck assembly. The purpose for this mechanism is to allow for a curved and molded shape to fill in the gap. Due to the nature of how I designed the neck base to bend in two sections with hard stops to prevent overtravel, a static section was not feasible. I needed something that would move to allow for clearance of the second neck joint that connected the accordion structure to the body.
The neck assembly, removed for detail, shows the general layout. A notched portion inside the lower cover prevents the cover from falling out the gap when the neck is fully upright. It acts as a hard stop around one of the structural tubes inside the body.
Here, the two hinges required to create the movement needed for the lower cover are visible. The hinge base also serves to strengthen the neck base against buckling. Also visible are the wire assemblies that hold the neck sections in place and limit rotation. The yellow wire section has less stiffness than the middle and lower portions. The assembly was too stiff with all three supports being made of stranded wire.
So right now, the horse has a semi-finalized neck and the rough outline for the body. Remaining tasks involve stiffening the rear legs and fleshing out the rest of the body. I'll also need to adjust the center of mass, as it's currently front heavy due to all the neck structures.


You're super talented! Found you on deviantart. Love your TF2 stuff.
ReplyDeleteWill continue to follow your blog! :) Keep up the good work!!
Thanks for visiting and for the comments. I hope you're not expecting more TF2 stuff from this blog. Won't be any more of that unless it's rework or a commission.
ReplyDeleteYour TF2 stuff linked me here, but I'm really impressed by your homemade ball jointed dolls as well. They are well-constructed! I also like the clothes you have for them :)
ReplyDeleteYour 1/6 scale items are great! Your reviews/posts are funny, and I enjoy seeing you construct awesome toys from scratch.
Anyways... can't wait to see your horse finished!