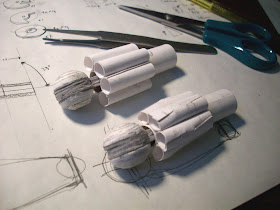
The hips have been a problem for one reason: they required to bear significant load on a small region of material. The hip requires a good deal of stiffness to resist torsion, bending/fractures, and friction to keep position under load. Prototype build 1 utilized screws and pins to hold the hip together using a hinge joint linked to the body by a pin. Really primitive, and the movements were restrictive and counter intuitive to the user.
Hip Iteration 2 played with ball joints. I had them aligned in two configurations (cup axial and perpendicular to the ball/shaft) and under three total designs. The problems with the ball joint were apparent: Friction was unreliable. To obtain the correct amount of friction, I had to balance the diameters of the ball with the socket ( often done by shimming with scrap paper) with the friction of the ball and the connector shaft.
 Here's the current build. Note the paper used to shim the gap between the socket and ball.
The goal was to allow for maintenance by allowing the leg with the socket to be removed from the ball, and if needed, the ball could be removed from the shaft. This was critical back then due to the way the ball was constructed: poorly. I required a method of allowing maintenance in case the ball sheared apart or deformed significantly, or if I required a complete mechanism overhaul. Handy that I designed for interchangeability and easy modifications back then.
The ball's biggest problem was that despite being able to craft them with a relatively decent degree of accuracy diameter-wise, they were very difficult to make respectably spherical. It was more like building an octagonal cross sectioned polygon. When moved, the "sphere" had more friction in some positions than others.
The second problem was the nature of the material itself. Paper does compress to some degree, and the irregular sphere deformed a lot. It deformed from moving around the socket, with the thicker sections of the ball compressing the socket, making a depression with low friction. The whole setup was susceptible to expansion effects. I noted a fluctuation in friction over the year, attributed best to humidity. Naturally, water will expand paper. The socket was made of Magic: the Gathering (for the smooth finish to assist movement) and the ball was made of 110 lb cardstock. The dissimilar materials caused a more drastic change of dimension than if they were similar. I'm presuming the 110lb cardstock deformed the most, but I have not been certain.
As a result of the problems, I encountered another problem: shaft torsion. Friction was uneven from the ball/socket and ball/shaft interfaces. Some cases occurred where the friction was fairly strong and a degree of torque applied to the system did not transfer to overcoming static friction of the system and went to torquing the shaft. As a result, I had a fair degree of axial play that no amount of shimming could correct.
Now we have the major problems identified:
- ball irregularity
- friction irregularity
- shaft torsion
 Iteration 5 is similar to the traditional hip structure in that it uses a hinge joint and a rotating shaft connected to the hip in a "T" fashion. It however opts to put the rotation within the hinge than at the hip. Iteration 5 uses the strength of the screw hinge system to allow for easy adjustable friction and bypasses the ball-and-socket system and its resultant problems. Shaft torsion has been reduced by shortening the connector shaft. Less length, less torsional effects.
 The system has the shaft inserted to a 6mm deep cup located on a notched region on the center movement disc. Disc is shown above the finished assembly. The hinge system resembles a "Pac-man", with an arc removed to allow for clearance of the cup. The cup moves along the arc, limited by the hard stops. Friction is easier to control, as there's only one factor for the rotational aspect. However, the engagement is less (10mm from the ball and socket, 6mm in this configuration) so the shaft needs to have extra friction to hold the same positions as the previous iteration did.
After some initial tests, I decided that my design was worth implementing, at least to one of the girls. Since I'm rather fond of Hotaru having legs, and Aelia isn't really doing anything important, I chose Lia as the test subject.
To construct the legs, I did the usual bit of tubes and shells. I however tried a new method of filling out the spherical void needed to cover the screw/nut part of the hinge: solid hemispheres.
 These were made with the handy paper solids maker from long back. I built them in cylindrical steps and sanded them down aggressively with a Dremel. The tube and shell method will be glossed over here since it's fairly simple: glue tubes and reinforce with a sheet of Magic card.

 So, how do the finished legs/hips look?
 "Don't get any ideas, I'm technically only 2 years old."
Gratuitous upskirt photo time. The new joints solve a cosmetic problem of filling in a small unsightly gap between the thigh and the hip structure. I've left the port covers for the fasteners unsanded for easy access/maintenance.
As for evaluation: they are fairly stiff to allow the legs to retain their position. I'm going to see how humidity effects affect the system before retrofitting them to Hotaru and Aelia. Lia will be testing the system and finding any flaws over her next few months. The system does have drawbacks. The mechanism only works for fairly large sphere/hinge joints (mine was 18mm in diameter, and does not work for smaller diameters) and there's a good chance of the torque from moving the legs unrooting the shaft from the hip. I had to re-attach the shaft to the body after noticing the new hips had twisted the shaft out of place.


