Saturday, June 27, 2009

Insights Into Magic Card Doll Making, Part 2

Welcome back to part 2 of documenting Lia.

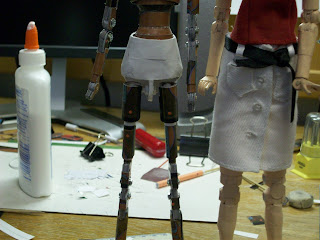
Figure 1: Finished legs
Figure 2: Hip structure

Lia at this stage sported Rev. B hips. Rev. A was too loose and was enclosed so any maintenance was destructive. I eventually changed her design to Rev. C which sported an open socket system with the opening parallel to her hip connector, which allows me to pop the ball joint out easily for repair. The rods are made with a bamboo stick used for barbecues. Approximate diameter is 1/8". These were bought specifically for use for building Hotaru and have lasted me to this current date.
Figure 3: Rear view of Lia's skeleton

Lia at this stage has her hip completed.

Figure 4: End caps for limb joints

I used the cone frustum maker to build these caps. The washer for the screws are glued down to the card face, and the nut is expoxied onto the washer so I have a false permanent thread to anchor the screws in. This allows me to adjust the tightness of her joints and easily change components.
Figure 5: Completed torso.

The body gets a coating of printer paper and 110lb cardstock to get as best of a surface finish a piece of sandpaper can get. Which in this case, isn't much. Fortunately, Aelia doesn't suffer from surface defects like Lia and Hotaru due to a more aggressive sanding.

Figure 6: Initial foot contruction

Figure 7: Foot construction, end stages

I changed the foot from an epoxied mess to a proper construction that could actually be painted. The foot is made of tubes stacked together until the form was present. After the tubes were secure, I coated the entire foot with 110lb cardstock, sanded it down, and cut out some toes.

Figure 8: Photo op for current progress.
Figure 9: Detail of the torso
Figure 10: Components ready for painting

This stage, the parts have been rounded out. I used the technique outlined here for making the twig-like limbs not so thin. Now, I have implemented a better system where I first add the tub reinforcements, cover them with a sheet of Magic card, then coat it with 110lb cardstock. I then cover the seams with printer paper, sand them smooth, then get them ready for paint.

The head was built using an out of date system that I've now abandoned in favor for a more sculpted process using a Dremel to carve out facial details. The previous method can be found here. I'm now using this process to make doll heads.

Hands were constructed in the same manner depicted here for Aelia.

Development log:
6/25/2007: Initiated building the development unit, based off an Obitsu ball jointed doll structure.
7/12/2007: Completed exterior build of development unit, Revision None.
7/27/2007: Hotaru officially completed.
9/13/2007: Hip design moved from hinge swivel joints to ball joints. Entered Revision A.
6/10/2008 to 6/15/2008: Lia built and completed. Entered Revision B. Feet and shoulders changed.
June 2008: Hotaru and Lia upgraded hip structure to Revision C.
2/28/2009: Aelia project initiated. Body enters Revision D. Changed shoulder joint and chest assembly for structural strength and reliability. Body shaped to resemble BBI proportions.
6/6/2009: Aelia project completed.


That wraps up two years of doll making. (Amazing that it's only been two years since I started. A lot has changed in skill level since then. ) I hope this has been insightful into the level of work needed to produce a doll made from Magic: the Gathering cards. I don't expect anyone to be able to replicate my work or even do close to what I do. I hope that by showing you this process, you can use this for ideas of how to build your own creations.

A lot of the building techniques used in building Hotaru and Lia were critical in the construction of the Team Fortress 2 related things. The sentry gun and Sasha would not exist if it weren't for those two.

Insights Into Magic Card Doll Making

On June 15, 2008, I finished making Lia, my second foray into dolls made out of Magic: the Gathering cards. I've never actually detailed what has gone into creating a doll from scratch, but that week I had taken a good set of photographs. To commemorate her first year of service, I show you the process of converting a stack of Magic cards into a doll. I'll also be answering some common questions I've been asked.

For starters:
Why Magic: the Gathering cards?

I had a pile of junk cards I'd never see play. I was previously working with papercraft (paper modeling) and had the idea of seeing if Magic cards could be used as a building medium. I spent a month designing the Hotaru body base and the subsequent techniques that would propel me on this weird path.

How do you prepare the cards?
First, I determined by testing that the thinnest stack of cards I could use to make a solid joint was eight layers. Each card layer is sanded down to remove the finish, then laminated together with Elmer's glue. Cutting Magic cards is easier when they're in thicknesses of 4 or less. Any more and you need some special tools.
Where are the instructions?
Unfortunately, I do not have explicit instructions for my dolls or anything else I build. Scratchbuilding isn't something I can hope to tell you how to replicate exactly. I documented my plans, which are all I have to use. I used these along with my engineering development unit, Hotaru.

Anyways, off to explain the unexplainable.
Figure 1: Chest assembly, Rev. A

This assembly serves as the base for Hotaru and Lia. Aelia uses a new system, Rev C, which is a single tube system than a box with 1/4" holes cut into it. This component was built from the plans linked here and utilizes a layer thickness of 4. The arm support consists of two plates to support a 1/4" pin. The projected load was small, so two thin walls would work.

Figure 2: Fleshing out the chest

The chest has several freehanded cards cut to fit and fill out her chest. The shoulders are still flat on this stage. I use regular printer paper to hold down the Magic cards. Sanding the card down would make securing them easier.
Figure 3: The Waist Section

I fondly call this component the aircraft turbine engine. I used the handy cone frustum maker to build the waist. The component on the thread spool is the joint mechanism, made with two 10mm diameter ball joints. This fits into the aircraft turbine part on the 7UP pencil sharpener can.
Figure 4: Torso Assembly

This stage highlights the initial fit of the torso components. The ball joint rod ends feed into a 16 layer thick section of Magic cards. The waist section near the black binder clip is one of these 16 layer thick sections. Another is in the chest, covered by the lower plating. Here, I've already added shoulders and a few more layers of paper to the chest.

Figure 5: Side view of the torso.

Sixteen layers is a lot of card. I did this before I had a Dremel, so I had to cut each layer at a time. Never doing that again. The background was my cutting mat back in 2008, which was a folded up poster for Earth Day.

Figure 6: The hip.

I needed to make a 1/8" hole in the pelvis for the ball joint rod ends that would serve as her hip. This was done with a hole punch, one sheet at a time. Now, I'd drill a hole with a Dremel.

Figure 7: Pattern templates for arms.

The second time around, I made templates. This layer of card would contain one of three sets of patterns needed to build another doll.

Figure 8: Arm assembly, Rev B

One day later, and we have arms. I must have not done any studying that week. Arms were documented here. Process is unchanged from Rev. A to Rev. B. Change from Rev A to B included increased range of motion using a P shaped shoulder connector than a D shape.


Figure 9, 10, 11: The Upper Assembly.

I've started sculpting out her body at this point. The hollow areas get stuffed with 110lb cardstock cylinders to reinforce the volume. This part isn't in my documentation. I've only provided the skeletals, since the rest gets freehanded at this stage onwards.

Part 2: The Lower Half and Miscellaneous Details

Friday, June 26, 2009

J.Norad Reviews ZACCA 1:6 scale Panzerschreck

Welcome back to part 2 of a 11 part series of me reviewing more lovely Zacca 1:6 scale models. I've bought two sets of rocket launchers: the five advertised blindboxed rockets for series 1 and series 2 of the 1:6 scale bazooka line. I mainly wanted the wall rack mount, but, hey, nothing says "I love you, Soldier" like buying him ten more types of explosive projectiles.

Ten 1:6 scale boxes does not equal 5/3.

This week, we'll review the Panzerschreck, German for "Tank Terror". This is model #2 of the first series of bazookas issued by Zacca. As with the FIM-92, it comes with a data leaflet with instructions on how to put it together. This time around, I didn't have to worry about my goods being smashed.

The Good

The panzerschreck is a lovely addition to your collection. As with all Zacca models, it's pretty detailed. The blast shield has several glued elements and a clear window. The tubing is well done and there's some silver accents on the metal parts near the hand grips.

The Bad

These models come in pieces due to their massive length. Fortunately, Zacca's engineers have made most of the pieces idiot proof in how you orient them during assembly. However, they have non-uniform part tolerances which make assembly annoying.

Figure 4: Panzerschreck Part Intolerance

From figure 4, I have three areas of interest to highlight. Section A, marked on the left of figure 4, shows the most annoying part of the model. If you don't glue the model together, which I have decided not to in the event I want to store them back in their original packaging, you'll have some loose pieces. The front end of the panzerschreck comes off too easily. It pops off with the slightest of nudges. Not great if you're trying to set up a photo outside and you spend a few minutes looking for it and putting it back on.


Section B, denoted by the letter and arrow on the right of figure 4, is the rear exhaust port of the panzerschreck. This piece is fairly detailed, but isn't something that can be handled with someone with ham fists and a temper tantrum of a 3 year old child. It's fairly fragile looking, but actually somewhat stiff. The problem is that this piece needs to be assembled onto the rear and the fit is tighter than I'd like. You will have to be fairly careful putting this piece on without sanding down the connector to avoid snapping the spokes during assembly. Otherwise, you'll have a slight gap if you don't put it on all the way. Not terrible, but something to look out for.

Section C highlights the rear sight. This is a fragile piece. It's a thin piece of plastic with a thin peg to slide into the side of the panzerschreck. Combo that with a tight fit, and you'll be spending a while getting it flush with the barrel. I haven't opted to sand it down yet, but I may have to in order to get it to fit. Another thing to look out for when you put yours together.

Zacca also uses some "weathering" on their models. In this case, some black details along the rails running parallel with the barrel. However, it's not uniform. There are parts where this effect suddenly disappears. You may want to redo them or possibly repaint this to your liking.

Overall

This is perhaps one of the lesser detailed models you can get from the Zacca line. It's pretty decent if you paid about $5-$8 for it. I don't really think it's worth hunting down for more than $12 unless money's no object and you demand the most detailed panzerschreck for your soldiers. At that point, you might as well buy a non Zacca panzerschreck. The one made by Dragon comes with actual rockets and a storage crate, if you're looking into the $20-30 range.

This one comes packed pretty well, so you won't have to worry about yours being brutally crushed by a belligerant postman. However, it's nowhere near as great as the FIM-92 "secret" model from the first series. If you're buying these blindboxed, you'll probably be unhappy knowing you could have gotten the FIM-92 and got this instead. Mainly since it's such a common model and not something exotic and rarely made in 1:6 scale.

I should also mention at this point that the model has solid end caps, so no jamming random objects down the barrel to "fire" them. They're painted black so you can't really tell from certain angles.


Overall Meaningless Scores and Stats

Price per unit:
MSRP: $5.
Average price: ~$10 shipped
Competing company prices: $20-40 (plastic and metal versions)

Length:
27.6cm long

Build quality:
Mixed. I'm pretty sure they had some design issues getting this model made cheaply. If you glue it and properly prepare it, it'll be your best friend. Comes in 6 pieces, assembly required. Looks actually sturdy enough to survive an accidental drop off a bookshelf. At least you can play with this one. Score: 9/10

Overall:
Not worth it. Buy a real model of a panzerschreck unless you're trying to buy lots of them cheap. For $5, you can buy 4-6 of these as opposed to one from Dragon. I hear Dragon's quality is much better than Zacca. But if you really want to arm a whole regiment of Nazis with panzerschrecks on a budget, this is an option. Score: 5/10

Sunday, June 14, 2009

RED Team Goes Treasure Hunting

J.Norad presents: RED team goes treasure hunting: because I can't be bothered to.

RED team had set up camp near the local garden. Just to be safe, they've put up a sentry to protect their haul.

Sniper sets up shop. "I think his mate saw me..."


"EUUUAHHHH..." BOOM. Headshot.


I crush puny little men at local store and steal their itty bitty treasure!

"With this, we can fire Sasha for 2 seconds!"

Saturday, June 13, 2009

J.Norad Reviews: Zacca 1:6 Scale FIM-92 Stinger Missile

Today, I bring you a review of a ZACCA 1/6 scale model FIM-92 Stinger Missile launcher from the Bazooka Chronicle series. About this product: Zacca makes stellar 1/6 scale weaponry among other things. I previously bought their World Gun Collection AK-47 and XM-177 at the 2007 WizardWorld convention. Great quality and detail. However, their products come blindboxed, meaning you buy a pack and don't know what's inside until you open it (or you cheat, more on that later). Right now, you can buy the set this FIM-92 comes from on hlj.com for a paltry price of $51 sans shipping for 10 packs, with the caveat that you're not guaranteed that one of them will have the FIM-92 (but likely you will get one). Good luck buying this in a physical store.

For those of you who simply want a 1/6 scale FIM-92 but for the cheapest price possible ($51 + possible $20-30 shipping is a real deal killer for a chance for one), there's a GI-Joe version without the antenna. For those of you want this particular model like I did, you can pick one up shipped for $18+ on ebay. For those of you who didn't know this existed, and are now debating trying to pick one up, I'll go into some details you should know.

The Model:
Comes with everything you see here. One modular display board, one removable coolant pack and a whole lot of Stinger. The model is very detailed and has minimal decals and paint. The sight folds up and locks into place, so you can have yours stowed away or ready to fire. However, the model is much larger than the box that it comes with, and because of that, it comes packed in pieces. The information sheet in the back also has instructions to piece together the 11 (yes, eleven) separate pieces that make up this model. By that note, this model is not something you can toss around in your weapon box and not expect to be splintered in a week. If you're buying this, you're going to be displaying it on the rack or somewhere else all the time.

The Packaging:

As mentioned, the FIM-92 comes shipped in eleven components: the rear tube, two strap holding brackets, the coolant pack, the main body, a laser sight, and a five piece antenna. As you can see, the box came crushed in transit. The box and inner packaging does little to protect the contents from random act of US Mail. If buying one online, make sure it's not tossed in a bubble envelope. If buying one in a store, you can do the following to guarantee you're getting an FIM-92...

The Crushing Blow:

The box was not the only thing damaged in transit. The fold up sight was broken off one of the two hinges. There's a small plastic pin that sheared off and should not in any circumstances be glued and placed back in. The left eye visor guard also snapped off during the crushing. That fortunately broke cleanly where the piece joined the body and was easily glued back on. However, that left me with a broken pin.

The pin, I should note, is a compound pin, with half the diameter larger than the other. I didn't know this, but I made a suitable replacement with a 0.045" paperclip trimmed to about 4mm long. A bit of Loc-tite was needed to secure the pin in place from falling out. Not a big deal, but annoying to get a paperclip near the exact diameter I needed.

What does this have to deal with guaranteeing you're getting an FIM-92 in a blindbox in a store? Well, all you now have to do is apply a light force to the center of the pack and if you hear a scary brittle snap, Congratulations! You've broken a blindboxed FIM-92.

The Unit In Action:

So, if you're not put off by the fact that you might be paying around $80 for a chance to get a model rocket launcher that may be broken in transit, here's some shots of the FIM-92 in use. And what person is more qualified to handle this missile launcher than the Team Fortress 2 Soldier! Today, it's the Soldier Update as far as he's concerned. Who needs four rockets when one with the power to down aircraft is available?
Today is a good day!

Boys, we have a blue aerial transport in our midst!


If Raytheon had wanted you to live, they would have not created the FIM-92!

Overall Meaningless Scores and Stats:

Price for one unit:
  • $5 (if you buy one box at a store and get it in that one)
  • $18 shipped on ebay (J.Norad's method)
  • $34 on ebay (+ shipping, other sellers)
  • $80+ on hlj.com
Build quality: Beautiful, but fragile. I wouldn't store this unit higher than one foot off a hard surface in the event it falling breaks off the antenna. Assembly required; eleven pieces. Score: 8/10.

Length assembled: 26cm

No glue required, glue not recommended.

Playability: You're either putting this on the included wall rack or permanently in a diorama. This is a model, not a toy as far as I'm concerned. Makes great photos due to the detailing, however. Score: 6/10.

Overall: A great visual prop, but I'm too concerned with breaking off the antenna. Good value for $18, compared to other models from Dragon and 21st Century Toys. I wouldn't recommend buying one unless you really love the FIM-92 or need one for your 12" Metal Gear Solid 1 Solid Snake figure. The cheaper FIM-43 doesn't look as fragile and can be had for $10, if you are insistant on getting a missile launcher. Score: 8/10.

Saturday, June 06, 2009

J.Norad Shortens His Lifespan and Lengthens a Spear

Shouldn't take a month to make a spear, right? Seems more like 2-3 months since I last worked on the spear. I extended the spear by about 2-3 cm and redid the spiral. I kept the head, since working on a new one would guarantee this spear never being completed.

I opted to go for carved details in the grip and ends, and drawn detail for the spiral. My first attempt carving the chevrons into the spiral ended with a flaky mess that chipped off easily. After building the shaft and the decorative round elements, the entire spear was painted with primer.

The grooves and decorative balls were first done by Dremel'ing the balls to the right shape. A coat of Loctite over the surface helped little in keeping the surface from fragmenting as I etched the grooves with an X-acto knife. If I had first glued the entire spherical section with Loctite and allowed the adhesive to permeate through the paper, it may have been better. I did patch reinforcements for the already chipping sections with regular Elmer's glue.

I sure can't manage my paints. Might be the lighting, but the paint looks a bit thicker than I would like it to be. I thinned out the mix of Gloss Black and Aluminum enamel paints, but it still looks like the thinner did more to poison me than thin the paint. The spiral chevrons were groggily done with a 5 micron art pen. Conveniently, I had a piece of red cloth that wouldn't fray too easily that I could use for the shaft.

Here's the spear separated into two sections and a coin for scale. I sadly feel I did the lower half of the spear better than the head. I can always rework it.

Well, after several months, the spear is "finished". Now off to trying to figure out how to make the guard for her sword.

Monday, June 01, 2009

Making Simple Spheres and Tubes Overly Complicated

Personal math reference time! Today's post deals with making revolved solids out of paper. This post will assist you in building your own tubes, cylinders and spheres for use in making ball joints, miniguns, and staves.

If you have a good understanding of math or don't care about the proof, skip to the end. If you're curious to the method behind the result, keep reading.

The basis of this method lies in the formula for a circle based on the diameter:

EQ. 1: Circumference = π* diameter

What we're doing when we roll paper into a tube is stacking a lot of thin walled tubes together to form a solid one. The goal is to make a formula to add up all the lengths of paper that consist of each individual tube together, so we can simply measure a length, roll it up around an object, and make a tube of the approximate dimensions.

I've been making my ball joints out of 3.175 mm (1/8") diameter bamboo sticks. For this example, I'll be using that as a baseline inner diameter for my measurements. You can choose to use other inner diameters later on. My goal for this example is to generate an 8mm diameter cylinder/sphere. First, I need to calculate how many times I'll need to wrap my strip of paper around this stick. Unfortunately, I need a vital measurement that most of you will be hard pressed to find: the thickness of paper. Fortunately, I've done that work for you.

Thickness of 110lb cardstock is roughly 0.252095 mm (or 0.009925"), calculated by a series of measurements, averaged to compensate for the lack of a digital caliper. (Dial calipers do have their drawbacks, but I love watching the spinning dial when I use mine.) Regular printer paper is roughly 0.004" to 0.005" for reference. You may notice, I kept all the decimals as far out as possible. I did this since the later part is going to vary a lot based on how accurate my values are.

Now. To the formulas! Time to pay attention to the equations, page skimmer! The number of revolutions your strip will need to make is:

You'll get a non-whole number. That's fine. Your revolved solid may be a bit thicker on one side than the other, but if you're aiming to make precise paper Rolexes, you shouldn't be learning from a guy who inhales Magic: the Gathering card dust on a daily basis.

Armed with this number, we're going to mess with arithmetic series. As we add a layer of paper, we're incrementally adding a length of paper proportional to the thickness and a constant. The thickness of paper is the change in diameter we're adding, and based off our formula earlier for the circumference, we're changing the circumference with each increment of the diameter. That gives us:

Where C is the circumference, N is the number of revolutions you need to make. Each revolution generates a length of paper that we'll have to add up to form our overall length to cut. So, if N=10, we'd add up C1, C2, C3... all the way to C10. Great for small values, terrible if you discover N=100. Arithmetic sums to the rescue!

The sum of an arithmetic series is simply:

With this, you just need to input your thickness, inner and outer diameters into the formulas above, and get the sum. That is the length of the strip of paper you need to cut out and roll around to get your tube.

Armed with this length, you can now control the size of the following revolved objects!


For small ball joints, the reference labeled "triangle" suffices. For large ones, you should probably just buy wooden beads or modify the "convex" one. I'd recommend using sandpaper to smooth out the spheres to be less octagonal.

For the socket part of a ball joint, I'd suggest using a sphere with a diameter larger than the inner diameter of the tube by 0.254mm (0.01"). That will give you a snug fit. You can always enlarge the sphere by adding a thin coat of superglue over it, and sanding it to fit when dry. I highly discourage adding material to the inside of a tube. It's too messy.


EDIT: Here's a microsoft Excel file for the formula for the extra-apathetic.

Just go to the proper tab and fiddle with the settings. And if you delete a formula, just download it again!