Showing posts with label Borderlands. Show all posts

Monday, July 19, 2010

Painting the Hellfire

I've always hated painting.

To paint the Maliwan Hellfire, I've had to buy some blue paint to experiment with. I have not owned a pot of blue enamel for about 8 years. Now I have 3. Two of them were useless. I decided to pick up Blue Metallic Flake, since the gun has a shiny blue coat of paint in-game. Probably the most useful color. The above image documents my attempts to get all the colors for the gun. For this painting disaster, I actually required the following paints:
  • Dark red
  • Blue Metallic Flake
  • Aluminum
  • Black
  • Grey
I needed a light blue, a deep blue, pinkish red, black and dark grey. The pinkish red was for the glowing red parts of the gun, but I didn't find any means of making a neon color from what I had. So red it is!

For the light blue, a mix of about 40% blue metallic flake and 60% aluminum worked well. An even balance got me a teal color that didn't fit. Dark blue came out with something a bit more obscene: 5% red and 95% blue metallic flake. Any more red and it becomes purple. Some parts required a dark grey, and since I ran out of Gunmetal Grey, a 60/40 mix of grey and black worked fine.

To mix the paints, the surface of an untreated/unsanded Magic: the Gathering card works great. I sacrificed a Crazed Goblin for this noblest of tasks.

The hardest part was probably getting the paints to not look like crap as I tend to do. The dark blue metallic mix tended to run the most and I had trouble getting an even coat. The rest worked fine. To make the finer details in the parts, I etched/scored panel lines with my ever-dulling X-acto knife, and filled it in with a 2 micron achival art pen. Art pens don't like being used on enamels, I learned. There goes another $3 pen! Something clogs up the tip that I can't remove or fix.

The most pain in the ass details were the red glowing parts. In my case, red solid matte lined things. A coat of gloss should fix that. But I'll need to buy that first. Instead of painting them directly on, or making a shallow recess for the paint to remain in, I chose to go the lame route and make pseudo decals. I wanted something on the gun to look somewhat straight. I have the painting skill of a 3 year old child holding an active firehose. If it's not supposed to be going all over the place, I'll need all the assistance I can get.

I painted a sheet of regular printer paper red, then cut 0.5-0.7mm thin strips.

With that, I trimmed them down to length, and applied them to the gun using reckless blobs of adhesive and really fine tweezers for the small red squares. Looks better than any paint job I could have had someone else do for me.


After a lot of painting, panel lining and gluing red things, I finally finished most of the parts. I didn't get to paint my favorite magazine, Mag 3, because it turns out, I mucked that part up and didn't get all the details made. I'll revisit that later.

Monday, July 12, 2010

Hellfire Construction Progress - July 12

Construction on the remaining Hellfire SMG bodies has begun. Body 5, designated HX, has been completed. All that remains are Bodies 1-4: the TD, KKA, TEK and RF designations. Body 1, despite being the most mediocre in game, is by far the most difficult to build due to the fragile sight mounting region, with the windowed frame. I had difficulty constructing the top sight rail for body 4, and that consisted of just a slit with two holes.


Figure 1: Patrol SMG Body Schematics

Here's the remaining schematic for the Patrol SMG series. A lot of the details need to be supplemented by in-game screenshots. I've detailed all the necessary information I need to get construction going, which means some of it will be ambiguous to the causal builder.

Today, I'll be documenting construction of the modular rail system used for the Maliwan Hellfire.

Figure 2: Starting the Laminate Tracings

This portion details the construction of Body 3: the TEK series. With the diagrams from the previous section regarding the rail details, I've traced out the TEK body and overlaid the internals on the tracing. A slot for the magazine 5mm deep and 9.5mm wide can be seen in the tracing in Figure 2. Provisions for the rails have been shaded as a guide.

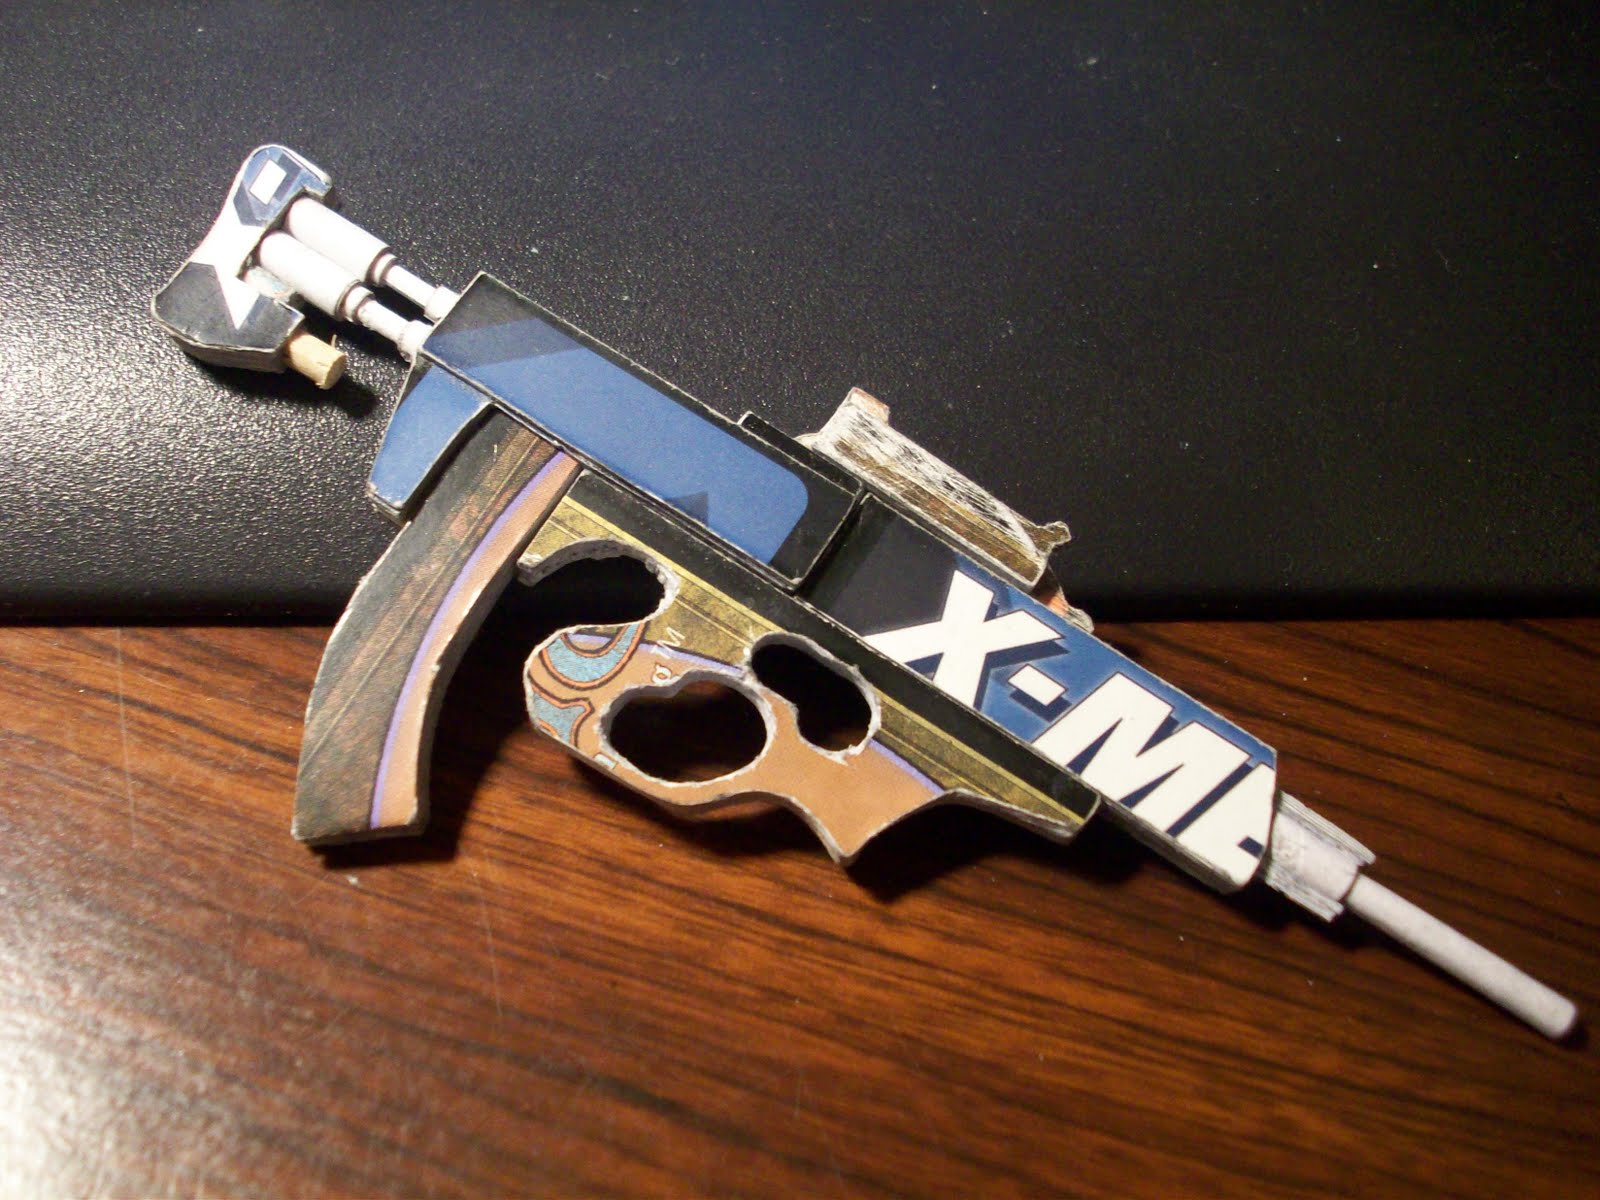
At this stage, I've gone into a color-type card system to help differentiate pre-glued card thicknesses. Usually, I use 4-card thick stacks documented here, but this project necessitated the use of 2-card thick laminates. Conveniently, I have a crapton of X-Men TCG cards to use. As a result, you'll be seeing a lot of multicolored sections. Magic: the Gathering colored parts are 4 cards thick; X-Men blue means 2 cards thick.

I'm taking advantage of thicknesses by carving and peeling layers off laminated cards to avoid cutting multiple tracings.There's a small recess for the magazine on the outer layers, about 2 cards thick, shown in the above figure.

Here's a view of the layers assembled partially, allowing you to see the individual thicknesses used to make the rail system. A narrow 2mm wide "rail" goes on the bottom and interfaces with the grip's "T" shaped rail. The regions in contact with sliding parts were left unsanded, to let the default coating on the cards have less friction and wear when sliding. Once the layers are assembled, there's little hope for repairs.

Test fit of Stock 3 and Grip 3 on Body 3.


Another view of the sliding rails.


For attaching the Fire elemental accessory to the body, some structural assistance was required. I was essentially gluing two rounded objects together, leaving little point of contact. To minimize future re-gluing repairs, I opted for metal rod reinforcements. 5mm long rods were made from a paper clip, and holes were drilled into the surfaces to be mated. Loc-Tite glue kept the pins into the holes. Once the two parts were joined, the metal pins would reduce problems associated with shearing to a minimum.


Semi completed TEK body. Details were achieved by carving out large sections, then assembling strips of card or cardstock into the cavities. The raised elements in the center of the body were achieved with a single layer of cardstock on a MtG card. At this scale, small bumps can be modeled by the thickness of cards. Some details require etching or peeling a layer partially. Some details require carving, as demonstrated below.

The rear section of the body tapers on Bodies 2,3 and 5. The TEK series tapers from 5mm to 3mm. To handle the taper, I've marked off the material required to be cut, using a black marker. This body belongs to the KKA series, Body 2.

Magic cards behave like plywood, and this can be taken advantage of in carving sloped surfaces. You can use the edge of a knife to slice away at the card stack, thus revealing the individual layers that comprise the card. Approaching the surface at a shallow angle, you can peel off layers lightly.


When you carve, you'll see lines due to the different layers of the individual cards. You can use these lines to judge your surface's flatness by seeing how uniform the lines are. You ideally want straight lines and uniform separation. However, any deviations can be solved by light sanding or gluing a flat surface on top of the slightly uneven one. I'm just going to sand it down, since minor unevenness won't be very noticeable.

Here's the current assortment of parts, semi-grouped into part number. I'm debating making 5 total grip sets and having 5 individual SMGs, but I'll never need all five assembled at once ever.


Here's all the parts available so far, separated. I'm missing five of the 20 parts and it's still workable for a good assortment of combinations.

I'm getting rather fond of the TEK body. This configuration's the TEK 400, with the less popular "Thumper" magazine. Unfortunately, due to the way the grip is designed in the actual game, most 1:6 scale figures cannot properly hold the weapon. A similar configuration would be the FN-P90. Not a lot of figures can hold that gun properly.

Depending on circumstances, I'll either move onto priming the parts for painting, or attempting Body 1 and Stock 1: the most pain in the ass parts to build.

Monday, July 05, 2010

Celebrating July: Maltese "Build a Modular SMG Month"

Finally got around to working on something for a change. There haven't been any other projects worth pursuing, despite playing a game that offered 13 million gun possibilities. A different scope or magazine does not mean an entirely different gun. We call that an "accessory". Borderlands was a rather disappointing run after you realize your weapon never matches the level you're at ever, and the best loot gets acquired long after you're bored with the story missions. "Hooray! I got me a TD52 Cobalt Tsunami! I can use it on that fun mission that I can't play now because the mission was a one time event!"

Anyways, enough of that mess. I've secured my first trophy, Sledge's Shotgun, since that gun was notable in appearance and function. However, my second trophy is distinguished by in-game function only and has 750 variants (150 if you remove magazine choices), and is visually identical to a generic version. It's the only other gun worth considering: the Maliwan Hellfire. In particular, I'm interested in the HX (body 5) version, Cobalt material grade. To better explain the scope of this project, let's bring on some diagrams!


Figure 1: The Pain Begins.

The above drawing is the preliminary planning for the gun. Since I don't want to build 150 versions of this gun, I'm going the modular route and building interchangeable parts. There's 5 different bodies, 6 stocks (counting no stock), 5 barrels, 5 magazines and one grip to choose from. (Maliwan by default is grip 3 for SMGs, therefore there is no option for that to choose from). This gives me an idea of what I'm looking at in terms of total parts to build.

The next phase of building is taking reference photos and scaling profile shots for use in drafting up schematics. Only problem is that there's no sense of scale in the game to use, and the gun wasn't designed to be ergonomic, based on preliminary fit tests. This resulted in an understanding that the g43 standard I've been using omitted a critical weapon category in determining scaling: bullpup configurations. I have not factored in ergonomics for bullpup rifles, which the Patrol SMG fits in, shape-wise. With some rough estimates from other rifles, I've accepted that a comfortable bullpup config has a 1:6 scale length from stock end to middle of the trigger of anywhere from 6-7 millimeters. This value gave me more variance than I liked. I settled for a reasonable and comfortable 6mm distance and set out taking screenshots.

Figure 2: Welcome to Hell. Fire.

I'm focusing on the HX designated body 5 for now. Bodies 1-4 will be built later. Screenshots were compiled by running through a glitched Armory level and picking up every Maliwan SMG in every chest for a good sample population, then chucking them all to the ground. Could have gathered them with the save editor, but that's no fun. I figured out the naming conventions for patrol SMGs in the process, which are detailed in Figure 1. Body 4 for Maliwan SMGs was the rarest for me, as a side note. The following diagrams were drafted for the key parts:

Figure 3: HX body laminate construction

Figure 4: Barrels

Figure 5: Body 5, Barrel 4

Figure 6: Magazines and Grip

Figure 7: Stocks

With that out of the way, It's time to build stuff. Figure 6 details the actual mechanism used to connect all the parts together. A T shaped rail integral to the grip will hold the barrel and body together. This piece required reasonable uniformity in spacing throughout. I found that a 2mm wide rail 2 cards thick retained enough strength to not shear off during repeated use.
The stock uses the same mechanism to hold into place with minimal wobbling. Here's a photo of the individual layers of stock 4. The middle layer has a notch to accept the mounting rail part. All sections are 4 cards thick.

Gluing stacks of card together is trivial to explain by now. I'm confident you all can glue 12 cards together and cut them. Parts here were built with some modifications to the diagrams from Figures 3-7.

Test fit of the HX430 config. No barrel has been built for Barrel 4 yet.

Test fit for Stock 3, in the HX 330 config. Stock 3 and 1 are the most unstable to build due to their low amount of material.

Stock 3 consists of two rods with notches that fit onto the retaining rail for mounting the stock. Not doing so would allow it to shear easily. Other options involved drilling holes and reinforcing with paper clips, which is what I did for the rear part of the rods.

I've started on the details for individual components, after being satisfied with how the parts fit together. At this stage, I've completed magazines 1,2,3,4, barrels, 1,2,3,4, stocks 2,3,4,5 and body 5 and tested for compatibility with each configuration. Time to etch out the grip details.

The grip has a few uneven layers that need to be carved. I took care of the larger noticeable side profile depressions by tracing them on with the template shown in the middle. I used an X-acto blade to cut out a groove, then peeled off the card layers gradually until the desired thickness was achieved.

After some carving, this was the end result.

The HX230 is looking better with the semi-finished grip. At least it matches now. Time for some part roundups.

HX 100, with barrel 1

HX 220 with barrel 2

HX 330 with barrel 3

HX 440 with barrel 4

Stock 5 was built, but I wanted to illustrate the parts with similar numerical groupings. Barrel 5 and magazine 5 have yet to be completed. After those are completed, work may begin on the other bodies.

Tuesday, February 23, 2010

Gold Paint Looks Terrible

Here's those pictures of the painted Sledge's Shotgun I semi promised I'd get around to taking. Perhaps one of my worst paint jobs ever. The front uses a mix of gloss black and copper to get a brownish tint that's barely noticeable. The wooden stock uses a mix of "rubber", red and some peach paint. Happens a lot when I have no paint handy that actually resembles the color of wood.

I'm quite happy with this photo, since there's only so many ways to showcase a break action gun. I've already had to photograph this feature three different times. You can only prop up the gun with clear tubes for so long before giving up.

Sledge's Shotgun is a very big shotgun. About twice the length of the Scout's Force-a-Nature. There's a lot of discussions out there noting the similarities between the two guns, so I won't bother discussing them here. I unfortunately discovered that the Scout's Shia LaBeouf body cannot actually wield Sledge's Shotgun. 'Tis a pity. Looks like only a select few of my TF2 collection will be able to wield the power of a Jakobs. I was looking forwards to using the Scout's Bonk! action button to slam the blade into things.

There's only one discussion around here in The Vortex, and the topic is "who's got the bigger gun". In this case, it's who has the bigger knockback. Unfortunately for the Scout, he drew the short straw on who goes first.

And with all discussions, there can only be one winner.

Monday, February 22, 2010

The Legend Lives On In 1:6 Scale

After a whopping four playthroughs of Borderlands, I've net me one weapon that I'd actually bother glorifying as a 1:6 scale weapon. So much for a game with a bajillion guns. They failed to mention that 4/5 of the guns are ones you'd never want to use ever. I originally shied away from shotguns since they were rather inferior to 70% of the game's enemies (and I still do, as they are still inferior to 70% of the game's enemies) but one shotgun in particular stood out.

Predictably, it's Sledge's Shotgun: the most ridiculous/interesting/fun shotgun added into the game. It's always sitting in your backpack since you get it so early and it is very underpowered until your 2nd playthrough, but you keep it around because the knockback effect is completely hilarious. The gun's blatantly a close range weapon, and the +150% melee bonus is just rubbing it in. In addition to the fun I had with this weapon, I chose it because it's one of few guns in the game that never changes its appearance no matter how many times you get one, thus making it a very consistent build.

Like all projects, I started off with a side profile trace of the weapon from a screenshot. This allowed me to determine what monstrosity I was going to deal with. It's a simple, yet complex shotgun with lots of unnecessary details on it. (A pump action break action revolver shotgun? Yes, your character does indeed pump the shotgun when you take it out, despite it being decorative.)

This gun pretty much is a project with prerequisites, requiring some prior experience to tackle successfully. For instance, this shotgun involves:
Granted, the break action mechanism is nothing hard. Just a hinge and pin. However, like the Grenade Launcher, there's no visible mechanism, just a latch and MAGIC! Naturally, I have to fight fire with fire and bust out my Magic. I had to cheat with the Grenade Launcher by adding some extra elements to lock the mechanism, much like I'll have to do here.

Behold, the most simple-ass mechanism ever. It's just a slider pin that slides into the revolver chamber axis. The two shot "cylinder" is built from two 5mm OD 3.175mm ID x15mm long tubes stacked around a 1mm diameter paper clip functioning as the cylinder axis of rotation. However, I left a 1mm diameter through hole between the two chambers and halfway filled it with a paperclip. This left me with a ~7mm hole to insert another paperclip rod into, or in this case, my locking mechanism!

The rest of the construction is nothing new to you readers. Stack Magic cards, Dremel the crap out of them, and stack some tubes. A miracle occurs, and you get a shotgun. This gun has a lot of varying thicknesses, so I'm taking advantage of the various thicknesses of printer paper, 110lb cardstock and Magic cards to flesh out the varying layers. You probably could care less about how that works, since you're likely not ever going to build 1:6 scale guns out of cards. So onto the semi-finished product!


Here is the un-primed Sledge's Shotgun, with almost all the details completed. It's a fairly long model, spanning 15cm.


There's annoyingly a rail on the top of the gun, which was completed by a layer of 3mmx3mm squares from an X-Men TCG card. The odd sight on the far back of the rail sits close to the break action lever. Unpainted, the mechanism is camouflaged with the rest of the gun. This gun also has no hammer mechanism, for you sharp eyed ones out there.

Interestingly about this model, the way it's designed, the revolver chamber needs to rotate 90 degrees in order to allow the gun to break open. This is the result of a small stub near the hinge that acts as a hard stop for the front of the gun when it swings back into place. This also provides a point of interference with the chamber when it swings open. GREAT DESIGN!

Once you get past the horror of video game weapon design, rotate the chamber and pull the lever back, you get the joy of being able to load in your two shells! Finally! Mine sit fairly loose in the chamber so they sometimes fling out when I fiddle with this gun. All the more joy of not having to manually extract the shells with my fingernails.

This gun was perhaps one of the most enjoyable models to make so far, due to the features, overall looks, and sheer easiness of the mechanism. Far simpler than the Force-a-Nature, which involved a special locking groove that translated rotation in one axis into a partial impedance on another axis of rotation. This one's just poke and pull.

I have since painted the model, and I must say, it looks actually better unfinished and unpainted. It looks much more interesting as a prototype model than a poorly painted mess with terrible colors. Once I figure out how to properly present it, I'll showcase the completed shotgun.