Showing posts with label Build progress. Show all posts

Sunday, May 27, 2012

This Month's Progress: MORNING RESCUE

Three weeks have passed. What have I built and learned about Homura's Time Shield? I learned that no amount of Morning Rescue can make this go smoother. Here's my current project goals and the resulting mess that ensued:
 
  1. Build the most detailed Homura's Time Shield from Puella Magi Madoka Magica out of freakin' Magic: the Gathering cards. Since no one else builds with MtG cards, I'm already a winner. Hooray for shallow goals.
  2. Make the gold shutter covers for the sides open. Not "removable" where you pop them off and lose them during a convention. They must open and retract into the shield.
  3. Add loose sand. No cheating with painting the sand containers red. The sand containers must be spheres and cannot be cheap jello cups or colored gems.
With the project goals defined, time to shoot myself in the head with an AT4. Let's take a look at what I've uncovered during the course of making this.

Planning and Research

There's two principles of building this shield: Aesthetically or Accurately. Aesthetically being that with exception of the center gearbox, the shield's features are symmetrical. Accurately being the result of my research into the actual shield itself: as close to the anime concept/production art as possible. Interestingly, you cannot have both.


This particular screencap highlights asymmetry in the sand flow device. The green boxes highlight non-uniformity in the teardrop shapes. The red boxes show where the dimensions differ where the teardrops connect to the center. One can reasonably argue that this is due to the animator's decision to not bother making it perfectly symmetric since that would involve more work. Let's assume that this is a once-of error.


The line art/concept art for the shield. However, I've mirrored the half and shown it in green. Original is red. There's numerous dimensional differences. These differences also match what was in the screencap. I was led to believe that this was perhaps the result of sloppy source material resulting in sloppy details in animation.


I was about to do a "corrected" version of the shield, where everything is symmetrical. Other examples of the time shield did this, since it's easier to do and looks less odd. However, the final piece of evidence that led me to proceed with the asymmetrical design was the production notes sleeve. Brief glance, the cutout is symmetrical. Upon closer examination, there are subtle signs that the differences were intentional. It's a lot easier to replicate something that's symmetrical especially with computers. It takes more effort to make something not.

Construction

Compasses are useless. The compass lead is blunt and imprecise. It's easier to draw a circle by making two holes on a strip of paper (equaling the radius), pinning one end to the center, putting a pencil on the other hole, then looping around. It's also reliable since you don't need to adjust the compass each time for repeated passes. So much for buying a compass.

Building gears teeth-by-teeth by gluing each tooth equally spaced around a cylinder is tedious. Given the alternative of cutting each tooth around a circle, gluing teeth one-by-one is easier. Screw building gears ever again. At least they're decorative and don't need to bear loads.

My plans focused on making the shield shutters open using gears.  Worst idea ever. I do not want to cut gear teeth by hand with a knife. Archimedes did it, but I sure as hell don't want to. Did I abandon the effort to make the shutters open? Nope! After some math, I determined the dimensions to get a four bar linkage going that would open both shutter halves with a small 30 degree turn.

The plan is to have the two large rectangles attach to the shutters, then have them open up by rotating the center ring and bar. If it doesn't work, I can always just scrap it, build a static shield, and cry in a corner. My development tests have shown the concept can work; it's just a matter of not screwing it up.


Currently, here's where I'm at. The outer ridges were difficult to judge the height of, since the line art and screencaps don't give much depth about any features. I'll consider releasing plans if someone really wants them.

More progress whenever it comes. Let's hope I succeed. 50 sheep tokens are resting on this.


Sunday, July 17, 2011

Finishing A Horse

Nearly three months after initiating building the first components for the horse, and nearly five months after deciding to build this, I've reached the end. Last time on the Vortex'o'suck, I had finished the entirety of the horse's neck, with means to conceal the largest gaps resulting from neck articulation. All the pre-planning and well-documented work ended there. Now it's time to throw that all away and free-hand everything. Why? Because I have no plan from here on out!

With the neck mechanism built, I can figure out the envelope for the chest cavity to conceal the sections. This involved cutting away the chest cavity and replacing the scaffolding with some nice solid walls. Most of the thin strips of cardstock will remain to keep the structure, but thin areas like the chest were removed entirely. They have served their purpose.

Using an old technique of "build a pinata", by gluing strips of paper until a hollow shell is formed, I completed the chest cavity that houses the neck assembly and hides the gaps. This technique will be used for the rest of the horse from here on out, and was the single cause for the delay in completing the horse, since it's an unexact method and tedious to do. 

 The upper assembly required a new cover. I peeled the previously built scaffolding away and formed a new cover. I opted for a double layer of card to ensure structural stiffness and to conceal join seams on the other side by hiding them between two layers.

 Here is the new cover, with the old scaffolding in place over it. The fore legs have been fleshed out with 110lb cardstock internally, and a single layer of magic card over it.

Building all the leg cover plates was annoying. I could wrap the entire body around with a layer of card like I did with the camel, but there were some sections that it wasn't feasible with due to the hinges. So, I decided to go with sets of mirrored cover plates to reduce the number of unique parts and to allow for somewhat easy assembly.
   
Once the wireframe support was constructed, more pinata building was in order. The opening on the side of the rear leg was added to account for the supports holding the rear legs in place. The rear leg assembly itself was a balance of form and function, as I could either go for a structural column between the legs, or remove it entirely and let the legs complete the shape themselves.

Some trimming later, and I built a dividing column for the rear legs. Some pillars were added to maintain strength, even though there should be zero interaction in the direction of the plates during normal operation. Figured it's a better option to do this now than deal with depressions in the card face later.

 With the rear structure completed and the front skin done, it was time to make the rest of the body. First off, I ended up breaking my personal rule of not using lands for construction. You can see the outer shell made of some swamps. They came in some free intro packs and I was actually dwindling on chaff cards. Not like anyone's going to care if I use some Tenth Edition swamps. People already assume I'm using lands anyways. I need to save the most horrible of cards for other projects. The skin was reinforced in some areas with two or three layers of card. Damage was a concern, and repair would be difficult. I am keeping the templates for all the free-handed sections in the event I need to redo sections, but I'm hoping I won't need to. 

 After assembling the last remaining parts of the horse, I added a tail (which I had never made provisions for in the first place) by putting two twisted strands of black electrical wire flanked by some black wig hair. I probably need more hair. The wire's there so I can attempt to put the tail in dynamic poses, which so far doesn't work.

 Adding all the skin and remaining sections used up a total of 69 cards. With the previous sum of 246 cards, I'm slightly over the original budget with 315 cards. Still not bad. Is it worth building a 1:6 scale horse out of cards? Totally not. I'd recommend buying an artist's reference model if you want it as a reference, and I'd recommend buying a professional made one for $99-300 that isn't made of flammables and cellulose. Although neither of those lets you have silly poses with 1:6 scale figures.

If you're interested in the plans for the horse, drop a comment or send a message. Otherwise, I won't bother posting them. They need some clean up anyways.

Monday, July 04, 2011

This Weekend's Project: 1:6 Scale Violin

This weekend's side project is severely lacking in the explosives department.

Tried my hand at #2 in Stringed Instruments Series, a Violin. The guitar was a fast project, and quite fun to do. This project however, was anything but quick, and mildly annoying to develop.

A quick search for violins yielded a blurry resized image of professional violin plans. The image was about the size I needed, and mildly blurry that I could still read it. After some resizing and quick drafting of some plans, I formed the basis of my violin body, in the same way I built the guitar.

This looks nice and simple, with tape holding the frame to the template, but the image lies! Taping a 5mm wide strip of Magic card and trying to get those pointed parts right was painful. Took a lot of time to get the laminations to stay in place while the rest of the frame dried.
 
Making the two faces was interesting as well. A violin has a contoured front and back, whereas the guitar I could slap on a solid face and call it a day. I took the contour map, made a model of it, then used it to form the pattern for my violin. Both sides differed in curvature, so I got to do this twice. Went through a good amount of cards trying to get the shape right.

After forming the sheet for the face, it was a good time to start cutting out the F-holes. Cutting them after being fully assembled would prevent me from cleaning up the other side of the holes. Unfortunately, the size of a violin prevents me from strategically placing the card back in interesting ways on the sides. What you see now will be obscured by clutter and will look less interesting.


Building the neck was much more difficult than the guitar. Here's a side view of how the inside was constructed. A hollow curve for the scroll, and lots of cobbled together laminations for the neck support. Peg holes were made using a 1/16" bit on a hand drill, same as with the guitar.


The main issue was trying to get the scroll shape, while keeping the side profile as a single card.I chose the more elegant route than the quick and dirty route of rolling up paper or shaving down the face to achieve the effect. It's a barely noticeable effect, especially at a distance, but I like knowing that it's there.

Stringing the violin was the same as the guitar. Stick white sewing thread into holes, stretch, wrap around pegs, repeat multiple times. I toyed with the idea of making the pegs capable of tightening the strings, then decided that was the stupidest idea ever. I jammed some knots into the pegbox and retained them with paper clips, then called it a night.

I have never played the violin. I can only guess that the chin rest is there to prevent your facial acne from creating a circular spot on the violin from contacting it for hours. Decided to try to make it removable for the sake of being able to. Worked out fine by using a bent paper clip anchored to a 4-card stack. The chin rest gets held in place as well by the spike I rammed into the tailpiece to hold it in place. I figured since there's some metal thing holding it in a real violin, I can jam one in mine to prevent mine from flying off after a slight nudge.

The bow used a large paper clip to provide support. I had underestimated the size of a violin bow. I always thought they'd be shorter than the violin. Seems like some are longer than the violin themselves. I opted for a 4/4 size violin and bow, so it's quite monstrous. The bow just uses paper to thicken the paper clip, and to provide an attachment point for the two bits that hold the string. Gluing them directly to a metal paper clip would have been ineffective and utterly silly. I ended up painting it with gloss black enamel and spraying it with a coat of clear gloss coat. Will that hold up against rough use? No idea!

I ended up using about six cards worth of material for this project, but ate up about 4 cards in development. Most of the parts were leftovers from the horse. This project helped deal with the pile of small scrap cards sitting on my desk, which is always nice as large projects yield a lot of semi-usable scrap.

Friday, June 24, 2011

More Horse Progress

There's slow progress for the horse. Just haven't had much of an incentive to get it going farther than it currently is.

In order to determine how the neck sections will be concealed, I started developing the frame for the horse's body and skin. Since it's going to be hollow, I've experimented with a more lightweight means of making the skin than the old method of piling on 110lb cardstock tubes until the shape gets fleshed out. The method involves making use of the tube framework that holds the body together, and adding depth gauges all along key points, then connecting them together with two thickness strips of 110lb cardstock. The resulting model looks like a wireframe outline of the desired shape, and presumably uses less material. It's a lot more fragile, but that's where the depth gauges come in to support the skin. The MtG skin should be thick enough to support itself once curved and glued.

Building the body requires the legs to be somewhat fleshed out as well. Tubes have been glued over the screws to provide access points. They're all outside the horse this time instead of the cosmetically better looking underside/inner side of the horse. I'll probably be tightening them often, so it's probably for the best. The screw assemblies compose of a countersink bolt, spring washer, two washers and a nut. The nut is held in place inside the center of the tubes by strips 2.5 Magic cards thick, 2mm wide, forming a hexagonal housing to prevent nut rotation. These will be later plugged with a 110lb cardstock core so the nut doesn't travel axially, fully restricting the degrees of freedom. If this wasn't added, tightening the bolts would be tedious and difficult since there's nothing to hold the nuts in place.

Since I've opted for the neck to bend downwards, I need to conceal the gaps that result. Rather than make a giant rotating joint that resembles a LEGO horse, I chose to go a more difficult route.

With the neck region and movement limits defined, I could figure out how much gap I needed to cover. At full upright, the neck has a large exposed gap at the bottom and a small gap at the top. The system has a static upper region, and a dynamic lower region.


At mid position, the edge of the upper triangular shaped cover piece lines up with the edge of the neck opening. The lower cover sinks inwards into the chest cavity, assisted by a set of hinges.

The neck further bends downwards 22 degrees to allow the head to reach the ground to do grazing poses. This does cause another gap in the upper region of the neck, which needs to be addressed. The lower cover dips downwards and inwards to provide clearance for the neck assembly. The purpose for this mechanism is to allow for a curved and molded shape to fill in the gap. Due to the nature of how I designed the neck base to bend in two sections with hard stops to prevent overtravel, a static section was not feasible. I needed something that would move to allow for clearance of the second neck joint that connected the accordion structure to the body.


The neck assembly, removed for detail, shows the general layout. A notched portion inside the lower cover prevents the cover from falling out the gap when the neck is fully upright. It acts as a hard stop around one of the structural tubes inside the body.

 
Here, the two hinges required to create the movement needed for the lower cover are visible. The hinge base also serves to strengthen the neck base against buckling. Also visible are the wire assemblies that hold the neck sections in place and limit rotation. The yellow wire section has less stiffness than the middle and lower portions. The assembly was too stiff with all three supports being made of stranded wire.

 So right now, the horse has a semi-finalized neck and the rough outline for the body. Remaining tasks involve stiffening the rear legs and fleshing out the rest of the body. I'll also need to adjust the center of mass, as it's currently front heavy due to all the neck structures.

Sunday, May 22, 2011

This Week's Project:: Conduit and Cards

With the head completed, I can judge how much mass I'll be dealing with for the head. The neck is identical in concept to those wooden art horse models that you may have seen: three cables threaded through multiple cutaway sections. It allows for the neck to bend in all sorts of fun directions while resembling a a knife rack. I opted to go with this design over any others since there's not much else that works and looks any better. Also, it works, period.

I split the neck into 20 minor sections composed of 5mm thick sections, and one large 30mm long section. From my understanding, the three bones near the head don't have much movement and the head will likely block the movement when angled down, so there's no point adding articulation that won't be utilized. I originally thought of making the sections 10mm thick, but it would look terrible and have poor movement.

Each section is composed of four cards thickness, so they're stiff enough for shape but not entirely rigid as an eight card thick layer. They taper from 30mm wide x 55mm long to 38mm wide x 80mm long. Approximately 10 stacks were used, so 40 cards total. The neck pivot required its own special assembly, which took 3 stacks, or 12 cards.

In order to get the neck to retain a pose, I selected some conduit that I happened to have lying around. Why do I have conduit lying around, you ask? Who doesn't have conduit lying around, I say! It's one of the fundamental building tools for paper modeling, next to sheet metal and and epoxy. Anyone who says otherwise still uses glue sticks and 100% post consumer content paper to make model La Pietàs. I originally chose three bundles, but that proved difficult to bend. The top and bottom rows need to slide within the 3.175mm diameter holes I made, and the conduit was just enough to not allow for smooth movement. For now, I made the center wire a conduit bundle, and opted for a twisted pair of two regular 20 gauge electrical wires for the top and bottom. I'll probably add a third after some more testing.

 The head-neck assembly will be done with a hinge, secured by a nut and bolt. I needed to make an assembly to interface with the hollow head, so I made a partial bucket shaped thing and glued it to the hinge top. Not much to say about my lack of planning here, except that it worked out fine. 

The head adapter fits inside the hollow head. I had to modify the head to allow for the adapter to fit in properly. That meant reducing material in the front of the neck and about 10mm from the back, shaped to adapt to the curvature of the adapter and neck. There's some part of the adapter still showing, but that will be trimmed to fit. 

 Here's the inside of the head. Looks a bit more professional than sanded Hand of Emrakuls bonded together with printer paper.

To attach the neck to the body, I used another 4 card stack to make a mounting plate. Right now, I jammed in the conduit end and it's being held in place by that alone. I'll need to make some stabilizer structures to keep it from wobbling. I'll also need a more permanent and sturdy means of providing neck articulation for the top and bottom wires. For now, the neck can do some decent poses, but can't do a straight extend. The weight tends to make it curve.


 Total costs so far: 124 cards on the neck assembly + 122 cards on the head and body= 246 cards. It's looking unlikely that I'll hit the under 300 mark with the remaining parts left. Then again, a smaller scale horse still costs more than the equivalent of 300 commons. If I increase my budget to 400 cards, it'll be about $100 at the rate of $0.25 a common (or $40 at $0.10 a common), which is still better than what they'd fetch if I tried to sell someone a stack of Kurgadons or Ingenious Thiefs.

Thursday, May 19, 2011

I Have Chunks of Hands of Emrakul Everywhere

 I'm finally at a stage where I can put a meaningful post on progress. Work has been started on the horse's head, since there's no point building something with the body of a horse and the head that resembles a pile of mutilated Centaur Veterans.After some load testing on a mock up neck mechanism, I decided that the best option is to reduce as much weight as possible and go for a hollow head. A solid one would be too massive to support using wire bundles. Since I plan on having the skin be the backing of Magic: the Gathering cards, I'll need to make it without carving out details. Papercraft to the rescue!

 I could be progressive and use modern methods like drawing a terrible rendition of a horse using Sketchup and importing it into Pepakura, then turning it into a paper model. That method's not very fun. I'll go at it the more archaic way that uses simultaneously less and more effort.We'll be making the head using a casting!

Starting off with a base of LEGO bricks, I form the rough shape of the head, so I don't have to expend extra resources shaping a mock up horse head.

 After some quick work piling on kneaded eraser, I end up with half a horse's head. Just a half, since it's symmetrical and I can mirror the pattern for the other half.

We bust out the stripchart thermal paper and form a mold. Why stripchart thermal paper? I have rolls of it from work and no stripchart to use them in. The step is just like making a papier-mâché mask: layer strips of paper and glue it together over the object in question with reckless abandon to actual sculpting skill. The shape still needs to be close to the original sculpt, otherwise the next step is worthless. The goal is to make a thin shell of the original. 

With the shell removed off the kneaded eraser sculpt, you'll have the negative to cut and flatten to form a template. The trick is to understand how paper behaves and where the folds would likely happen. It's like peeling an orange and keeping the peel in one part. Useless for the majority of you, since you won't be making castings with playing cards. This technique is going to be the core of all the horse's construction from here on out. The resulting template gets tested out on cardstock before the final build with actual cards.

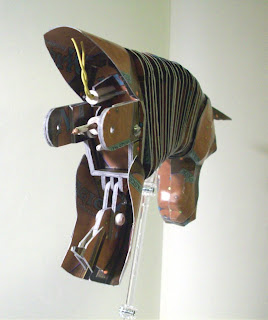
Behold, a horse's head, made out of Hand of Emrakuls. There's still slivers of them near the base. Took me five of them and a Predator's Strike to form a head, or a converted mana cost of 47! They were quite playable in retrospect, but I hate Timmy creatures.

I'm mildly happy with the results. I achieved the goal of forming a hollow horse's head. Just need to form a mount for the rest of the structure. Total costs incurred so far: 122 (6 cards used on the head) Now for some fun with a hollow horse's head, non-Godfather style.

I am Heavy Weapons Horse!

Heavy Weapons Horse is hungry!

I'm almost finished with the neck mechanism. Hopefully, by the weekend, I'll have attached the head to the neck. Or I may end up stabbing horses in Mount and Blade.

Sunday, May 01, 2011

This Month's Project: Horse Legs

 Been about a two months since I decided to build a horse. After much time of not trying, I made some progress. I've finished drafting up plans for the legs and am happy with the overall status. No point posting plans since you will never want to build these. I also still have no plans for the neck and head so far.

The leg system is largely unchanged from other endeavors: 16 card thick hinge pieces with screws.I should be using larger fasteners, but I still have a good stockpile of parts remaining. Only difference is the overall larger size of each component, and less modular nature. What you see here is a sense of how many cards were destroyed to build the horse's legs. Quite a bit this time. A set of forelegs and hind legs used 22 sheets of 4 card stacks, for a total of 88 cards. Already close to my original arbitrary goal of 300 cards. I ruined one part due to drawing errors, adding eight more cards to development costs. Sixteen cards were used to build the templates, with four being scrapped. That brings up the total expenditure (including the four used in development two months ago) to 116 cards used. In case there's any doubters that I am not using basic lands, and am, in fact, using crap commons, here's some of the templates used to build the legs:

 Good old crappy Ice Age. Seems that I accumulated a stack of oddly glossier Ice Age cards. I never liked them due to their odd finish that ruined and came off easier than the regular coat and used them for templates. Turns out that they were sort of uncommon in print run, but nothing worth celebrating about. A glossy Pyknite is still useless.

I spent some time figuring out the leg range of motion for each part using various photos and references. I'm probably off by a good margin, but I have the general movement mapped out. If you're interested, you're better off buying a book on horse anatomy (which I didn't), or studying one properly (which I didn't). My measurements aren't the most reliable. 

The most important parts of the project are the legs, neck, head and, for a lack of a better term, chassis. Everything else will be freehanded like the camel, and skinned with a coat of card, hopefully. Right now, it's going to be a horse made of scaffolding. 

This is where the horse currently stands. The joints can be tightened enough to allow me to do this, and hopefully retain this pose with additional weight from the rest of the horse's body. As a test of joint strength, I added some test mass to the neck region to give a good estimate on what to expect. What better to simulate the mass of 60 more magic cards than someone made of about 60 Magic cards?

Hotaru proved that the hinges need a lot of tightening. I could stack the Heavy on the front and provide a more rigorous test. I had some difficulty keeping the rear legs angled correctly with just Hotaru, and it will be trickier once there's more mass to work with. I'll have to readjust the center of mass once I develop the head, much like the camel. 

It'll probably be a while before I figure out the neck and head components. Until now, it's a glorified barricade horse. I now have a good idea of how crazy of a size this thing is going to be, fully built.