Thursday, October 30, 2008

Heavy Lessons in Paint Quality

There is a law to keep in mind when selecting paints. The stronger the fumes it gives off, the more awesome the color/quality of paint it is. Flat grey? Practically odorless. But copper? Smells strong, makes you have headaches, and comes with a warning label regarding carcinogenic effects! We all know the dangerous stuff is the fun stuff in life.

Well, anyways, the Heavy action figure is now finished, somewhat. Still missing some minor details, but the general details are there. The ammo links on his vest are now done. I used Testors Enamel paint. Copper for the bullet casings, yellow for the tips, and a mix of tan and rubber for the circular depressions on the belt. What mix? It's called "wing it". Probably more tan than rubber.
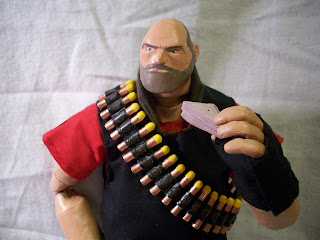
Well, after about two months of not really trying, here we are. Time for a cost analysis.

Sculpey for head: $3
Fabric (pants, vest, shirt, $1 apiece): $3
Epoxy for the hands: $17
Aluminum foil for the hands: $3 new, $0 if stolen from your kitchen
Paints ($10 for acrylics, ~$7 for enamels)
Cardstock: $~$6-7 a pack, new
Magic: The Gathering cards (about 10 used): $3.99 (one booster pack), $0 if "resourcefully liberated" from your friends
Soldiers of the World figure: ($5 on sale/clearance, $25 retail)
Saw (for cutting the figure): $15
Plumber's epoxy (regluing the figure): $4
Velcro: $2 ($0 if salvaged from the base figure's clothes)
Glue: $4 (elmer's and/or Loctite)

Total cost from scratch: ~$100 (wow, this was more than I was expecting)
My actual cost: ~$52 (many materials were shared with other projects)

So far, this was the first "real" custom job I've done. Not just a simple head swap, but actually modifying the base structure to get something distinctly different. Along with the fact that it's my first fat guy figure, I'm pleased with the fact that it's not horribly bad. Probably will never make another one of these ever again, but then again, I said the same thing about Hotaru.

Tuesday, October 28, 2008

Molded Versus Sewn Gloves

One of the most important choices for making the Heavy doll/figure was whether to mold his gloves onto his fists or to sew actual gloves for him. Molding them on is considerably simpler and faster, but sewing gives it a better appearance but takes much longer. I ended up choosing to sew gloves for the heavy, partly to hide his wrist joints. They're less ugly when they're covered by the gloves, and it also helps cover the semi-poor paint job I did.

Using the same method described to make the Heavy's clothes, I layered paper over his fists and created a template for his gloves. Hotaru holds one of two patterns needed to achieve the glove. Note the rectangular hole for the glove back. I planned on making the glove velcro together, since I don't have a good stretchy fabric to do the gloves with. Small issue, but better than nothing. The gloves don't cover all of his hands, which also helped the decision to sew them together. The fingerless glove allows me to take a shortcut and not sew holes for each individual finger. If I had molded his hands better and had better sewing control, I'd consider doing that.

Anyways, now for some shots to celebrate the near completion of the Heavy.


This really makes me notice how thin and pale Hotaru is compared to the Heavy. Not going to change anything though. She'll be filling in the role of the minigun until I get around to that.

Tuesday, October 21, 2008

Heavy Construction Documentation, Part 3

This week's installment of Making Fat People, I make clothes! I find clothes for large people annoying. They're only good for that one guy who wears that size while the rest can only use them as tents. Anyways, time to delve into the process of making a vest. For the confused, I already made the shirt and pants by modifying and enlarging existing clothes stripped off of the soldiers. The following process can be applied to other strange and unique forms of clothing. At least in theory.

First, I take some thermal printing paper (that was all that was handy at the time) and start taping strips over the body until I get the shape and form of the clothes I want to make. You'll (as if you'll actually try this) need to get the shape pretty accurate at least on one side of the outfit/clothing if it's symmetrical, and both sides if not. Use scissors and masking tape liberally.

Next, I turn the paper clothing into a pattern. We do this by cutting the clothing off the model along planned seam lines. How do you determine these lines? Shoulders and below the armpit make good places to cut, as they have seams going along those regions in your own clothes. You'll then have (hopefully) some pieces of paper that when put together will have the shape of your desired clothing item. Cutting them to get them to lay flat may be an issue, but nothing sewing can't take care of. The next step is making any symmetrical pieces symmetrical (by folding over the line of symmetry and trimming) and getting any other details taken care of now.

Then it's tracing time! Trace each part onto another sheet of paper. Add about 5-8mm of border to your parts for seam allowance. Cut the now widened parts and trace them onto fabric. You may use a fabric marker, or you can do it the bootleg way with a BIC pen or white Crayola colored pencil! I presume you don't care for sewing, so pass it off to someone who can and you'll get this:

The last items to handle are the little details. First, I'll "document" the ammo belt links the Heavy wears. I used 1/8" dia bamboo skewers wrapped in a 4cm long length of 110lb cardstock, trimmed down to 2.5cm long rods. Confused yet? I made 36-38 of these small rods, then sanded one end down to a round tip. Why 38? Guesstimation. Should have made 40, actually.

Taking a 1cm wide length of 110lb cardstock, I glued each bullet to the strip, curving the paper around each bullet and leaving 3mm of separation between rounds. This was kept uniform by the thickness of my tweezers I used to hold the links together.

After a lot of unhappy gluing action, you get the following belt of ammo!

This is the current state of the Heavy. I'm still debating molding or sewing gloves, and I'm probably going to need better paint for his arms. It's easily chipping off. I'm hoping Testors makes enamel paints that have flesh tone. That stuff doesn't chip as easily and dries on a bit more uniformly. The belt and ammo pouch are made of black construction paper. Probably should have documented making those, but those were too quick and relatively simple in my eyes to warrant documentation.

Now, to get gloves, paint, and the minigun!

Sunday, October 12, 2008

This Weekend's Project: The Incredible Hulking Heavy

Epoxy is heavy stuff. So is cardstock. Surprisingly, crumpled aluminum foil isn't. Combine them together, and you get something durable and thick.
In this stage of construction, I've covered the cardstock and Magic cards with a somewhat thin layer of Kneadatite modeling epoxy, of a thickness of around a millimeter or less. To smooth the arms out, I used a bit more to create rounded elements for the elbow and shoulder region. The epoxy is a darker green than depicted, with the lighter elements being the result of sanding it down smooth. Well, not smooth as I'd like, but better than lumpy.

The sanding allows me to see which regions are uneven and need more epoxy. Sanding it down allows the primer to go on better, which is important since I doubt my paints can cover the hideous shade of green. There was a lot of hacking away the aluminum foil for the hands to get it to the right shape, and I'll be hacking more off this week to get the desired range of motion.

Buying small packs of sculpey is better than buying the giant box at this stage. For $2, you get enough to sculpt a head, and the rest can be easily squandered by making accessories. The box initially was reasonable considering the amount of heads I needed to sculpt, but the poor storage conditions negated prolonged usefulness. I unfortunately found some cracks during baking, but I can easily solve that by hiding it with paint. Nothing too severe. However, 4 non-consecutive hours of baking at 275F did not darken the sculpey as much as I'd like it to be, signifying the rock solid state. I'll paint it once I get the arms done, if ever.

Checklist for what needs to be done:
  • Shirt
  • Vest
  • Belt and ammo pouch
  • Gloves
  • Ammo link belt
  • Sasha, the minigun
I'd easily get it done if I wasn't a lazy bum with the arms.

Wednesday, October 08, 2008

Progress Update: The Long and Heavy Road

Time for a bit of backlogged progress notes. I kept these progress images unpublished since I figured I might actually fail at making the Heavy, leaving me with a lot of disappointment and wasted documentation. It's now looking very feasible after doing a few revisions, so I figured it's a good time to show you the progress behind making the Team Fortress Heavy Weapons Guy action figure.

First off, I used this very misleading but useful poster sold at Valve's site as a basis for figuring out how the body was laid out. Naturally, nothing really matched the body structure of a Soldiers of the World figure. Hands were too small, arms and legs of different lengths and girths, and the massive gut. Naturally, I used the tried and true method of tracing the profile images off my LCD (don't try this at home kids, unless you're crazy!) to get reference sketches.

Here's the base figure, with masking tape to cordon off the regions to be sawed off with a hobby saw. You can see the shins, thighs and chest marked off.

The Heavy was planned to be 34 cm tall, 4 cm taller than the base figure. Since I was shortening the legs by about a centimeter or so, I needed to extend the chest by 5 cm in height. Wondering how to do that?

Well, it's Magic!

Here's the first attempt to flesh out the chest. I do say "first" as I redid it properly the second time to correct shape and design flaws. The Heavy's neck is not straight like the other characters, but angled forwards. I estimated it to be at a 30 degree slope from the floor, with the Heavy standing straight. For these older images, it's a really ugly hack job.

Speaking of hack jobs, here's the arms being made. I used tape to mark off boundaries to assist manual saw cutting. Dremel users can probably do this in seconds. Us who like using Amish methods will have to deal. The white tube is the core from thermal printer paper rolls. Why? I had a case of them at work that was going to be thrown out anyways. Now they're my modeling fodder.

Here is the first revision of the Heavy body. Glaring problems with this model:
  • No waist or protruding gut.
  • No transition from the waist to the crotch. Left a sharp edge.
  • Neck at improper angle
Note: I've deleted the previous posts regarding Heavy Progress to mesh better with chronological documentation. Gripes and complaints from said posts will be abridged and retained for your reading dis/pleasure.

Build Revision 2
There was a long lull between Heavy revisions. I bought epoxy from ebay, which took 2 weeks to arrive due to a week long delay before it was mailed out.

I still hold my resentment and hatred of Gamer's Workshop for selling overpriced things, hence refused to waste my gas money to find out where to properly buy epoxy and get it myself than wait for a really slow ebay seller. GRIPE OVER. Epoxy came the day after my gripe, so back to work.

You can see the new gradual transition from the crotch to the chest, and the thicker wrists. The wrists are hollow underneath the Magic card, supported by the ends with rolled up strips of 110lb cardstock. The shape was redone with small 110lb cardstock tubes underneath and Magic cards to form a stiffer outer shell. This photo shows the new angled neck position, with the chest slightly misaligned off center. That has been redone.

Saturday, October 04, 2008

This Weekend's Project: Handiwork

Less whining about epoxy, more using the epoxy. Finally got around to working on the hands. Mainly because my sculpey has dried solid. Well, to minimize epoxy volume, I decided to go with the traditional wire armature with aluminum foil approach.


There's the hands over the crude sketches of the wire length dimensions.


Hand after a bit of fleshing out with aluminum foil. I used the epoxy to hold it to the pre-existing hand. Now, to do that, I had to modify the hand a bit, since the fingers were smaller and in the way. Fortunately, there's many devices on my desk that can get the job done...

Scissors are overrated. Jamming things into moving machinery is for MEN!


Here's the current state of the Heavy. Hands are roughly done, waiting for the epoxy to cure before I attempt to add more volume. Loctite works wonders holding the foil down as I add more layers. I'm sure there's a technique for adding foil over wire, but I'm certainly not using it. I'm rolling it over the wire fingers right now, and randomly folding the end over miscellaneous regions. The end result is a few laminations of foil coming off slightly every few places.

Hopefully, this project will reach a nice end.