Wednesday, March 25, 2009

Motto of the Month: "Plenty more where that came from"

Making armor is quite an interesting experience. It's not much different from making sewing patterns by taping swaths of paper together until you get the right shape. The end result just ends up being solid. The main issue is getting it all to work properly when you have all the plates together. I'm still working on having the armor hold together and what fasteners to use.

Unfortunately, I've had a lot of "reject" parts due to warping, improper lamination, and just out of testing. However, I've acquired a new batch of raw materials that made the process less about optimizing material cost and more about end result. First, let's see where we stand:

Right now, I have the chest plate, waist segments and hips structurally completed. I'm experimenting with the skirt plates and the arm sections. Nothing like using a lot of thermal paper and masking tape to complete my armor. Reminds me of my high school crafting days.

I've bought a sealed box of X-Men Trading Card Game cards for the sole (and silly) purpose of getting three cards from the set for my art collection. A real waste, but no one sells these cards individually since no one plays this trading card game. Luckily, Wizards of the Coast also made these cards, and the card quality is on par with Magic for raw materials. I'll be finding a use for this obscenely large volume of cardstock soon. How big of a volume?

This big.

Sadly, this represents about half my "chaff" reserve. I have in total, something that looks like five to seven times this amount of cards that I can consider "expendable".

Sunday, March 15, 2009

This Weekend's Project: Two Pointy Heads

I've always hated three parts of the doll making process:
  1. Joint cap covers for the screws
  2. Making the ball joints work
  3. Making the head
The head's a pain to do since you want it to look nice, and it gives the final product its character. I've gotten extra picky with how the head went this time, since I'm trying to go for something similar to an established character design. I went through three tries before settling on one I liked. As usual, I settled on the old Ruri template although I now have newer alternatives. (Note: the old headmaking post is now out of date. This will update the newer techniques.)

After tracing the template onto some Muck Rats, I sanded the pieces down lightly to remove the shiny varnish. Each part was then assembled by placing printer paper strips on the inner side. I did the face as one single part, and the back of the head as two parts: upper and lower. This time, I was zealous with the pre-sanding to remove the rough edges. I covered the seams with more printer paper strips and sanded those down by hand. I found that coating the paper with a thin layer of glue before sanding with a Dremel also gets nice results, as the paper holds its integrity better.

Here are some of the development stages. From the left: First iteration, deemed too pointy and narrow; Second iteration, deemed too fat and odd shaped; test build from Moekami's newer models, deemed unusable due to extra pointy elements; Third iteration, the final build.

The difference from the first two iterations is the addition of extra mass to round out the head. This was done with layering 110lb cardstock over the regions needed to bulk up and carefully grinding them down with a Dremel. Printer paper works well for concealing small blemishes and smoothing out transitions made too rough with the Dremel. The third time, I got something I liked.

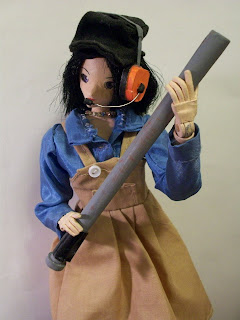
I didn't succeed in finding a hair donor in time. Therefore, Aelia has short white cardstock hair for the time being. They're quite pointy. I opted for a different hair technique than the first iterations of hair. Her eyebrows are actually Magic: the Gathering cards. Decided to try glue-on eyebrows this time. Aelia suffers from the problem of always looking unhappy when you look down on her. Then again, you'd be too.

This is the reason why this revision was called Aelia. I'm actually going to attempt to make her as Aelia from Valkyrie Profile, the green armored polearm wielding character. This, is her spearhead, which consumed about 6 MtG cards. There's a lot of details that I tried my best to capture. A Dremel was used to grind out the rough shapes and curves, and the little grooves were hand cut with an X-Acto knife. The curved coil consists of four strips of Magic card, 5mm wide. The strength of the coil has yet to be tested. It should be noted that Aelia's spear in the concept art has the coil unsupported from end to end, so it is a very unstable means of attaching the spearhead to the shaft. It would likely flex and have a higher chance of breaking, as it will behave like a spring than a solid shaft.

The shaft consists of two bamboo sticks linked together at the second hand hold to provide an overall shaft length of 28cm. The grip regions are rolls of 110lb cardstock. I'll be adding details to the individual sections once I've figured out the spearhead.

Unfortunately, the bamboo sticks aren't perfectly straight. Not that you can tell easily.

Aelia's body isn't the delicate, thin frame used for Hotaru and Lia, but the more stocky build BBI's doll has. It's still compatible with all the existing elements made for Hotaru. I'll have to field test her joint stiffness over the next month to see if the new joint construction methods and layout can support the added mass and the usual fatigue and wear.

Tuesday, March 10, 2009

Celebrating March 10: Japanese "Gundams With Flying Claws Day"

In the pursuit of new and interesting forms of mechanical joints, I've acquired two more Gundam kits: Blitz and Aegis Gundams. Blitz comes courtesy from a good friend of mine, and Aegis comes from my own shopping whims. Both showed me that I really suck at removing plastic parts from the sprue.

Here's Blitz with Airmaster, my first Gundam. What I noticed first was Blitz' lack of posable fingers. Airmaster had them to hold his guns, and I liked them very much. I was expecting all 1/100 scales to have moving fingers. I like gimmicky models a lot, hence why I chose Airmaster for its flight transformation mode. Blitz' gimmick is his flying claw.

The claw's quite a nice design, and integrates electrical wire to serve as the posable cable. It even comes with its own personal claw stand, which I'd have preferred to be clear instead of cadet blue.

And well, here's Aegis, in a not so mecha form. I like this "protoss dragoon" mode more than how it's supposed to be posed, like a flying claw. The one drawback of Aegis is the inability to put him on a Gundam Action Base. Since we have two Gundams with claw like modes, why not put them to use?

Sunday, March 08, 2009

This Weekend's Project: Fleshing Out A Skeleton

Well, another week, another update. This week, I've spent a good deal of time inhaling more tasty airborne carcinogens to flesh out Aelia. Right now, she's missing proper feet, her rest of her head, and elbow covers. For the time being, rather than show off her incomplete scalp, I've dug up an antiquated hair model from long ago, and surprisingly, it fits. She has an odd appearance to her face that I need to identify, rectify and execute. I think it's the wide eyes making her look like she's scared of Hotaru and her newly stolen bat.

I actually need to redo the bat. It's quite off in shape and it's covered with red marks for when I was testing the scout's BONK! action button by hitting a dispenser repeatedly.

Aelia's sporting the Shenhua hairdo I made two years ago back when I was attempting to make Shenhua. Back heavy and impractical, it's all I have to offer her until I find a proper transplant donor for hair. I had issues with her head sculpt this week, so I decided to complete her face to see how she looks near complete. A blank head's also undeniably creepy looking, especially one with empty eye sockets.

Rather than make this post completely devoid of content from the farce of a "show and tell" it started off as, here's something useful. Here's the construction progress of the hands. I've actually never properly documented it.

The process uses regular thin electrical wire of some unknown gage with 25mm x 30mm strips of printer paper rolled around them to form the fingers. A 6x6x8mm 4 walled box connects the fingers to the stub. I trimmed the fingers down to a max length of 25mm counting the root, which gives about 20mm of protruding finger to work with. I layered some 110 lb cardstock over certain portions to flesh it out, and carved them down with a Dremel. Cheating, but it yields a nice shape unattainable with just folding and cutting. I may have to update everyone's hands to this newer design.

Monday, March 02, 2009

Celebrate March 1, National "Build Something With A Converted Mana Cost Of 143 Or Less" Day

March marks the start of great headway into my third foray into Magic: the Dolls. I've said before, that I'll likely never build another of these again. I said that after building Hotaru. Then there was Lia. I said that again, and now we have the start of Aelia. Aelia is a development project to correct one major flaw withe Hotaru base (Lia shares the Hotaru framework, and belongs into her revision), which is a bad shoulder connection. The main issue isn't tightness of fit, but more of reassembly. The pins tend to hit the walls of the internal structure that hold the shoulder pins in place, rather than slide in smoothly. This causes irreparable wear.

Aelia is structurally compatible and nearly identical to Hotaru's frame, save one difference: a 6mm diameter tube serves as the common shoulder connector than a specialized box-like housing. I've, for the sake of variety, made Aelia 12mm shorter.

All possible range of motion has been copied and refined with this revision. This time through, I'm going to document a few more neglected components along with the significant change with the upper torso.
This is the framework behind Aelia's revision. With the Dremel, I can now afford to save massive amounts of time by using just tubes to form structure. Tubes are massively simpler and faster to produce than a flat 3D solid, which involves designing, accounting for material thickness, and lots of assembly. A tubular approach cuts down development time. However, the Dremel causes the drawback of generating plumes of Magic: the Carcinogenic Dust. The lower component on the spool of thread is the bottom part of the upper torso which receives the ball joint connector. The three tubes assembled on the plate have been ground down to have a 4mm radiused groove to accept the new connector.

This is a shot of the bare skeletal system, devoid of any features except joint systems. I haven't many images of the minimum, since I tend to quickly progress from stage to stage. I was originally debating making a fourth doll, to be in a perpetual state of incompleteness for a demonstration model, but that plan's currently suspended until further notice.

Critical points of interest: the upper torso is made of 8mm OD, 6mm ID tubing, formed by rolling a MtG card around a 5.7mm dia rod to ensure consistency. The neck is angled 60 degrees from the horizontal. Loc-tite glue is great for widening the diameters of pin connections and ball joints, but care needs to be exercised to allow parts to cure before doing a test fit. Internal wall tearing caused by wet glue means a scrapped part, as the tearing will worsen over time.