Showing posts with label gundam. Show all posts

Sunday, March 04, 2012

Kshatriya + Obitsu Stands = Fun

 I recently purchased a 1/144 HGUC Kshatriya from the Gundam Unicorn series. One of the comments I've seen floating around is that there's no means provided to display all 24 of the funnels. It's a shame, as you can't have the full glory of Kshatriya annihilating enemies with an overabundance of laser spam. All I've seen people do with their kits is pose them in the usual flight config with an Action Base, or standing on a table. Nothing with the funnels. How hard could it be to display them all?


A while back, I had bought three Obitsu Multi Purpose Clear Stands to try out. I was quite pleased with their performance. I had recently bought three more because they were that awesome. This is my 6th and last unassembled stand that I was saving up until now. Where are we going with this? We'll find out!

 I discovered something about the funnel's attachment point to the wing binders and the shape of the Obitsu grabbing claw tips: they snugly fit with each other without modifications. Each stand comes with two grabbing claws. Theoretically, each stand can hold four funnels. I already have six Obitsu stands. Worked out better than I expected.
 
With some fiddling with the arrangement, you can finally have your Kshatriya with all funnels fully deployed. Too bad I have nothing that requires 24 funnels to kill. I did come across another problem that this configuration brings: I don't have 24 beam effects of the same color. Per the series, all the beams are green. Kshatriya comes with two beam sabers, which provides... two beam effects. Still 22 short. Luckily, like a pack rat, I kept the runners.
 
The best I could do was to cut up the runner to form two additional beam parts. 

Using the stand itself to support the beam, and the tip of the funnel itself, you can get mid-shot effects with some mounting tack. I sure don't have more stands to hold up these beams by themselves, and this method worked out quite well.

 Can you say, "screwed"? 

This was the first instance I had where I used every single type of stand I owned to do a single photo: six Obitsu Stands, one MMS stand (for the Zephyrantes), and an Action Base. This setup also takes up an ungodly amount of room to display, which is a shame since I'd like to keep this display on my shelf. It does need more beam effects though.

For a low budget method, you can just use black/white electrical wire and mount the funnels to the tips. Although, you'd need to fashion some weights to hold them down. The cost of six Obitsu stands is practically the cost of Kshatriya itself, so I wouldn't suggest anyone to go out and buy them just for this purpose. Although I don't think any Gunpla builder would have these stands to begin with.

Monday, February 20, 2012

Alternate Weapon Ideas For A Strike Rouge

Still fiddling with Gundam kits at the moment. I had recently bought the Strike Rouge and Skygrasper/Aile Striker set. A month or so later, I finally completed it in a state that I'd consider "partially acceptable". There's plenty of reviews about the kit, so I'll spare you the crappy assault of "build progress" photos and "poseability" photos demonstrating how the articulation works. This is the Vortex! Only useless information that no one wants will be shared here!

For the inquiring minds, the PG Strike (and presumably all other Perfect Grade kits) stand roughly 12" tall, which conveniently is the same scale as a 1:6 scale figure. Unfortunately, their hands are quite large and don't translate well to a 1:6 scale figure, and feel more like 1:5 scale hands in size. While off scale, this does provide an opportunity to all you PG Strike owners who want something more desirable in their arsenal than the included beam rifle, shield and shiny sword. What if you wanted to give your Strike Gundam something more... interesting?

Let's put on our thinking glasses and brainstorm! Where else could we find some crap to give our Gundam to use? Stuff that's roughly 1:6 scale, and would be used by a military fighting robot? 
 
 To the gun rack!

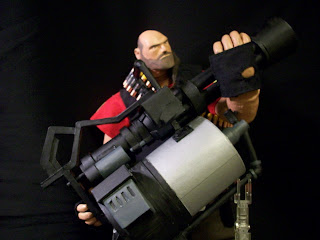
 Since the hands are a bit larger than 1:6 scale, the Strike is limited in gun options. Guns like the M-4/M-16 with small thin grips are almost out of the question. Even if you happen to have one that sort of works, the fingers tend to overhang the trigger guard, so you end up like the Heavy Weapons guy holding... practically anything other than the minigun. My solution was to cup the grip with just the fingers, and that placed the trigger finger around the right area so it doesn't look oversized.

Guns with a stock work well, as the grip occupies more space in the hand, allowing you to use the thumb more. So if you want to give your Strike some 1:6 scale guns, stuff like hunting rifles, shotguns and the like work well. Pistol grip weapons, not so much. I'm certain that a MK23 or a desert eagle would fit nicely. A Tokarev... not so well. I also tried out the MGL, and that didn't work. The fingers just didn't want to work with it.

Now, what about heavy weapons?

The Strike's hands seem to fit a Dragon Browning M2HB quite well. All four fingers fit around the rear handles and the thumbs are close enough for the trigger. However, the main issue with giving your Strike the M2HB is that you really need to put your Strike in a trench. It can do some prone poses, but not enough to make the M2 work without putting the gun a little higher. Not quite a satisfactory addition. It's acceptable if you wanted to make a support gunner out of your Strike. 


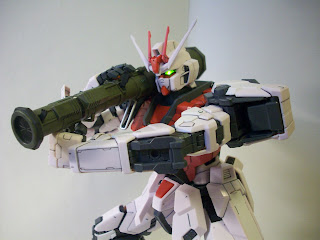
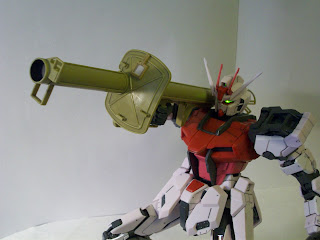
After a long while, I finally found a use for my ZACCA bazookas. They look great on the Strike Rouge, and the size fits nicely. However, there's a significant problem with giving 1:6 scale bazookas to a PG Gundam, and that's related to how their hands work. They don't have enough wrist articulation like you get out of most 1:6 scale human bodies. They're on ball joints, so you have a limited cone of range whereas human figures get wrists that can almost go 180 degrees. That makes most bazookas unsuitable for a Gundam.

I tried out most of the bazookas/rocket launchers I had and found a lot of not-at-all surprising results. I took photos of the ones that worked best.
 
Soldiers of the World/ZACCA M20A1: mediocre. Hands fit around the trigger perfectly, but the limited wrist motion prevents you from holding them correctly. Shoulder armor interferes with the shoulder rest, so you'll need to be creative with your poses.
 
ZACCA Panzerfaust 3: Great.  Nothing interferes, and there's enough range of motion to hold it properly. Can almost look down the scope as well.


ZACCA M136 AT-4: Great. Since you hold it with one hand on top, the oversize hands for the Strike work well. The front grip's easy to hold. The shoulder strap should be glued together on the AT-4, but otherwise a good addition to the Strike. It's one of the more elegant rocket launchers you could have in your collection.

 ZACCA Panzerschreck: Mediocre. You're going to have to hold this with one hand like the M20A1.  No chance in hell you can get the second hand to hold it in any decent manner. Looks great, but you just can't hold the thing. This is where a better wrist motion would help a lot.

Other notes:
I couldn't get the FIM-92, FIM-43 or the SA-18 to work due to the wrists. If you wanted a Strike Stinger combo, it'll look awkward. Don't even bother with panzerfausts. Other models from the ZACCA collection simply didn't work due to the shoulder armor interfering.

There's one outlet left for 1:6 scale weapons: Melee!

Let's say you felt the Grand Slam sword was a bit lacking, and the beam sabers were pretty dull. We can fix that with a Moonfire/Bloodberry! I did find that the fingers worked well to hold the hilts for my Bloodberry and Moonfire, but unfortunately the Moonfire's weight was too much for the fingers to handle. I had to play with the fingers to get them to clasp shut around the hilt. I could use some blue tack to attempt to hold the sword in place, but you will need to use quite a lot to hold it in place. Moonfire's the heaviest sword I have currently, almost twice the weight of the Grand Slam, and without hand pegs to hold it into place. The hands are capable of holding thin objects such as polearms, so it's feasible to have other swords (much like the Red Frame Astray) without relying on the hand peg.

It's convenient to know that a PG Strike can use about half of the possible 1:6 scale stuff on the market. The biggest problem is the wrists. I would recommend experimenting with other melee weapons than guns or rockets, as they offer the best results. Don't settle for energy blades when you can use a slab of metal to impale your foes.

Monday, February 06, 2012

Presenting the worst implausible plane ever

Decided to take a break and build stuff that doesn't require me busting out a slide rule and protractor. Picked up a Perfect Grade Strike Rouge and the accompanying Skygrasper. I had finished up watching Gundam Seed Destiny recently. That anime makes a good drinking game if you take a shot per every 5 minutes of re-used footage, and have a death wish. I actually don't care for the Strike Gundam much, but I read it was a very good example of a perfect grade model, and I need more puppets/test subjects.

I liked two things about the entire SEED series. The Moebius Zero, and the Skygrasper. Well, three if you count the pilot for both of these. The Moebius Zero model involves a lot of painting. Anything I paint looks five times worse than if I left it in primer, so that was out. What was left was the PG Skygrasper, which doesn't involve painting. Hooray! I decided to roll with that. And since it comes with a Aile Striker pack, I figured I'd get the Strike Rouge so the pack isn't worthless.

I found myself liking the Skygrasper less after examining how the model was designed, as a vehicle and as a model kit.

Landing Gear
This model does not offer any folding landing gear. There's actually NO space in the fuselage or engines to modify to fit the landing gear in. The space under the cockpit  has room for half the wheel diameters before touching the pilot's feet. If you were dreaming of modding this to have working landing gear, no luck buddy.

The front landing gear actually can't fold in even if wanted to. The canards and the region where I presume hardware exists to control them blocks the region where the wheels would fold into, and there's actually a panel that obstructs the wheels anyways. The panel lines don't even suggest that this panel moves. It has a protective flap to top it off. The front flap's existence is to solely allow you to get a fingernail under the landing gear cover to remove it.

The landing gear has four wheels, two on the front and one on each rear strut. The wheels are molded separately, and are attached by friction pegs. They do not freely spin at all. If this is the case, then why did they put a flat on the wheels? To stop the non-existent movement the wheels have from making the model not slide? Now you have to precisely orient the flat sides of the wheels on the ground, otherwise it looks odd. I guess it's to replicate a loaded tire?


The Main Cannon
Oh boy, do I hate this stupid cannon. How bad can it be, you ask?

This gun is a detriment to the plane in so many ways, it's not even funny. Actually, it is quite funny. First off, it's the size of something that should be mounted to the side of a battleship, and not a plane. Its so large, that if you turn it perpendicular to the fuselage, the profile of the gun would theoretically disrupt airflow to the tail fins and create control issues. The turret can spin around and easily smash the tail fins with the cannon barrel, so the tail fins are doubly worthless.

The best part about this cannon is the elevation. It can change the elevation to aim at targets in a fairly good cone. It's great for tracking targets. Its also great if you had a really bad day and wanted to kill yourself, as it can shoot into the cockpit. And the engines too, if you wanted to go out in a fireball.

I can also presume that the Skygrasper has no ejection seats.  If you consider that ejection involves shooting out the canopy first, you'll also need to eject the turret too, otherwise the seat will collide with the long barrel. Then again, pilot safety is low on a Gundam series' mechanical design department.

The turret is the only outlandish part of the design, and it would have been acceptable if the rest of the plane was designed in an absurd manner. I removed the turret and plan on replacing the hole with some sort of cover or fan or anything that isn't an obnoxiously large gun. I find that the plane looks much better without it. If I was so inclined, I'd cut away the turret ring and make it transition to the front fuselage better.

The Color Scheme
I just don't like the blue. It's too bright and not fitting for a military plane.  So despite my original plan, I decided to paint this. I chose to replace all the blue with "gunship grey" which turned out to be the same as "Bandai plastic grey". Whoops. Still looks better than an elementary student's coloring sheet. I did like the yellow though, so I kept it on the intakes. I would have kept it on the engine/gun pods, but I damaged those with a large fissure, and required painting to hide that.

I've finished my first attempt at painting over the blue, and have removed the turret. I think it looks a lot better.  Just need to detail the cockpit.

Anyways, enough about the plane. The kit comes with three pilot figures, which is weird since the plane is a two-seater. I've also never recalled two people being in one Skygrasper in the series.

Gundam Seed was a bit hazy. I recall the pilot's name for the Skygrasper starting with an "M". I did my best to paint him like I remembered how he appeared in the series. I think I was spot on.
 
And who can forget the scene where the Skygrasper pilot M-something docks with the experimental Mobile Pants, and riverdances over the enemy forces in a might of Celtic flurry.

I still have quite a bit of work to do on the Skygrasper before I'm happy with it. Once that's done, I'll have the Mobile Pants part to fix up. I think I can see where the next few months are (not) going.

Sunday, November 27, 2011

Mobile Suit Biker Sinanju

No new projects involving cards or guns. I did however finally buy something that I always wanted to have in my collection: a Master Grade MSN-06S Sinanju. Just liked the design and the color scheme. It'll make a good addition to my desk, having vacated some slots. Also, it'll finally make use of those Gundam Action Bases I've bought a while back.

No review of the kit here, since there's plenty around. I did end up breaking two parts during construction, and the fuel tank caps ruptured due to thermal expansion during painting with thinner. Had to make some repairs, but they're not noticeable. I haven't gotten around to the decals yet. Waiting for my topcoat to arrive first. In case you're interested, I opted to hand paint all the gold after painting the parts black. No stickers or water slide decals were used, nor will they be used. Going to build this with the default stuff they give me.

I found that the kit was larger than I was expecting, and the scale was a tad under 1:6. I could make Sinanju hold some 1:6 scale weapons to some extent. I did have something lying around that was much better than a 1:6 scale weapon. Something that fit perfectly.

Lego Technic set 8422! Managed to finally get some more use out of it. Color scheme matches somewhat as well. I'm rather fond of this motorcycle's styling and overall design. I could get one of the newer mototcycles, but none of them have the same appeal as this one.


Agile in space, and on the ground.

 I also had the time to buy some more Obitsu stands. Somewhat wobbly for trying to do a wheelie pose.

Unfortunately, Sinanju doesn't quite fit on Fenrir. The color scheme didn't fit anyways. At least now I can have mounted combat. 

Tuesday, August 31, 2010

J.Norad Refuses to Pay A Man in Singapore $3 For Ammo

After an hour wasted looking for 1:6 scale shotgun shells to buy for cheap, I was pretty disappointed. eBay did turn up some listings for 12 shells for $3. $0.33 per shell. I'm not going to pay $3 and wait two weeks for something that I can have now for fairly little cost. So I decided to attempt to see if it's possible to build my own shotgun shells.


Initial development tests used printer paper rolls to achieve the proper thickness. The resultant product deformed significantly to be used, and wasn't replicable by the average person. Subsequent attempts using whittled bamboo sticks with paper rolls produced good results, but subpar capability to reproduce the results.

The goal then became to provide a consistent means of producing a 1:6 scale shotgun shell that YOU, the reader, could feasibly do in the comfort of your own desk, given the same tools I have. You probably have better things to do than make your own bullets, but it's always good to know you can save a bit of money for other things. Like more guns.

Using an existing Dragon shotgun shell as a model, I measured the dimensions and found that I'd need a 7.5mm long 3mm diameter cylindrical rod, and a 3.175mm diameter end cap about 0.5mm thick with a minor depression in the center. Those dimensions are mighty convenient... A 1/8" hole punch on two Magic: the Gathering cards glued together gets me the end cap dimensions. As for the 3mm diameter rods, I happen to know the perfect source!

GUNDAM runners. I ended up keeping my runners from my Airmaster, Aegis and Blitz Gundam kits. I got a few more from the Obitsu Multi Purpose Clear Stands I bought. They both have diameters of 3mm for the runners. Excellent. And there's also runners that come in red! There's enough runner from one kit (or in this case, one Obitsu stand) to just cut down the smooth sections and ignore the sprues and gates. You only need 7.5mm of material and there's enough material to make about 40 rounds or more. I chose to smooth out the runners to form relatively smooth clear plastic rods, sand them lightly, then trim them down using a Dremel. A saw or knife works fine, but Dremel's for the impatient builder. Can't be bothered waiting 2 weeks, nor 5 minutes of sawing. Got to have my results in 3 seconds.

I found the tip of my beadmaker's pliers had the right diameter to make an indentation into the card face for the primer. You'll need something about 1mm in diameter. Press hard into the card face and you'll leave a minor depression. Use a 1/8" hole punch to punch out the disk and set that aside.

With your 7.5mm long rod sections, use some non-Elmer's glue like Loc-Tite to secure the disk to the end of the rod. The diameters shouldn't be flush, to simulate the rimmed edge of a shotgun shell. Lightly apply a coat of glue over the rim to thicken and seal the card edge. Your shells are almost done. On the other side, you can use a 1/16" drill tip to bore a small hole into the other end to simulate the packaged end.

 Here's a photo of the completed shotgun shells on the left, and Dragon's shotgun shells on the right. Not quite the same, especially with the primer. It's only an issue if you really scrutinize the details up close. Far away, it's sufficient to work with for dioramas or piles of spent casings.

 The front tips don't match very well, but comparing the results with other shells I've seen, a simple small 1/16" hole in the front is acceptable. My shells rather glow due to a lack of primer on the clear rods I used. They rather resemble red gummy bears right now. As a proof of concept, I think the results are acceptable. In terms of effort spent compared to just buying pre-made ones with more detail, if you're going to just toss them around, it's worth it. You won't need the extra little detail in your photos unless you plan on taking up-close images of piles of ammo.

Tuesday, March 10, 2009

Celebrating March 10: Japanese "Gundams With Flying Claws Day"

In the pursuit of new and interesting forms of mechanical joints, I've acquired two more Gundam kits: Blitz and Aegis Gundams. Blitz comes courtesy from a good friend of mine, and Aegis comes from my own shopping whims. Both showed me that I really suck at removing plastic parts from the sprue.

Here's Blitz with Airmaster, my first Gundam. What I noticed first was Blitz' lack of posable fingers. Airmaster had them to hold his guns, and I liked them very much. I was expecting all 1/100 scales to have moving fingers. I like gimmicky models a lot, hence why I chose Airmaster for its flight transformation mode. Blitz' gimmick is his flying claw.

The claw's quite a nice design, and integrates electrical wire to serve as the posable cable. It even comes with its own personal claw stand, which I'd have preferred to be clear instead of cadet blue.

And well, here's Aegis, in a not so mecha form. I like this "protoss dragoon" mode more than how it's supposed to be posed, like a flying claw. The one drawback of Aegis is the inability to put him on a Gundam Action Base. Since we have two Gundams with claw like modes, why not put them to use?

Sunday, December 14, 2008

This Weekend's Project: Building a Gundam Airmaster

This weekend was spent exploring the world of GUNDAM models. I selected the GUNDAM Airmaster for the experiment due to the interesting premise of an alternate aircraft mode. Some basic facts:

Model made by BanDai in 1996, High Grade (which means not made of crap, but still worth a decent week of fun)
1/100 scale (which means 18 cm tall)
Cost: $24.99 at local toy shop (base, no paints or panel markers)
Uses rubber parts in the joint construction to assist posability
Snap together, no glue required
No paint required, comes with stickers (which are the coward's way out!)

Before I delve into my first experience making a GUNDAM model (by now, you might wonder why GUNDAM is all in caps. It's apparently an acronym that differs from each GUNDAM series and refers to the mechanical unit's military designation. Great Ubiquitous Narcoleptic Despot Achieving Mechanicalization. Geriatric Underwear Nicking Delinquents Assaulting Minors. You can take your pick.), I'll show the final result.

Well, "Final" is a tentative term, as I somewhat half-assed it so I could play with it. I'll redo and improve it later. The kit is designed for minimal after-assembly decoration (paint and the forbidden stickers, more on that in a second), with different colored plastics removing the need of painting individual parts the correct color. Perfect, as I paint like a drunken child with ADD. The only significant thing you need to do is decorate all the panel lines: all the black lines all over the model that you see/can't see. You can use specially designed GUNDAM markers to draw the lines, or you can do what I did and wash all the parts with thinned black enamel and let it seep into the cracks and wash off the excess. However, not doing that properly (like I did) leaves you with a dirty/weathered look or looking like a dirty 1980's toy. Not that it's a bad thing.

Now, about the stickers... I hate stickers. They look tacky, they're too shiny compared to the rest of the model, and I can never place them right. I'll always hate how they're slightly off, and they'll always peel off over time, making them terrible means of adding detail to something. Plus, they're not waterproof. I practically ignored the sticker sheet and decided to paint the details instead. You also can't access the panel lines using stickers, making your model look even more half-assed.

For scale, here's Hotaru with the Airmaster. There's a lot of moving parts on this model, but it unfortunately leaves the Airmaster top heavy. The knees are insufficient in preventing him from falling backwards, and his hips are not compatible with BanDai's GUNDAM Action Bases. I can't display the Mech or Aircraft mode in any dynamic action poses. Speaking of the Aircraft mode, this is the Airmaster's Aerial mode.

As you can see, I'm using a laboratory beaker as a display stand. Nothing I can really do about it. Aside from a few design flaws, it's a nice aircraft. The Airmaster's golden chest vents act as air scoops. I presume propulsion is from the rocket thrusters in his feet, and not from these random air vents angled upwards on his back. The legs get angled oddly in aircraft mode, which doesn't help the non-aerodynamic flow of the GUNDAM's boxy arms and stuff hanging off the side. Overall, the red trim helps make the model look a bit nicer.

For $24.99, it's an ok model. My friend tells me that more recent models come with endoskeletons for support, instead of using these rubber "polycaps" as they call it. It would greatly make this model from "ok" to "great" if the joints could hold better. It would be even better if there was a way to display it in aircraft mode at all.

If you ever come across this model, kindly do yourself a favor and pick something more recent. 1996 wasn't a kind year to the Airmaster. It certainly hasn't gotten better over time.

Tuesday, November 11, 2008

Meet the Heavy... and Sasha

Amidst all the fun and joy of destroying my hands and lungs making the minigun in one week, I didn't get any pics of the Heavy with the newly painted minigun. I now appreciate keeping this translucent runner I saved from these GUNDAM stands to use as a posing support. Speaking of which, I don't recall ever saying how awesome these things are.

First off, here's the product in question: an "Action Base" made by Ban Dai for displaying GUNDAMs in fun poses. ($9 at my local toy shop, probably $5 online) Why buy these if I have no GUNDAMs? For the ability to do things like this!


What a random sidetrack. Now back to the main purpose of today. Enjoy the Heavy Weapons Guy and his glory.


"We make good team!"
"All of you are babies!"
"Cry some more!"