Sunday, August 31, 2008

Weekend project: Engineering a Minigun

Decided now's a good time to get working on making a 1:6 scale TF2 minigun for the heavy weapons guy. Luckily, it's largely revolved objects. The minigun is composed of six barrels, mounted on some sort of flashlight looking object that is mounted on a giant drum. No idea how this thing is supposed to operate if it was real, but who cares! It's a nice and pretty model to make.
Here's a shot of the near completed main barrel for Sasha, the minigun. It's propped up on top of what I presume is the ammo drum. The two smaller rolls are for some inexplicable components that I'll have to sort out soon. The background sketches are the only two images I'm using so far to draft up parts. The rest are from screenshots. Right now, it's looking a bit small. Let's put something in frame to show the scale of the gun.


Here's a 28cm tall Engineer, with a ruler to illustrate how massive this thing is. Just the spinning barrel assembly is 30 cm long (yes, I allowed for rotation). I would have bothered showing construction progress of the barrel, but it's just rolling up tubes. Tedious work, and not too exciting blog fodder. I'll show some of the components broken down next.

The flashlight shaped object is the barrel spinning mechanism housing. The inconspicuously placed cylinder below the large ammo drum thing is the cap for the six barreled shaft. I currently have a separate, non-glued shaft spacer that's being used to hold the assembly together. Once the model's painted, I'll consider gluing it down.

Structurally, this thing is feasible. The sheer volume of paper consumed so far is quite incredible. The weight so far of the barrel itself nearly rivals the weight of a 1:6 doll. I estimate 16 sheets of cardstock used so far to construct the pictured components. While relatively lighter than plastic, it's still a large quantity. I expect the finished gun to be dragging along the ground, since no figure I currently possess will have any joint stiffness capable of holding it off the ground more than an instant. I'll see how much headway I'll get on Labor Day.

Friday, August 29, 2008

Desk Vignettes #2: No love for the Sniper

Experimenting with visual methods of showing emotion for figures. This week's experiment: hearts. Feel free to make up a story to go along with these pics.

Always a good tactic to bludgeon the Sniper while he's distracted with someone else.

Sunday, August 24, 2008

Celebrating August 24, "Build A Grenade Launcher Day"

Took about a few weeks to get around to it, but I've finally built the Demoman's grenade launcher. Not as involved as the flamethrower, but it was a lot of revolved objects. The center six grenade tubes are solid 110 lb cardstock rolls around 0.125mm dia bamboo skewers. That gives it a bit of heft to the overall weapon. Unfortunately, I opted not to allow the break open action of the grenade launcher for structural reasons. It would have made for a good, fun miniature accessory.

Anyways, to celebrate the near completion of six of the nine figures, time for a group shot. Here's the original group shot that I'm constantly using to get me motivated to complete the rest of the nine.
Now for the two-thirds compromise.

Given, I'll concede a few issues with my group. Still need to finish the Pyro boots, the Engineer's glove, some minor details on the Demoman pouch, and the really unfinished toolbox. I'm debating sewing a few more details for the Engineer's overalls as well. Not that anyone's going to really notice. No one notices that the Engineer's electrical cord on his belt loops twice and only has one end plug, or that the fact that the Pyro's tank doesn't do anything (it's not an oxygen tank, as it has a flammable sticker on the second smaller tank), or how any of the grenades attach to the belts.

Hopefully I'll get some nice, opaque yellow paint, electrical tape and finally finish the Engineer's glove and Pyro's boots.

Saturday, August 23, 2008

Experimenting with enamel paints

On the bright side of today, I've figured out the proper way of utilizing enamel paints. Always have primer unless you want the paint to run a bit. The glossy appearance of enamel has some interesting applications. Let's start off by demonstrating.

If you note the gloves, they have a shine to them. By using enamel paint, I have turned modeling epoxy and cardstock into what appears to be rubber gloves. The fun note is that the hands were rubber to start with, and I used epoxy to flesh them out thicker and provide a means for the paint to stick. A decent layer, about less than half a millimeter, of epoxy was applied at the fingertips. The key is to use water to keep your fingers from sticking to the epoxy, and to smooth out the epoxy after you apply it to minimize the sanding. Generous amounts of epoxy at the wrist limit the wrist to turning, but made the shape transition better to the glove. The gauntlet part of the glove was done by 110 cardstock cone frustums, 13mm OD to 23mm OD expander tube spanning 22mm long. I made the cardstock at least 2 layers thick to retain stiffness. After some light sanding, a moderately half-assed coat of primer went on, accompanied by a set of tan and black enamel.

As for the figure itself, I'll formally introduce the Pyro once I finish his boots.

Lessons Learned: So I know what not to do ever again...

Never buy acrylics without checking if they're "translucent".

Good two weeks wasted figuring out why primer wasn't helping this piece of shit paint stick any better. Going to go buy real paint and stop using this inferior stuff. No wonder why the hell yellow looked like piss when painting over light grey, let alone white. The engineer's glove is going to have to wait another week before being close to done.

I was wondering why the hell a darker color wasn't covering up a lighter color. That makes no sense.

Wednesday, August 20, 2008

Engineering Sketch/Schematic/Diagram overload time

Took a year, but I finally have bothered to make proper drawings of the core components that comprise Hotaru and Lia. Actually, they've been documented as of June when I was building Lia, but I've now gotten around to scanning them. A grand total of five (5) sheets of A4 paper cover the arm and leg joint systems, the chest, waist and hip assemblies with their respective joint mechanisms. As a bonus, I've thrown in some other development sketches.

I've divided the drawings into two groups separated by project, then again by schematics and sketches. Unless specified in the drawings, construction material tends to be 110 lb cardstock. Parts were assembled with regular Elmer's Glue and painted with acrylics.

1:6 Scale Obitsu Replica

Schematics (drawings with dimensions and some exploded view diagrams. All part dimensions are in mm, but tolerances for joints are +/- 0.003 in, since I used a US caliper.)
Development Sketches (insights into the assembly and conceptual development)
Team Fortress 2 Weaponry and Other Junk (dimensions are all mm with a tolerance of +/-0.5)  
Edit(8/28/10): Added newer diagrams for completed projects and links to completed projects.
Other Projects

Now, with those out of the way, time for a few words on some of these drawings. The doll schematics cover 70% of the core structure. An additional 15% are supplemented by the following links:

Joining/constructing limb components (requires the mighty cube with 1/4" holes through it
Building the head
Construction progress image gallery(only documentation of how I made new feet)

That leaves out the fingers, hair, eyes, and to some degree, fleshing out the body.


For the Team Fortress 2 weapons, what you see is all I used in constructing the models. There are no additional drawings or sketches. I've freehanded the models to some extent, based on some simple guiding principles and construction techniques. There's a few elements that I used in game screens to assist in completing, such as the shoulder strap holder for the rocket launcher, and the LAM wire for the sniper rifle. These drawings were included in this post as an insight as to how my mind works and what level of planning I need to get a project going. I've added links to the completed projects and construction progress pages to show the hidden, undocumented steps. You'll probably get nowhere with just these TF2 weapon drawings without additional images.

Monday, August 18, 2008

Having some fun with red markers and a chestless guy

Did some experiments with the soldier body to find what's inside. I cut the front of the chest off to flatten it for the next feasible figure, and to plan out future heavy modifications. As expected, the body was hollow, and the chest rotation mechanism was located high up inside. I now have a good pile of plastic chunks that formerly composed the guy's chest. What does one do with a dude with an open chest cavity, the shards of said chest cavity, and his natural state of headless victim? Why take these pictures of course!

FINISH HIM!

Direct hit!

"AAAAAAAAAAAAaaaaaaaauuuuuuughhhhhh!"
"Saw-ry!"

Now with that out of the way, here's some lessons learned that I'd like to record.
  1. Epoxy needs pre-smoothing or post sanding. Fingerprints are very noticeable.
  2. Primer needs a good solid coat color. Anything that shows a hint of the under layer's color is going to fail hard.
  3. No amount of layering yellow on semi effective primer will ever work.
  4. If you thinly apply epoxy onto rubber, you can paint it with acrylics! Take that, non-paintable rubber! And if you have semi-flexible modeling epoxy, you'll still have a somewhat bendable object!

Sunday, August 17, 2008

Making head-way engineering an Engineer head

I've been practically innundated with a single question on how I sculpt the heads for these Team Fortress 2 figures. Time to shed some light on what goes on during the 2-3 hour span a head sculpt gets done.

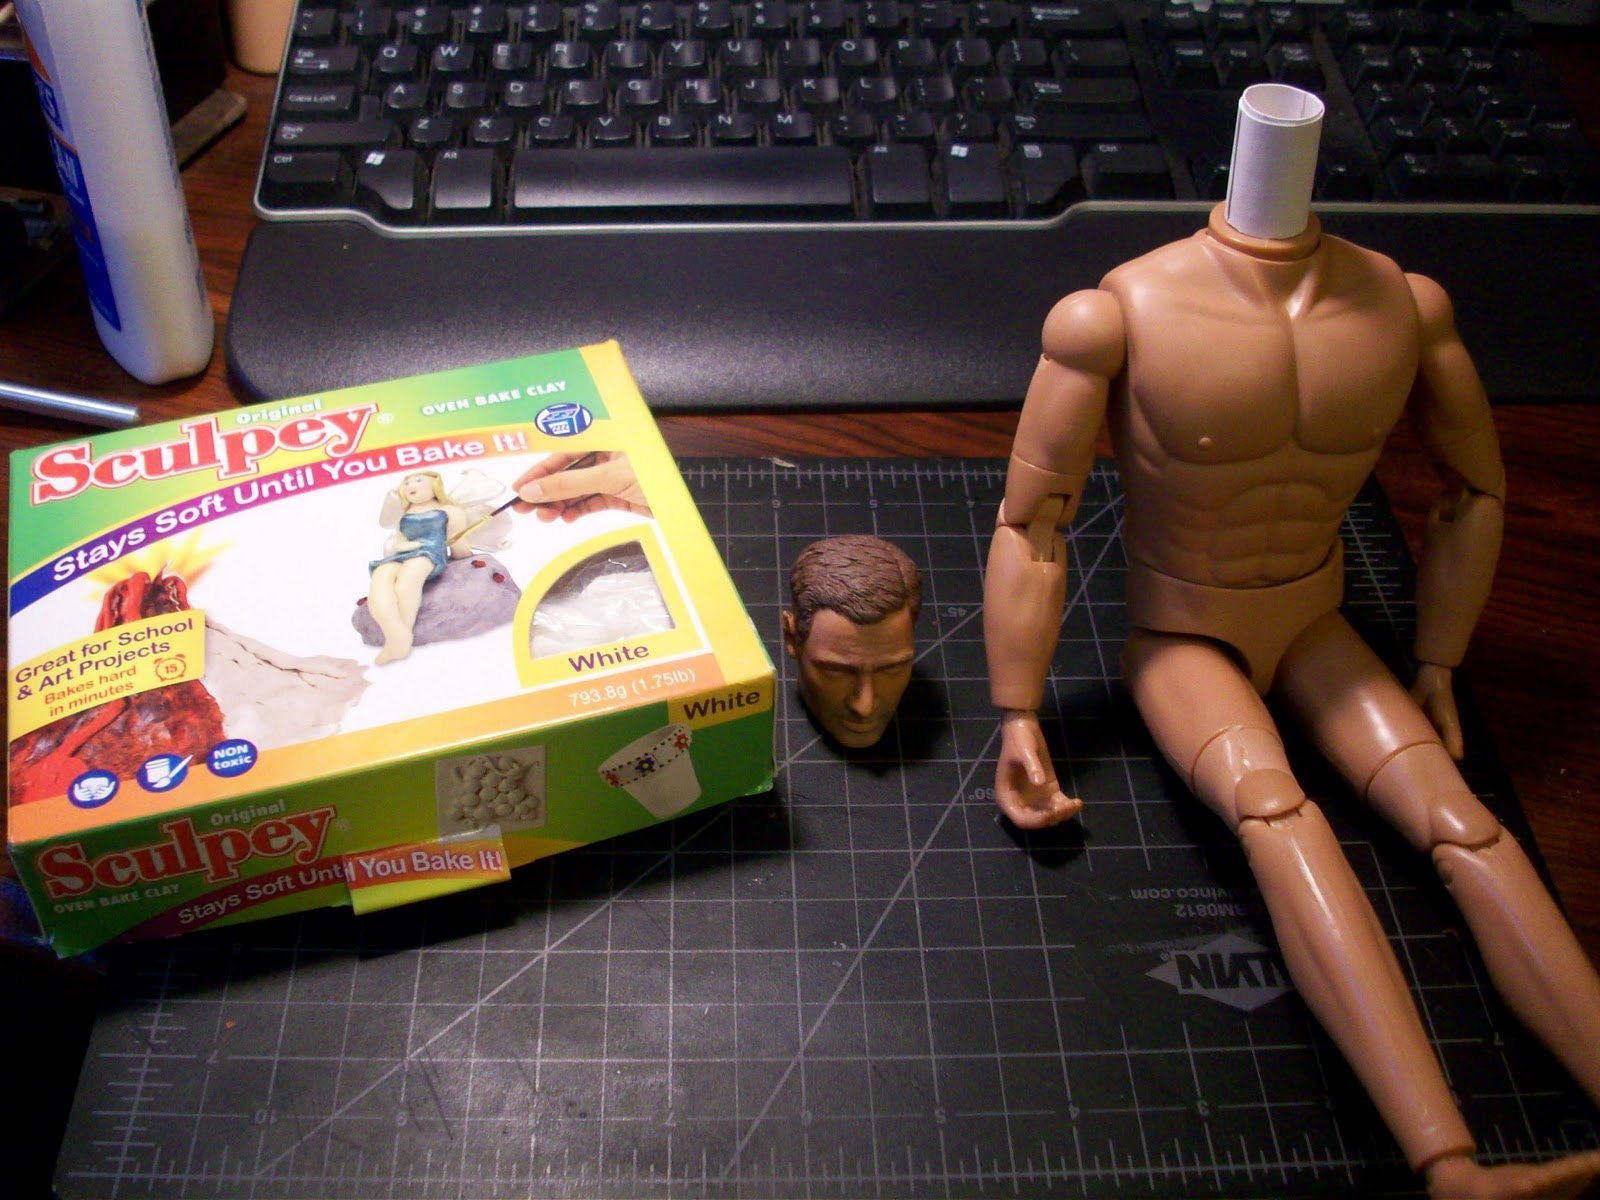
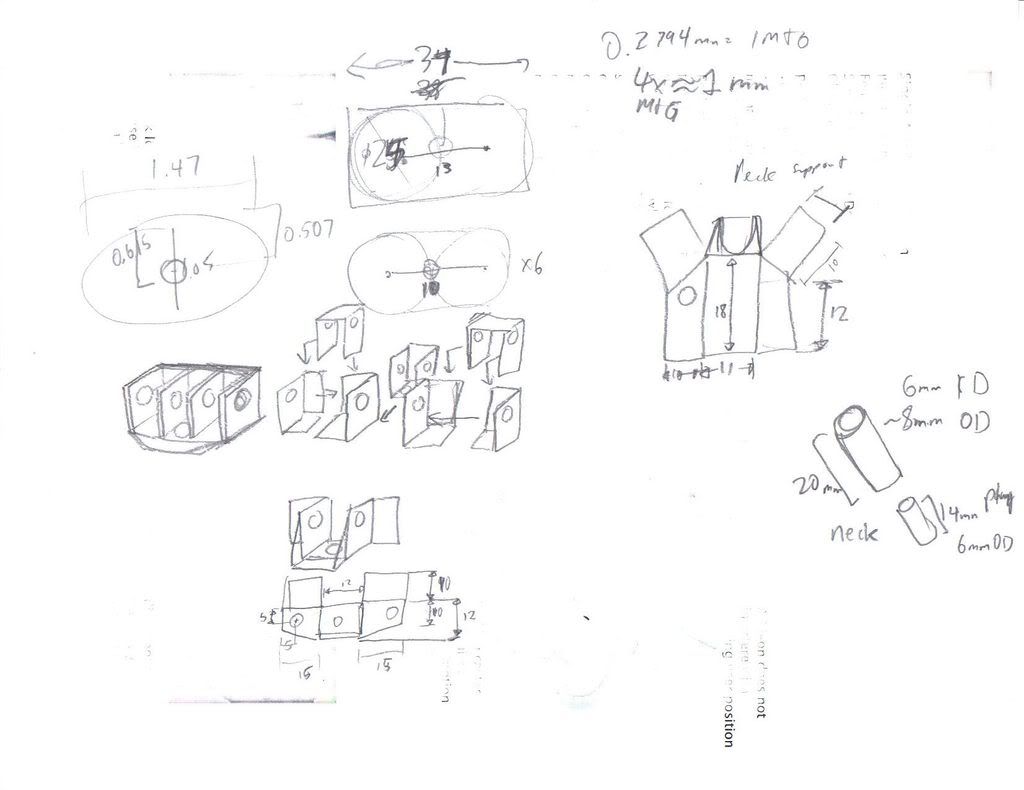
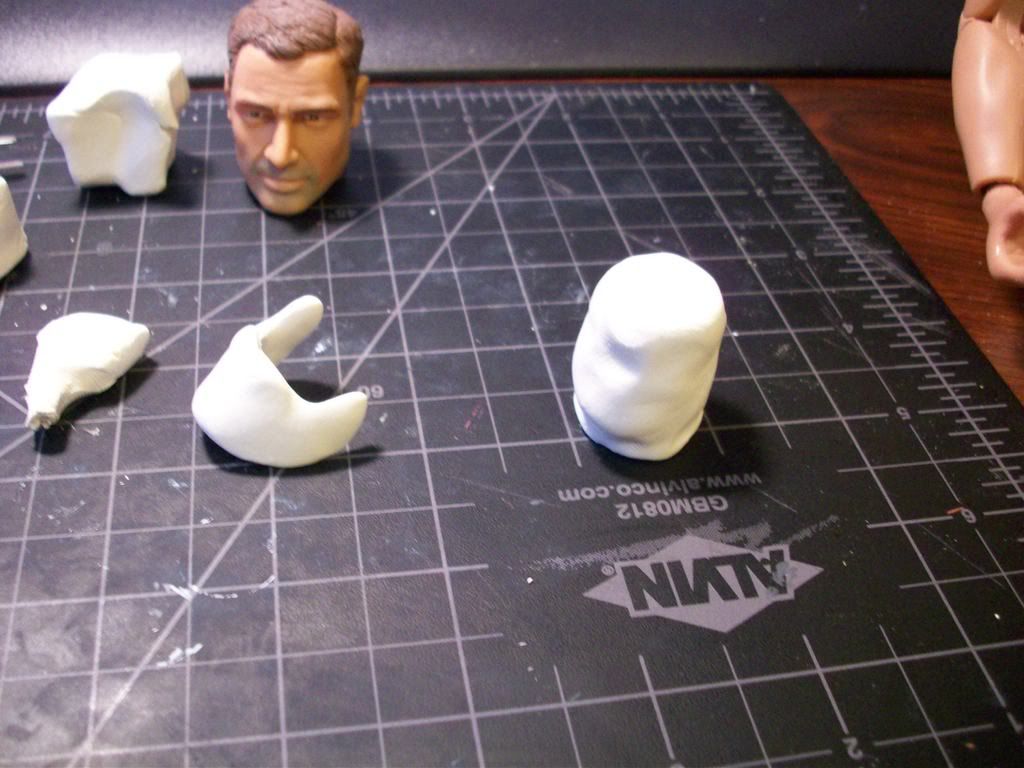
As usual, I start off with decapitating a doll. A 110 lb cardstock tube gets molded around the attachment point, serving as the base for the neck.


I put a coating of sculpey around and in the top of the cylinder. Sculpey doesn't stick to anything but sculpey, so I recommend using very lightly kneaded sculpey so it's still solid, or finding some means of making the cylinder sticky like mixing in another clay. On the left of the cylinder, there's a piece that has two prongs coming out the right. What I like to do next is make a jaw, and as you will see, that piece shapes out the side profile of the face.


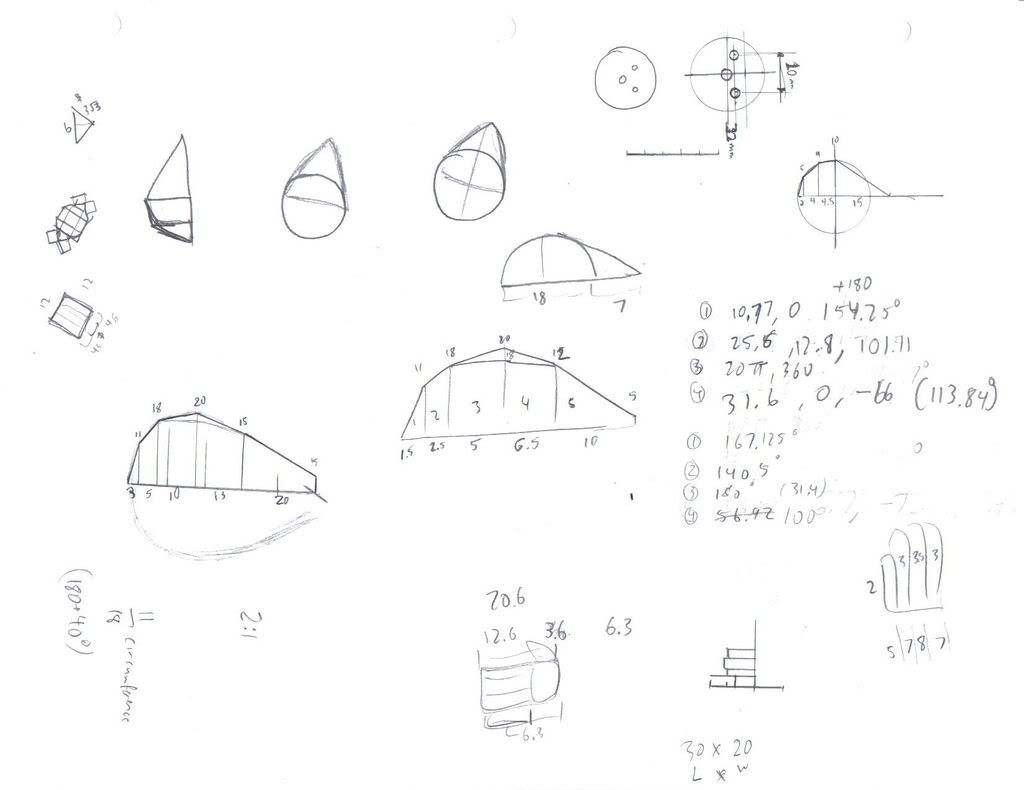
Using the former head as reference, I place some clay where the nose, eye sockets, eyebrows and ears will go. This helps determine spatially what I need to do. These heads are regular, so these landmarks will be valid for all human heads.


Now for the creepy stalker headshot gallery. Every sculptor needs a good set of views of what they're sculpting. I've added a general set of features to the face, including a line for the mouth and general eye sockets for locational purposes. I tend to play with the shape of the nose now, so I get a feel of where the rest of the facial features lie in relation to it.


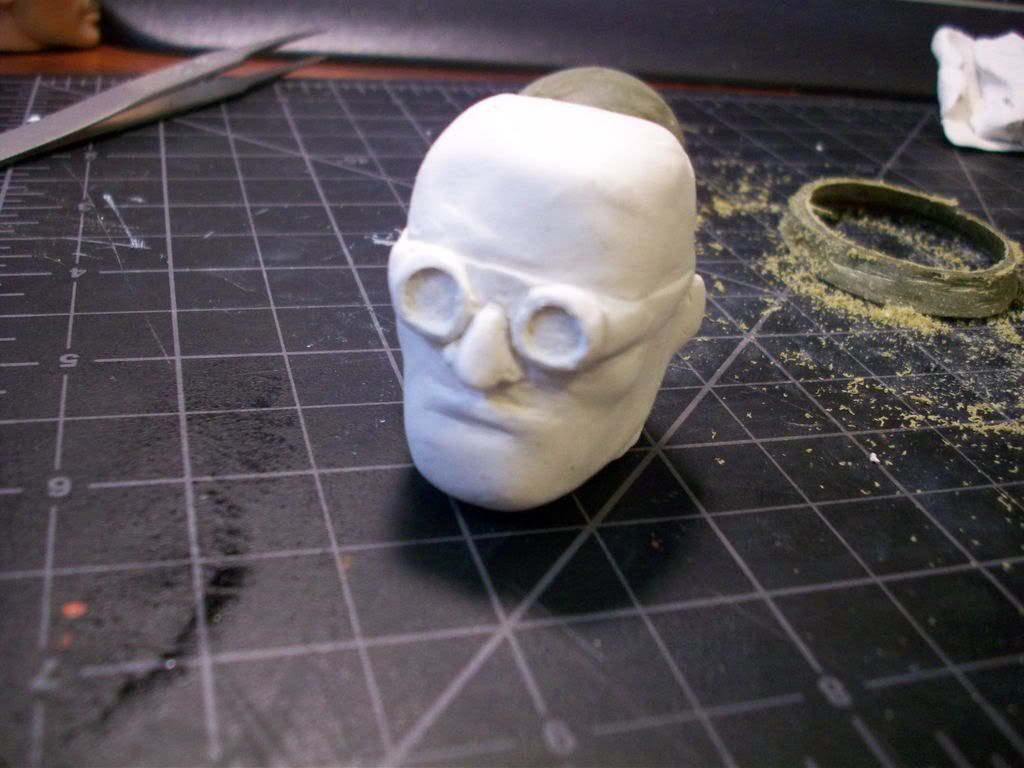
Here, I've added subtle depressions and elements to round out the face based on the headshot gallery. The chin, lips and cheekbones are taking shape now. Normally, I'd carve out a faint outline for the eyes, but the Engineer has goggles, making that wasted.


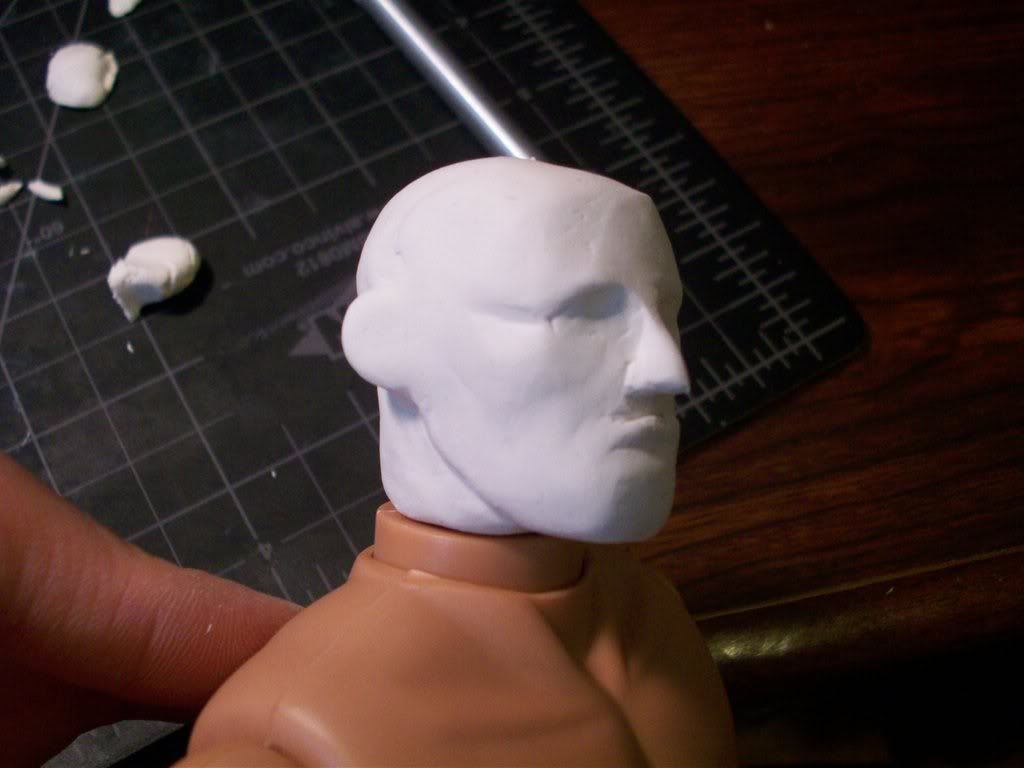
Bit more material and X-acto knife cutting, I reach this stage where the face has 70-80% of the features defined.


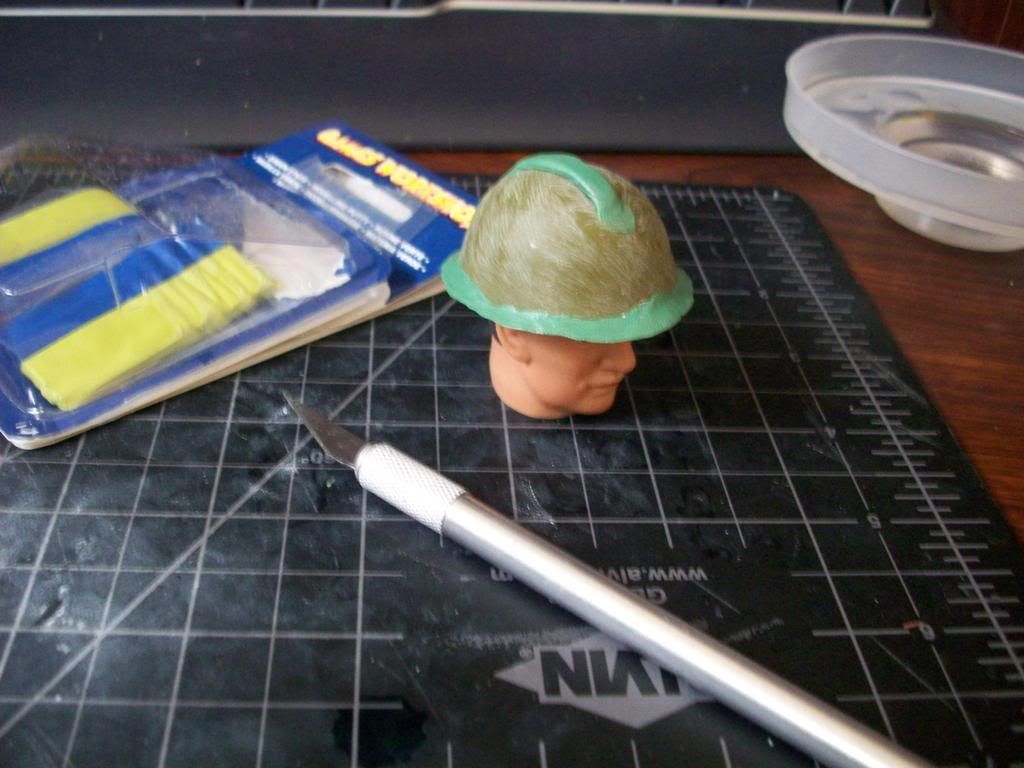
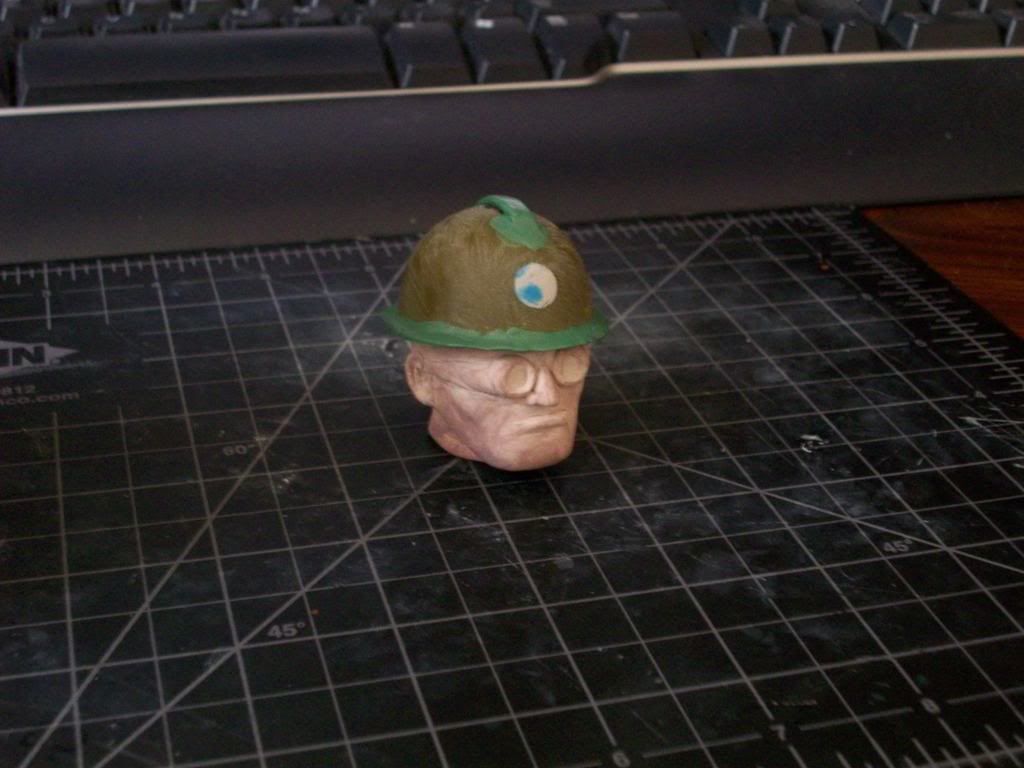
 Modding a regular soldier helmet to be an engineer hat. Soldier helmets are taller and therefore need some sawing. Now to make the helmet lip and top protrusion.


Overpriced Games Workshop epoxy ($8) is a bit flexible when dry and thinly applied, and sticks well. If not, there's always Loc-tite. The shop guy told me to keep my tools wet so the green stuff doesn't stick on them. I suggest having a cup of water nearby to wet your fingers.


A bit of baking in the oven for 2 hours at 275 degrees Fahrenheit. Note the reddish color. That's a sign of the sculpey being solid. Really good and solid sculpey would look real red, not this half-assed pink I settled for.

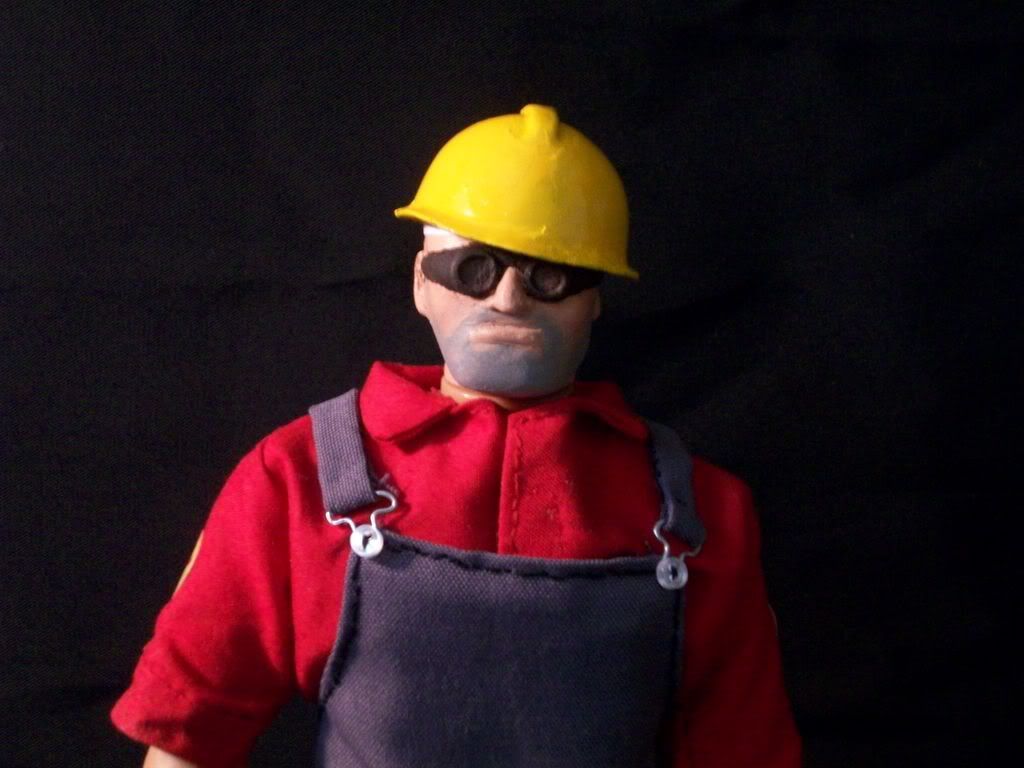
After some painting, this is what you get. To do beard stubble, I do a direct layer of grey onto the face, then before it dries, apply a thin portrait tone/flesh color layer on it. Since the over layer is lighter, it doesn't completely cover up the grey, making a lighter, stubbled beard appearance.

However, in the event your head doesn't have goggles or something covering his eyes, you'll have to do some eye painting.

Jin Saotome has a good tutorial 
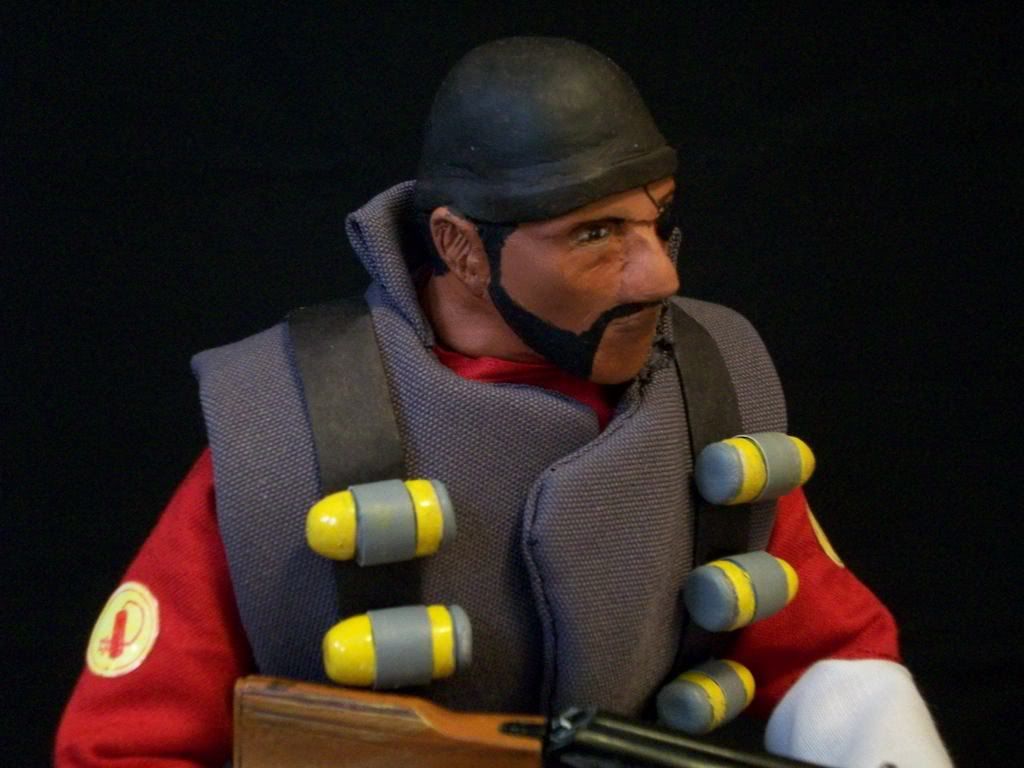
that I half-assed (as usual) to do the Demoman's eye. I did the first half or so, since I'm not too keen on that realistic looking of an eye. Also, I have about the worst brush selection and miniature painting skill for a modeler. For people who aren't rubbish at painting miniatures or have surgeon hands, this will be a bit easier and better looking for you. I think I did the best job so far on the Demoman, since he had only one eye and I tried on that one. The Soldier and Sniper have stuff blocking their eyes, so I had some leeway with cutting corners.

That in essence is the entire sculpting process. Takes at least 2 hours to sculpt, and about 4-5 hours to get to the painting stage. You may take longer, depending on how great your spatial skills and ability to work with small details in clay are.
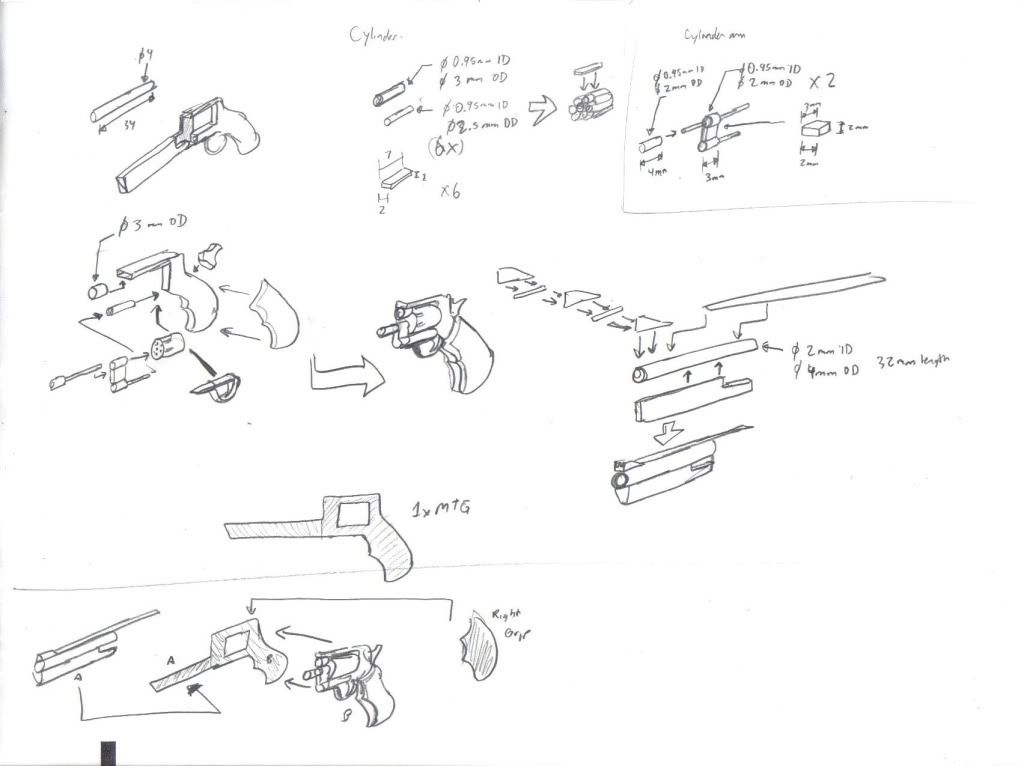
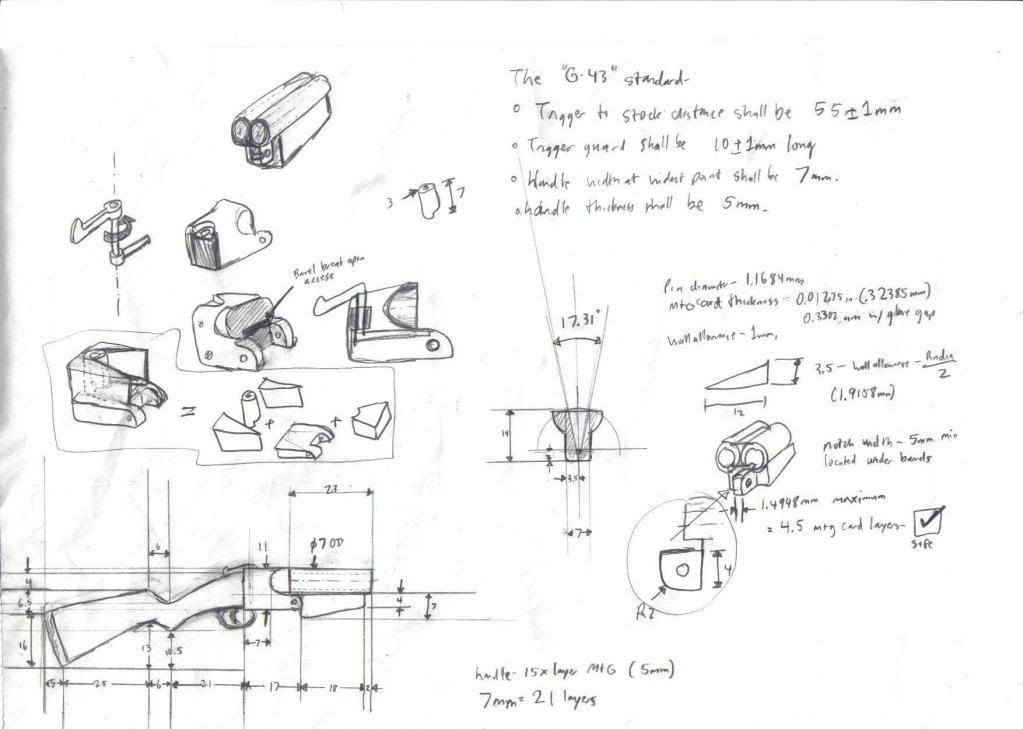
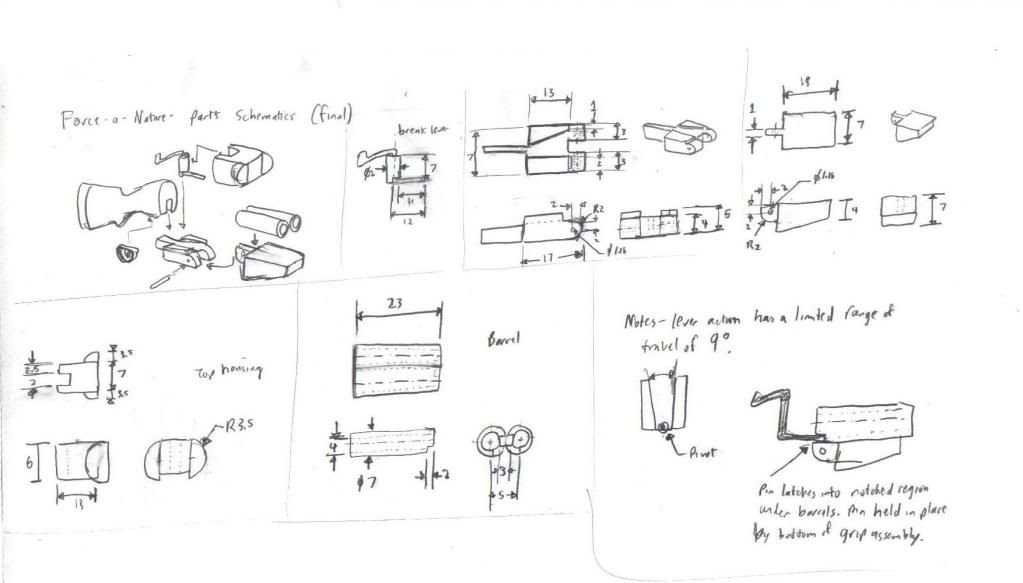
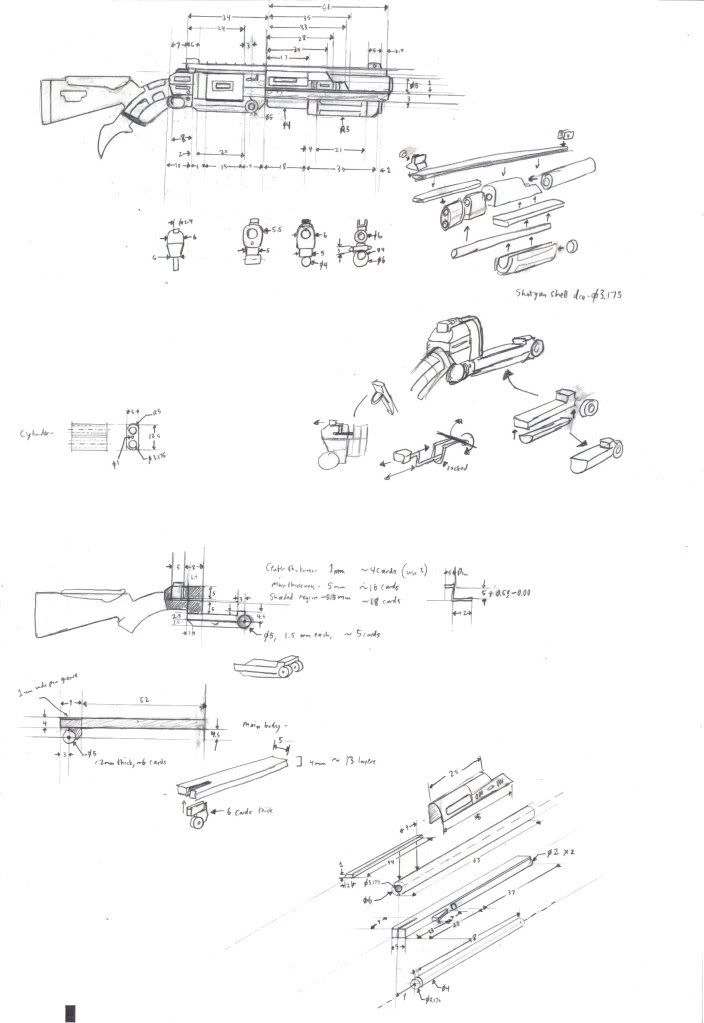
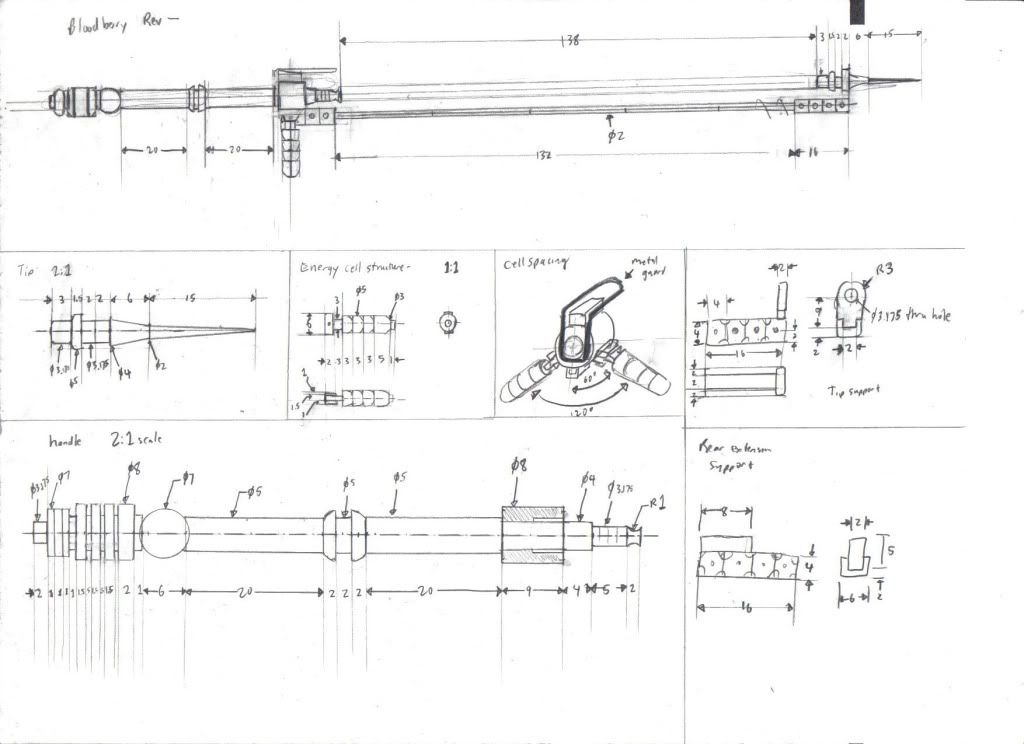
Good ol' fashioned engineering

Experimental modification to determine feasibility of making different body heights: Making an engineer.

For this project, I simply need to shorten the legs to get the right height. Simple. I proceeded by stabilizing the victim by decapitating him. After that, I marked off a good location to start hacking away with my X-acto hand saw. I chose a point 4.5cm from the knee, planning on cutting off a 1.5cm section of thigh. I somehow managed to miss cutting through the pins holding the plastic shells for the thigh together. Lucky. With the section removed, I proceeded to utilize the structural pins to my advantage. The next picture shows how close I was to cutting through the pin. A revolved step plug with two slots will fit into the thigh region, held in place with glue and the pin/slot fit. These were made with the standard method of Magic: The Gathering cards as a core, but with 110 lb cardstock for the outer layer for a softer shell that would better fit and deform into the irregular shaped cavity.


The thighs look like this after the procedure. I secured the two halves with plumbing epoxy (set time of 5-10 minutes, non-paintable with acrylics, cheap to buy), which would have by itself secured both halves together without the revolved step pin I made.


I shortened the shins by a centimeter but opted to use tubes to reinforce the shin in the event the epoxy had issues securing properly. The cross section was triangular, so I was "forced" to use three tubes of cardstock to do it. Hooray for plumber's epoxy being really strong.

The finished leg modification. Not really helpful since there's no height comparison to the other figures here. It's noticeably shorter though. I almost put the feet on incorrectly with the epoxy setting, but luckily I fixed that. Now there's the question of what to do with those cross sections I cut out...
I'll have to do some modifications for the Heavy, if I ever get around to that. The legs will be the same, but the arms and chest need extensions. I'll properly document how I get about doing that if that ever happens. Until that happens, I'll share how I sculpt the heads for these guys in the next installment.

Saturday, August 16, 2008

Desk Vignettes #1: A Gift

I noticed that I conveniently forgot to make the most important accessory for the Sniper doll. I decided to have Hotaru give the missing article as a gift. She's a sucker for men with high powered rifles.
What could this gift be?
Why, it's the coffee mug from the Meet the Sniper vignette!
The Sniper is touched. However, I'd have to forcibly carve a smile into his face to show that. And no one likes having giant people six times your size taking a knife to your face.
Now, with this coffee mug, I always remember I'm the #1 Sniper! I'm too busy being awesome to remember that, so I need a $10 coffee mug to tell me every morning.

Thursday, August 14, 2008

Meet the Sniper action figure

What better way to celebrate the Heavy Weapons Guy update next Tuesday by finishing up one of his many arch-nemeses, the sniper!


(Insert musical flourish here)

He's finally painted and completed. Bought some doll stands to commemorate/help the bugger stand up properly. The sniper rifle has the laser aiming module wire after a long bout of "not doing it". The only thing holding him back last week was a lack of the right shade of brown/tan for the vest. I gave in and cannibalized a military jacket from one of the $5 soldiers which made for a great shade of tan. Let's look at some of the details.

He comes complete with his shoulder emblem, usable pockets on his vest, belt and pouch, shoulder slung carrying thing (Which I suspect is for his kukri), and the chest pocket with four rounds of rifle ammo. I bought another soldier with the M1-Garand rifle just for the ammunition. $5 for a premade detail like that is worth it. His sunglasses are removable and come from my first soldier I modded into the Medic. Now, you may assume his head is a solid sculpt, but I made sure he could also do some of his taunts...

It's not quite the same if the Sniper can't do the kukri taunt. His hat is removable, but has been designed to custom fit him only.
"As long as there are two people in the world, chances are one of them is going to want the other one dead."

"Hold still..."

For the curious, what the Sniper cost me to make (assuming I started from nothing).

Body: $4.95 (counts the rifle ammo and sunglasses as a single purchase)
Cloth and thread: ~$6 (1x black thread, 1x red, white, black, grey cloth at half a yard each)
Sculpey for the head: $10 (regular)
Epoxy for the glove: $8 (epoxy allowed me to paint rubber without the problem of rubber not being paintable)
Misc paper and paint supplies: $16 (1x white, black, brown, green, blue, portrait tone acrylic)
Total cost: ~$45

In actuality, the price is closer to $15 since the materials are shared among the other figures. Not bad for something that Valve doesn't plan on ever making.

More pictures of the TF2 Sniper doll here. (Technically, he's a doll, but hey, call him an "action figure" if you got masculinity issues with playing with dolls.)

Saturday, August 09, 2008

KA-BOOM!

Time to work on the demoman figure, simply because I found the perfect shade of grey for his vest. On a silly note, the demoman looks like a prison convict with his red pants and shirt, without his equipment. First, to make the vest, I layered strips of paper over his chest to make a rough outline. Enough masking tape ensured pieces stay together during the cutting process.


I cut the paper along proposed seam lines, traced them on paper and made tracing patterns for the vest's main and side parts. The demoman's blast jacket is thicker than usual clothing, so I opted for layering a third, thicker fabric to add thickness than use cardstock inserts. I laid out in order, one red thicker cloth, then two grey cloths for the outer side. Why the red on the bottom? When you sew the edges together, you can pull it inside out to hide the seams. This puts the bottom layer in the middle. Think of a pillowcase.

Unfortunately, I miscalculated the collar length. I'll sort it out somehow. The demoman lacks his grenade launcher, so a Thompson will suffice. I'll add his ammo pouches and grenades after I bust out some clay for the next set of head sculpts. There's a few other issues I need to complete as well, including his boot detail and to color his hands.

Of course, I didn't forget the smiley face taped to his crotch. KA-Booom!

Wednesday, August 06, 2008

Musings of $5 (formerly $8) surplus weapons

Each of the crappy Soldiers of the World figures tends to come with a handgun. I've managed to accumulate two Beretta M92's and five 1911's, all with holsters. What do you do with seven handguns when neither of your modded figures will ever use these? Do a Meryl Strife from Trigun and go to town.For added effect, I threw in the ammo links from the M60E4 machine gun. I actually have hip holsters for the Berettas, but those didn't look too well with a skirt. Also today's a good time to experiment with a backdrop cloth for photos. Fake wood and Magic: the Gathering boxes makes for bad contrast.

Not quite "Derringer Meryl", more of The Duke from Boondock Saints, I'd say.
One of the more welcome surprises was this M1 Garand rifle with the not shown grenade launching attachment. I forgot to mention that the build quality of the Soldiers of the World weapons tends to be quite surprising for what I paid. If I actually paid the retail $25, I'd be really disappointed with the lackluster figure and somewhat happy with the included gun. Some features of note include the shoulder strap clasps, despite not having said straps. Still a nice detail.
This piece took the cake for the rifle. Actual well molded separable clips. Not also that, but the rifle has moving parts to insert these into.

The loading port closes. Separate motion from the cocking lever, but still a nice touch.
For $5, you'd expect a solid molded piece of plastic with no features, poor paint job and poor details. Comparatively, Ultimate Soldier's line of 1:6 scale weapons suffer a bit from paint jobs (I have a badly painted SMLE rifle from their British Commonwealth set) and also have an obtrusive copyright stamp on the weapons. Luckily, Capt. Generic's Army Surplus needed to mass produce these things cheaply to the point where they couldn't be bothered to mold that on the weapons. Although, these things have solid barrels (can't stick a toothpick down the barrels) which is ok considering the level of detail they have.

I should probably change the girls' outfits soon. Getting bored of the same old thing and I've been overshadowing them lately. Maybe after the demoman gets made.