Showing posts with label paint. Show all posts

Saturday, April 09, 2011

This Weekend's Project: Cleanup

 Never officially finished the Demoman and posted any of the results on this blog. Been overdue for two years. Wasn't entirely happy with how it came out, but I had a chance to redo some of the problems I really didn't like about the first attempt. It's a good opportunity to share what I've learned during the process.


First, I didn't like how I did the head. Plain generic expression. I carved a slight grin to his face. Can't say it's my best work, but it helps a lot. Not bothering to completely redo the head this time. It wasn't as bad as the first Medic's head. That was horrible. This was one of the later sculpts that wasn't entirely made of suck.

 When I started out, I was still using some lackluster materials to accomplish the job. Notably belts made of black construction paper fastened together with a wire hook that was neither strong or pleasant to look at. Had a chance to correct that by making some fake leather belts. Picked up an imitation leather wallet and stripped it apart for materials. They're just long enough to make a belt, with some extra length to it. In this case, they were enough to go from the Y shape fork in the back to the front belt. It being vinyl, it was easier to assemble than regular cloth. I had the lovely option of either sewing the belt straps together, or just using hot glue to get them into place. Either method provided a satisfactory result. If you're trying to avoid seamwork, a thin application of hot glue will work. Just don't expect stellar results in extreme heat. Or leave him out in the sun.

 
  The grenades on his vest were made of Sculpey. Bad idea. They were heavy, and not to mention, didn't glue well to anything. I had made sleeves around the thick middle section, and glued those to the straps. Now with better tech, I made the grenades out of 110lb cardstock rolls that are much lighter and more willing to be hot glued into place. I did experiment with fabric glue, but that wasn't strong enough to hold that into place. It may have been if I had let the fabric glue cure for more than an hour. I wasn't taking any chances.

The smiley face was originally paper taped to his crotch. I guess that's how it's supposed to be. It doesn't provide a good result though in 1:6 scale as the tape degrades. For a permanent solution, I glued the paper drawing to a small piece of white cloth, left 2-3mm of cloth over the top, and sewed it to the pants. Fabric glue in this case worked wonders. Don't even bother trying using regular glue with fabric.

The pants themselves, I altered so they weren't as loose at the waist. Not sure what I was thinking at the time, but they were obscenely baggy. As a result, he had loose rapper pants that constantly needed pulling up. Unfortunately, unlike rappers, he didn't have underwear. That was a dead giveaway that his body wasn't actually black either... I added velcro to his fly and narrowed the waist to allow for less mishaps involving pants. Because a drunken man and pants never tend to be good friends.

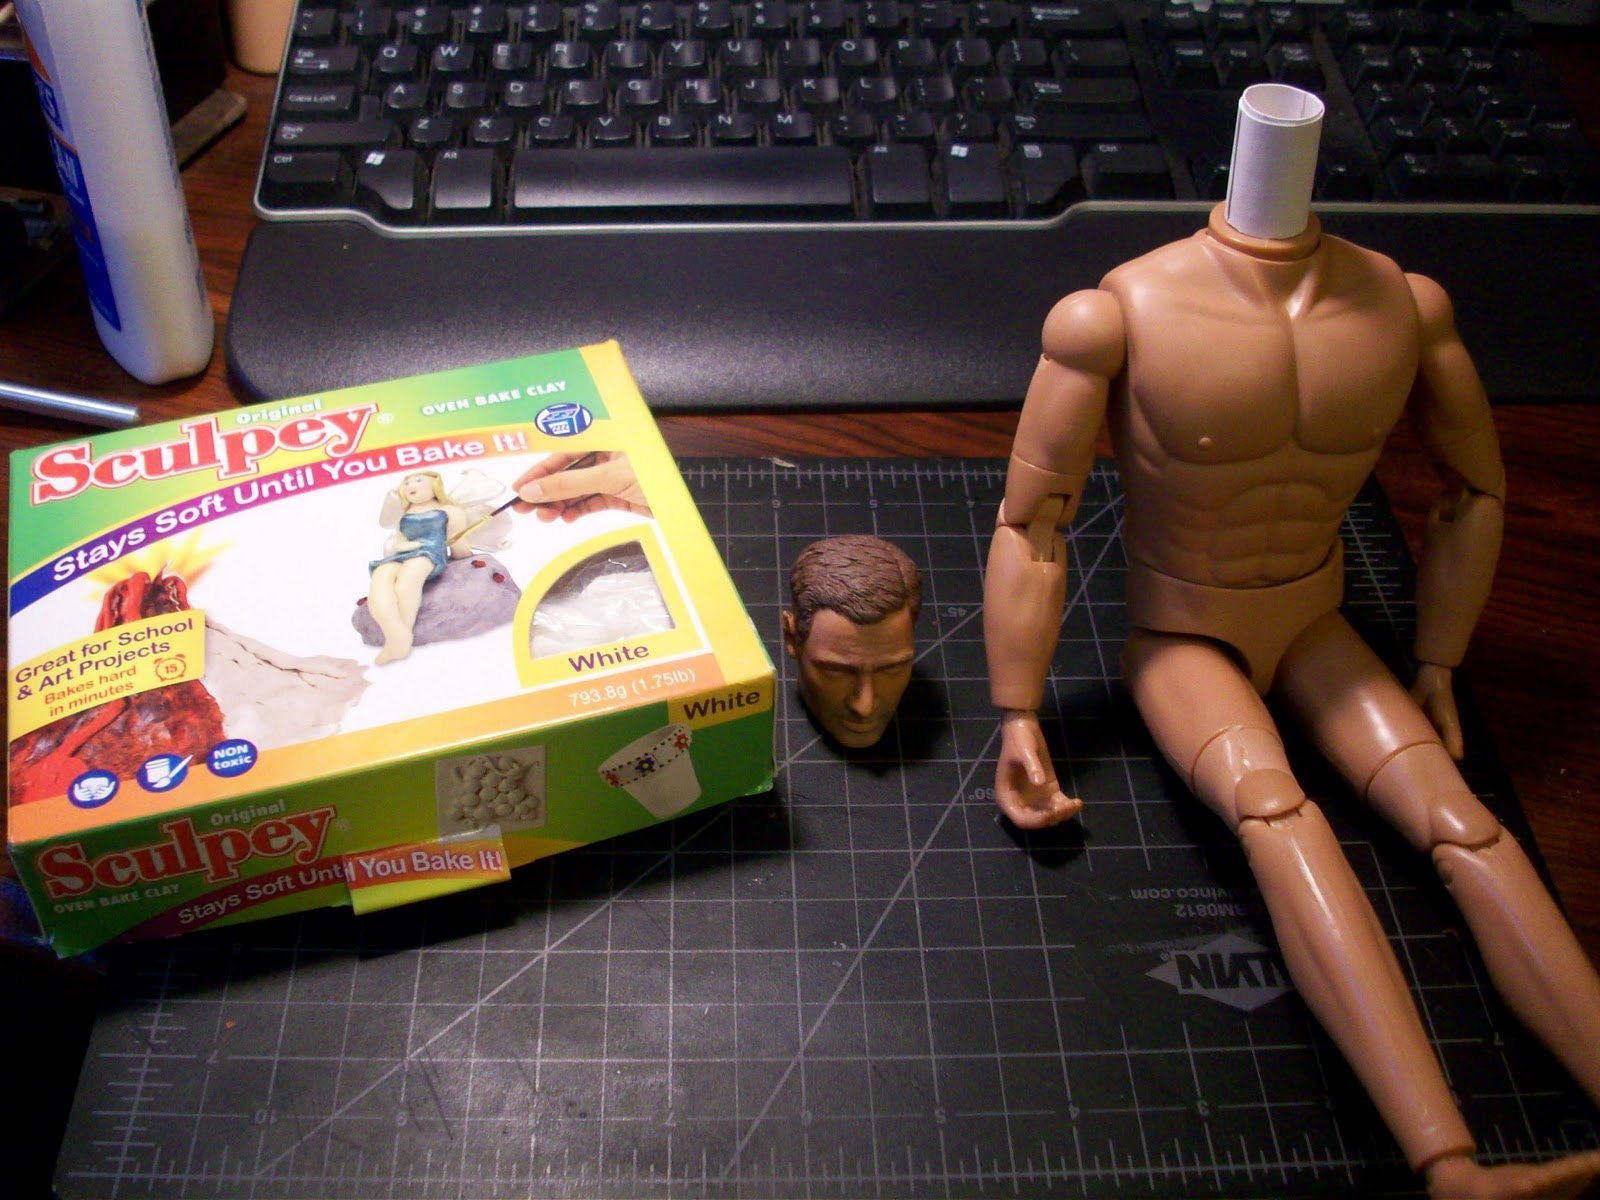
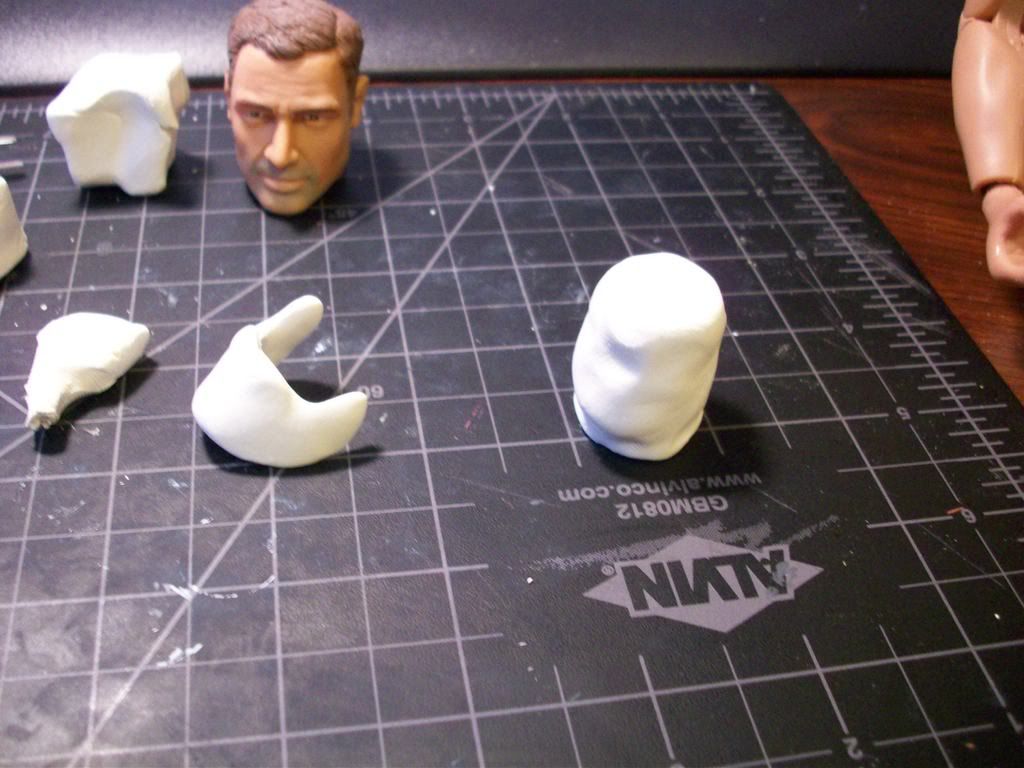
I learned long ago that you cannot paint directly on rubber. Well, you can, but it doesn't stick. It rubs off easily and does nothing useful for something that will receive heavy play. However, I did learn that if you put kneadatite over rubber, you can cheat and make it paintable. It does add a ridiculous amount of thickness to the medium, which in the case of a flexible rubber hand, any thickness is ridiculous. The hands were immobile and not even worth trying to use to hold anything. Method #2 to the rescue! With the power of enamel paint, you can paint rubber, just not well. If you cover it with a layer of Loc-tite or super glue of any sort, it'll form a nice solid layer that's thin but still somewhat ok. I haven't fully tested the durability of it, but it's an improvement. You may ask "why not just buy a body of the correct skin color?" I'll reply with "This body cost $5 and the correct one costs $30." That body also requires a totally different head. I'm not making another head. Inverse Michael Jackson it is!
 

Now that the Demoman's officially done, I'm liking him a little better than how it was originally. I didn't make many photos with him in it due to his hands being a liability in holding props. And that he looked mediocre. Now, I can close the project also officially get rid of it for extra shelf space. It's finally in a state that I'd consider "presentable" and safe for someone to handle.

Monday, July 19, 2010

Painting the Hellfire

I've always hated painting.

To paint the Maliwan Hellfire, I've had to buy some blue paint to experiment with. I have not owned a pot of blue enamel for about 8 years. Now I have 3. Two of them were useless. I decided to pick up Blue Metallic Flake, since the gun has a shiny blue coat of paint in-game. Probably the most useful color. The above image documents my attempts to get all the colors for the gun. For this painting disaster, I actually required the following paints:
  • Dark red
  • Blue Metallic Flake
  • Aluminum
  • Black
  • Grey
I needed a light blue, a deep blue, pinkish red, black and dark grey. The pinkish red was for the glowing red parts of the gun, but I didn't find any means of making a neon color from what I had. So red it is!

For the light blue, a mix of about 40% blue metallic flake and 60% aluminum worked well. An even balance got me a teal color that didn't fit. Dark blue came out with something a bit more obscene: 5% red and 95% blue metallic flake. Any more red and it becomes purple. Some parts required a dark grey, and since I ran out of Gunmetal Grey, a 60/40 mix of grey and black worked fine.

To mix the paints, the surface of an untreated/unsanded Magic: the Gathering card works great. I sacrificed a Crazed Goblin for this noblest of tasks.

The hardest part was probably getting the paints to not look like crap as I tend to do. The dark blue metallic mix tended to run the most and I had trouble getting an even coat. The rest worked fine. To make the finer details in the parts, I etched/scored panel lines with my ever-dulling X-acto knife, and filled it in with a 2 micron achival art pen. Art pens don't like being used on enamels, I learned. There goes another $3 pen! Something clogs up the tip that I can't remove or fix.

The most pain in the ass details were the red glowing parts. In my case, red solid matte lined things. A coat of gloss should fix that. But I'll need to buy that first. Instead of painting them directly on, or making a shallow recess for the paint to remain in, I chose to go the lame route and make pseudo decals. I wanted something on the gun to look somewhat straight. I have the painting skill of a 3 year old child holding an active firehose. If it's not supposed to be going all over the place, I'll need all the assistance I can get.

I painted a sheet of regular printer paper red, then cut 0.5-0.7mm thin strips.

With that, I trimmed them down to length, and applied them to the gun using reckless blobs of adhesive and really fine tweezers for the small red squares. Looks better than any paint job I could have had someone else do for me.


After a lot of painting, panel lining and gluing red things, I finally finished most of the parts. I didn't get to paint my favorite magazine, Mag 3, because it turns out, I mucked that part up and didn't get all the details made. I'll revisit that later.

Tuesday, September 08, 2009

Labor Day Spoils: Building a Moonfire Sword

I've had a fondness of exotic weaponry. Drakengard will always have a place in my "Stuff to Build" pile due to the wonderful assortment of weapons and great lore behind them. One of the long swords I liked, appearance-wise, is the Moonfire.

The Moonfire sword, according to Drakengard's weapon history, is a granite blade that burns hot except to those under the protection of the moon god. My Moonfire is a sword made of a $0.76 bendy plastic ruler I bought at a local drugstore and some X-Men TCG cards that burn if you take a lighter to it. Not quite as exciting, but when you're building on a budget, it's acceptable.
This sword had the main goal of a translucent blade. Painting a sword red is pretty easy. I could have done that and been done in a few hours. I wanted something that was a bit different than the other bladed weapons I've built. I needed a blade approximately 20cm long for the Moonfire, so that limits a lot of raw material sources.

The above image shows stages of the Moonfire's construction. The first stage involves cutting out the materials and preparing them to be structurally sound. I've made cutouts using leftover 6-ply X-Men cards from the Devilscale for the guard. A notch was added for the bamboo stick grip and the blade. The blade itself was cut from a Penway "Megaflex" ruler. I remember the days when school supplies were solid plastic objects that splintered when you tried to slash at someone in school with them. The good old days of consumer safety. As a side effect, I have a really limp blade to work with at the moment. More on that in a bit.

I've hidden the notches with two layers of card on each side, then added two more to define some details in the guard. The third image shows the primed guard with the raised details. I created those details using a sheet of 110lb cardstock and cutting out the lowered parts. The thickness of the paper was sufficient in making the details stand out. The bottom image shows the details painted. I first painted the black details first, leaving the raised parts unpainted. What I should have done was paint the entire thing black first. Gold paint isn't good if it's thinned, and in some cases, the enamel paint thins as you use it, leaving light spots that show a bit of primer. If I had painted everything black first, then gone over it in gold, the gold would have stuck better to the layer underneath. I'd also know quickly which spots were underpainted. Oh well. Lesson learned.

So far, I've barely made use of my four month investment building Aelia. For all that work that went into building her, she's been photgraphed less than the minigun. I figured what better way to make a sword interesting than an armored girl using the sword. I'm experimenting (or better yet, just now bothering) with enhancing the photos I take, since I'm not going to wait until the weekend where there's better natural sunlight to take photos. They look a lot different than my usual darkened desk photos. Anyways, some opportunity to use Aelia in some photos!


Saturday, June 06, 2009

J.Norad Shortens His Lifespan and Lengthens a Spear

Shouldn't take a month to make a spear, right? Seems more like 2-3 months since I last worked on the spear. I extended the spear by about 2-3 cm and redid the spiral. I kept the head, since working on a new one would guarantee this spear never being completed.

I opted to go for carved details in the grip and ends, and drawn detail for the spiral. My first attempt carving the chevrons into the spiral ended with a flaky mess that chipped off easily. After building the shaft and the decorative round elements, the entire spear was painted with primer.

The grooves and decorative balls were first done by Dremel'ing the balls to the right shape. A coat of Loctite over the surface helped little in keeping the surface from fragmenting as I etched the grooves with an X-acto knife. If I had first glued the entire spherical section with Loctite and allowed the adhesive to permeate through the paper, it may have been better. I did patch reinforcements for the already chipping sections with regular Elmer's glue.

I sure can't manage my paints. Might be the lighting, but the paint looks a bit thicker than I would like it to be. I thinned out the mix of Gloss Black and Aluminum enamel paints, but it still looks like the thinner did more to poison me than thin the paint. The spiral chevrons were groggily done with a 5 micron art pen. Conveniently, I had a piece of red cloth that wouldn't fray too easily that I could use for the shaft.

Here's the spear separated into two sections and a coin for scale. I sadly feel I did the lower half of the spear better than the head. I can always rework it.

Well, after several months, the spear is "finished". Now off to trying to figure out how to make the guard for her sword.

Monday, May 25, 2009

Aluminum + Green Metal Flake + Thinner = Poisonous Fumes

Finally got around to painting the armor. Used a layer of primer, then a mix of Testors Enamel Aluminum and Green Metal Flake. I tried using a wash of Green Metal Flake over the Aluminum, but that didn't work as well, creating a semi-uneven color at points. Mixing the two together provides a good shade of light green metallic color. I'm not too sure whether the finish is what's considered decent for painting models, but I'm definitely not going to cover it with a layer of gloss lacquer. I've inhaled enough toxic flammable fumes this month. Anyways, here's where Aelia currently stands in terms of construction progress. Still spear-less and sword-less and in need of decent hair.


I'm not liking the gloves too much. I may need to redo them, and that's painfully long and tedious work.

Next stages: going to work on the weaponry and the armor rivets. Someday, I'll find better hair, and fix up the head a bit more.

Sunday, December 14, 2008

This Weekend's Project: Building a Gundam Airmaster

This weekend was spent exploring the world of GUNDAM models. I selected the GUNDAM Airmaster for the experiment due to the interesting premise of an alternate aircraft mode. Some basic facts:

Model made by BanDai in 1996, High Grade (which means not made of crap, but still worth a decent week of fun)
1/100 scale (which means 18 cm tall)
Cost: $24.99 at local toy shop (base, no paints or panel markers)
Uses rubber parts in the joint construction to assist posability
Snap together, no glue required
No paint required, comes with stickers (which are the coward's way out!)

Before I delve into my first experience making a GUNDAM model (by now, you might wonder why GUNDAM is all in caps. It's apparently an acronym that differs from each GUNDAM series and refers to the mechanical unit's military designation. Great Ubiquitous Narcoleptic Despot Achieving Mechanicalization. Geriatric Underwear Nicking Delinquents Assaulting Minors. You can take your pick.), I'll show the final result.

Well, "Final" is a tentative term, as I somewhat half-assed it so I could play with it. I'll redo and improve it later. The kit is designed for minimal after-assembly decoration (paint and the forbidden stickers, more on that in a second), with different colored plastics removing the need of painting individual parts the correct color. Perfect, as I paint like a drunken child with ADD. The only significant thing you need to do is decorate all the panel lines: all the black lines all over the model that you see/can't see. You can use specially designed GUNDAM markers to draw the lines, or you can do what I did and wash all the parts with thinned black enamel and let it seep into the cracks and wash off the excess. However, not doing that properly (like I did) leaves you with a dirty/weathered look or looking like a dirty 1980's toy. Not that it's a bad thing.

Now, about the stickers... I hate stickers. They look tacky, they're too shiny compared to the rest of the model, and I can never place them right. I'll always hate how they're slightly off, and they'll always peel off over time, making them terrible means of adding detail to something. Plus, they're not waterproof. I practically ignored the sticker sheet and decided to paint the details instead. You also can't access the panel lines using stickers, making your model look even more half-assed.

For scale, here's Hotaru with the Airmaster. There's a lot of moving parts on this model, but it unfortunately leaves the Airmaster top heavy. The knees are insufficient in preventing him from falling backwards, and his hips are not compatible with BanDai's GUNDAM Action Bases. I can't display the Mech or Aircraft mode in any dynamic action poses. Speaking of the Aircraft mode, this is the Airmaster's Aerial mode.

As you can see, I'm using a laboratory beaker as a display stand. Nothing I can really do about it. Aside from a few design flaws, it's a nice aircraft. The Airmaster's golden chest vents act as air scoops. I presume propulsion is from the rocket thrusters in his feet, and not from these random air vents angled upwards on his back. The legs get angled oddly in aircraft mode, which doesn't help the non-aerodynamic flow of the GUNDAM's boxy arms and stuff hanging off the side. Overall, the red trim helps make the model look a bit nicer.

For $24.99, it's an ok model. My friend tells me that more recent models come with endoskeletons for support, instead of using these rubber "polycaps" as they call it. It would greatly make this model from "ok" to "great" if the joints could hold better. It would be even better if there was a way to display it in aircraft mode at all.

If you ever come across this model, kindly do yourself a favor and pick something more recent. 1996 wasn't a kind year to the Airmaster. It certainly hasn't gotten better over time.

Sunday, November 09, 2008

1:6 scale Minigun "Sasha" from Team Fortress 2

One paint job and 4 hours of paint thinner fume exposure later, I have the minigun completed. Total time: a little over a week from start to finish.

The Team Fortress 2 minigun, or "Sasha" as it's referred to by the Heavy Weapons Guy, is the most pain in the ass object to make in terms of weapons. The flamethrower had nowhere near as many components as this had. The sheer weight of Sasha rivals that of anything a 12" figure is capable of supporting without forcibly moving their limbs or tipping it over. I'll likely need a special stand for assisting Sasha in poses.

I used a bottle of Flat Black Testors Enamel paint that I had lying around for about four years. Still decent! The quality was a bit thicker than I'd like, and a bit of thinner was needed. The Gunmetal Grey was a bit better despite also being unused for four years. I used some of the Aluminum paint for the silvery part. A recommendation to anyone who decides to try building something like this: paint your parts first. There were way too many small crevices that required a bit of effort to paint when most of it was built.


Here's a sketch of the front profile of the minigun, as traced from the Valve poster. A very handy image to have to work with. I'll finish off with a few more shots of the minigun from different angles to get a sense of the details.


Thursday, October 30, 2008

Heavy Lessons in Paint Quality

There is a law to keep in mind when selecting paints. The stronger the fumes it gives off, the more awesome the color/quality of paint it is. Flat grey? Practically odorless. But copper? Smells strong, makes you have headaches, and comes with a warning label regarding carcinogenic effects! We all know the dangerous stuff is the fun stuff in life.

Well, anyways, the Heavy action figure is now finished, somewhat. Still missing some minor details, but the general details are there. The ammo links on his vest are now done. I used Testors Enamel paint. Copper for the bullet casings, yellow for the tips, and a mix of tan and rubber for the circular depressions on the belt. What mix? It's called "wing it". Probably more tan than rubber.

Well, after about two months of not really trying, here we are. Time for a cost analysis.

Sculpey for head: $3
Fabric (pants, vest, shirt, $1 apiece): $3
Epoxy for the hands: $17
Aluminum foil for the hands: $3 new, $0 if stolen from your kitchen
Paints ($10 for acrylics, ~$7 for enamels)
Cardstock: $~$6-7 a pack, new
Magic: The Gathering cards (about 10 used): $3.99 (one booster pack), $0 if "resourcefully liberated" from your friends
Soldiers of the World figure: ($5 on sale/clearance, $25 retail)
Saw (for cutting the figure): $15
Plumber's epoxy (regluing the figure): $4
Velcro: $2 ($0 if salvaged from the base figure's clothes)
Glue: $4 (elmer's and/or Loctite)

Total cost from scratch: ~$100 (wow, this was more than I was expecting)
My actual cost: ~$52 (many materials were shared with other projects)

So far, this was the first "real" custom job I've done. Not just a simple head swap, but actually modifying the base structure to get something distinctly different. Along with the fact that it's my first fat guy figure, I'm pleased with the fact that it's not horribly bad. Probably will never make another one of these ever again, but then again, I said the same thing about Hotaru.

Tuesday, October 21, 2008

Heavy Construction Documentation, Part 3

This week's installment of Making Fat People, I make clothes! I find clothes for large people annoying. They're only good for that one guy who wears that size while the rest can only use them as tents. Anyways, time to delve into the process of making a vest. For the confused, I already made the shirt and pants by modifying and enlarging existing clothes stripped off of the soldiers. The following process can be applied to other strange and unique forms of clothing. At least in theory.

First, I take some thermal printing paper (that was all that was handy at the time) and start taping strips over the body until I get the shape and form of the clothes I want to make. You'll (as if you'll actually try this) need to get the shape pretty accurate at least on one side of the outfit/clothing if it's symmetrical, and both sides if not. Use scissors and masking tape liberally.

Next, I turn the paper clothing into a pattern. We do this by cutting the clothing off the model along planned seam lines. How do you determine these lines? Shoulders and below the armpit make good places to cut, as they have seams going along those regions in your own clothes. You'll then have (hopefully) some pieces of paper that when put together will have the shape of your desired clothing item. Cutting them to get them to lay flat may be an issue, but nothing sewing can't take care of. The next step is making any symmetrical pieces symmetrical (by folding over the line of symmetry and trimming) and getting any other details taken care of now.

Then it's tracing time! Trace each part onto another sheet of paper. Add about 5-8mm of border to your parts for seam allowance. Cut the now widened parts and trace them onto fabric. You may use a fabric marker, or you can do it the bootleg way with a BIC pen or white Crayola colored pencil! I presume you don't care for sewing, so pass it off to someone who can and you'll get this:

The last items to handle are the little details. First, I'll "document" the ammo belt links the Heavy wears. I used 1/8" dia bamboo skewers wrapped in a 4cm long length of 110lb cardstock, trimmed down to 2.5cm long rods. Confused yet? I made 36-38 of these small rods, then sanded one end down to a round tip. Why 38? Guesstimation. Should have made 40, actually.

Taking a 1cm wide length of 110lb cardstock, I glued each bullet to the strip, curving the paper around each bullet and leaving 3mm of separation between rounds. This was kept uniform by the thickness of my tweezers I used to hold the links together.

After a lot of unhappy gluing action, you get the following belt of ammo!

This is the current state of the Heavy. I'm still debating molding or sewing gloves, and I'm probably going to need better paint for his arms. It's easily chipping off. I'm hoping Testors makes enamel paints that have flesh tone. That stuff doesn't chip as easily and dries on a bit more uniformly. The belt and ammo pouch are made of black construction paper. Probably should have documented making those, but those were too quick and relatively simple in my eyes to warrant documentation.

Now, to get gloves, paint, and the minigun!

Saturday, August 23, 2008

Experimenting with enamel paints

On the bright side of today, I've figured out the proper way of utilizing enamel paints. Always have primer unless you want the paint to run a bit. The glossy appearance of enamel has some interesting applications. Let's start off by demonstrating.

If you note the gloves, they have a shine to them. By using enamel paint, I have turned modeling epoxy and cardstock into what appears to be rubber gloves. The fun note is that the hands were rubber to start with, and I used epoxy to flesh them out thicker and provide a means for the paint to stick. A decent layer, about less than half a millimeter, of epoxy was applied at the fingertips. The key is to use water to keep your fingers from sticking to the epoxy, and to smooth out the epoxy after you apply it to minimize the sanding. Generous amounts of epoxy at the wrist limit the wrist to turning, but made the shape transition better to the glove. The gauntlet part of the glove was done by 110 cardstock cone frustums, 13mm OD to 23mm OD expander tube spanning 22mm long. I made the cardstock at least 2 layers thick to retain stiffness. After some light sanding, a moderately half-assed coat of primer went on, accompanied by a set of tan and black enamel.

As for the figure itself, I'll formally introduce the Pyro once I finish his boots.

Lessons Learned: So I know what not to do ever again...

Never buy acrylics without checking if they're "translucent".

Good two weeks wasted figuring out why primer wasn't helping this piece of shit paint stick any better. Going to go buy real paint and stop using this inferior stuff. No wonder why the hell yellow looked like piss when painting over light grey, let alone white. The engineer's glove is going to have to wait another week before being close to done.

I was wondering why the hell a darker color wasn't covering up a lighter color. That makes no sense.

Monday, August 18, 2008

Having some fun with red markers and a chestless guy

Did some experiments with the soldier body to find what's inside. I cut the front of the chest off to flatten it for the next feasible figure, and to plan out future heavy modifications. As expected, the body was hollow, and the chest rotation mechanism was located high up inside. I now have a good pile of plastic chunks that formerly composed the guy's chest. What does one do with a dude with an open chest cavity, the shards of said chest cavity, and his natural state of headless victim? Why take these pictures of course!

FINISH HIM!

Direct hit!

"AAAAAAAAAAAAaaaaaaaauuuuuuughhhhhh!"
"Saw-ry!"

Now with that out of the way, here's some lessons learned that I'd like to record.
  1. Epoxy needs pre-smoothing or post sanding. Fingerprints are very noticeable.
  2. Primer needs a good solid coat color. Anything that shows a hint of the under layer's color is going to fail hard.
  3. No amount of layering yellow on semi effective primer will ever work.
  4. If you thinly apply epoxy onto rubber, you can paint it with acrylics! Take that, non-paintable rubber! And if you have semi-flexible modeling epoxy, you'll still have a somewhat bendable object!

Sunday, August 17, 2008

Making head-way engineering an Engineer head

I've been practically innundated with a single question on how I sculpt the heads for these Team Fortress 2 figures. Time to shed some light on what goes on during the 2-3 hour span a head sculpt gets done.

As usual, I start off with decapitating a doll. A 110 lb cardstock tube gets molded around the attachment point, serving as the base for the neck.


I put a coating of sculpey around and in the top of the cylinder. Sculpey doesn't stick to anything but sculpey, so I recommend using very lightly kneaded sculpey so it's still solid, or finding some means of making the cylinder sticky like mixing in another clay. On the left of the cylinder, there's a piece that has two prongs coming out the right. What I like to do next is make a jaw, and as you will see, that piece shapes out the side profile of the face.


Using the former head as reference, I place some clay where the nose, eye sockets, eyebrows and ears will go. This helps determine spatially what I need to do. These heads are regular, so these landmarks will be valid for all human heads.


Now for the creepy stalker headshot gallery. Every sculptor needs a good set of views of what they're sculpting. I've added a general set of features to the face, including a line for the mouth and general eye sockets for locational purposes. I tend to play with the shape of the nose now, so I get a feel of where the rest of the facial features lie in relation to it.


Here, I've added subtle depressions and elements to round out the face based on the headshot gallery. The chin, lips and cheekbones are taking shape now. Normally, I'd carve out a faint outline for the eyes, but the Engineer has goggles, making that wasted.


Bit more material and X-acto knife cutting, I reach this stage where the face has 70-80% of the features defined.


 Modding a regular soldier helmet to be an engineer hat. Soldier helmets are taller and therefore need some sawing. Now to make the helmet lip and top protrusion.


Overpriced Games Workshop epoxy ($8) is a bit flexible when dry and thinly applied, and sticks well. If not, there's always Loc-tite. The shop guy told me to keep my tools wet so the green stuff doesn't stick on them. I suggest having a cup of water nearby to wet your fingers.


A bit of baking in the oven for 2 hours at 275 degrees Fahrenheit. Note the reddish color. That's a sign of the sculpey being solid. Really good and solid sculpey would look real red, not this half-assed pink I settled for.

After some painting, this is what you get. To do beard stubble, I do a direct layer of grey onto the face, then before it dries, apply a thin portrait tone/flesh color layer on it. Since the over layer is lighter, it doesn't completely cover up the grey, making a lighter, stubbled beard appearance.

However, in the event your head doesn't have goggles or something covering his eyes, you'll have to do some eye painting.

Jin Saotome has a good tutorial that I half-assed (as usual) to do the Demoman's eye. I did the first half or so, since I'm not too keen on that realistic looking of an eye. Also, I have about the worst brush selection and miniature painting skill for a modeler. For people who aren't rubbish at painting miniatures or have surgeon hands, this will be a bit easier and better looking for you. I think I did the best job so far on the Demoman, since he had only one eye and I tried on that one. The Soldier and Sniper have stuff blocking their eyes, so I had some leeway with cutting corners.

That in essence is the entire sculpting process. Takes at least 2 hours to sculpt, and about 4-5 hours to get to the painting stage. You may take longer, depending on how great your spatial skills and ability to work with small details in clay are.