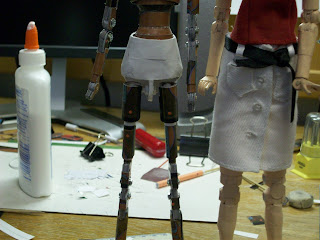
 Figure 1: Finished legs
 Figure 2: Hip structure
Lia at this stage sported Rev. B hips. Rev. A was too loose and was enclosed so any maintenance was destructive. I eventually changed her design to Rev. C which sported an open socket system with the opening parallel to her hip connector, which allows me to pop the ball joint out easily for repair. The rods are made with a bamboo stick used for barbecues. Approximate diameter is 1/8". These were bought specifically for use for building Hotaru and have lasted me to this current date.
Lia at this stage has her hip completed.
 Figure 4: End caps for limb joints
I used the cone frustum maker to build these caps. The washer for the screws are glued down to the card face, and the nut is expoxied onto the washer so I have a false permanent thread to anchor the screws in. This allows me to adjust the tightness of her joints and easily change components.
 Figure 5: Completed torso.
The body gets a coating of printer paper and 110lb cardstock to get as best of a surface finish a piece of sandpaper can get. Which in this case, isn't much. Fortunately, Aelia doesn't suffer from surface defects like Lia and Hotaru due to a more aggressive sanding.
 Figure 7: Foot construction, end stages
I changed the foot from an epoxied mess to a proper construction that could actually be painted. The foot is made of tubes stacked together until the form was present. After the tubes were secure, I coated the entire foot with 110lb cardstock, sanded it down, and cut out some toes.
 Figure 10: Components ready for painting
This stage, the parts have been rounded out. I used the technique outlined here for making the twig-like limbs not so thin. Now, I have implemented a better system where I first add the tub reinforcements, cover them with a sheet of Magic card, then coat it with 110lb cardstock. I then cover the seams with printer paper, sand them smooth, then get them ready for paint.
The head was built using an out of date system that I've now abandoned in favor for a more sculpted process using a Dremel to carve out facial details. The previous method can be found here. I'm now using this process to make doll heads.
Hands were constructed in the same manner depicted here for Aelia.
Development log:
6/25/2007: Initiated building the development unit, based off an Obitsu ball jointed doll structure.
7/12/2007: Completed exterior build of development unit, Revision None.
7/27/2007: Hotaru officially completed.
9/13/2007: Hip design moved from hinge swivel joints to ball joints. Entered Revision A.
6/10/2008 to 6/15/2008: Lia built and completed. Entered Revision B. Feet and shoulders changed.
June 2008: Hotaru and Lia upgraded hip structure to Revision C.
2/28/2009: Aelia project initiated. Body enters Revision D. Changed shoulder joint and chest assembly for structural strength and reliability. Body shaped to resemble BBI proportions.
6/6/2009: Aelia project completed.
That wraps up two years of doll making. (Amazing that it's only been two years since I started. A lot has changed in skill level since then. ) I hope this has been insightful into the level of work needed to produce a doll made from Magic: the Gathering cards. I don't expect anyone to be able to replicate my work or even do close to what I do. I hope that by showing you this process, you can use this for ideas of how to build your own creations.
A lot of the building techniques used in building Hotaru and Lia were critical in the construction of the Team Fortress 2 related things. The sentry gun and Sasha would not exist if it weren't for those two.


No comments:
Post a Comment